Topic hdri in blender: Explore the transformative power of HDRI in Blender, a game-changer for artists aiming to inject photorealistic lighting and breathtaking realism into their 3D renders. Unlock the secrets to captivating visuals with this essential guide.
Table of Content
- Benefits of Using HDRI in Blender
- How to Use HDRI in Blender
- Advanced Tips for HDRI Usage
- Creating High-Quality HDR Environments
- Conclusion
- How to Use HDRI in Blender
- Advanced Tips for HDRI Usage
- Creating High-Quality HDR Environments
- How do I add an HDRI in Blender for enhancing my renders?
- Conclusion
- YOUTUBE: How to Use HDRIs in Blender 3.0 Tutorial
- Advanced Tips for HDRI Usage
- Creating High-Quality HDR Environments
- Conclusion
- Creating High-Quality HDR Environments
- Conclusion
- Conclusion
- Introduction to HDRI and Its Importance in Blender
- Step-by-Step Guide to Setting Up HDRI in Blender
- Benefits of Using HDRI for Realistic Rendering
- Choosing the Right HDRI for Your Scene
- Adjusting HDRI Settings for Optimal Results
- Advanced Techniques in HDRI Lighting
- Creating Your Own HDRI Maps for Blender
- Common Challenges and Solutions in HDRI Setup
- Resources for Free and High-Quality HDRI Maps
- Conclusion: Enhancing Your Blender Projects with HDRI
Benefits of Using HDRI in Blender
- Enhanced realism in 3D scenes through accurate lighting detail.
- Quick and efficient way to light a scene with minimal setup.
- Ability to achieve photorealistic results with ease.
READ MORE:
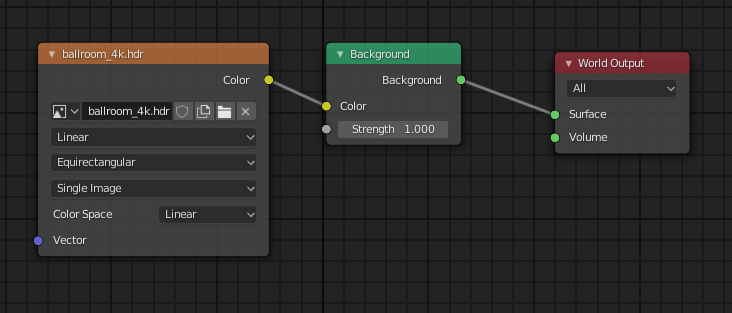
How to Use HDRI in Blender
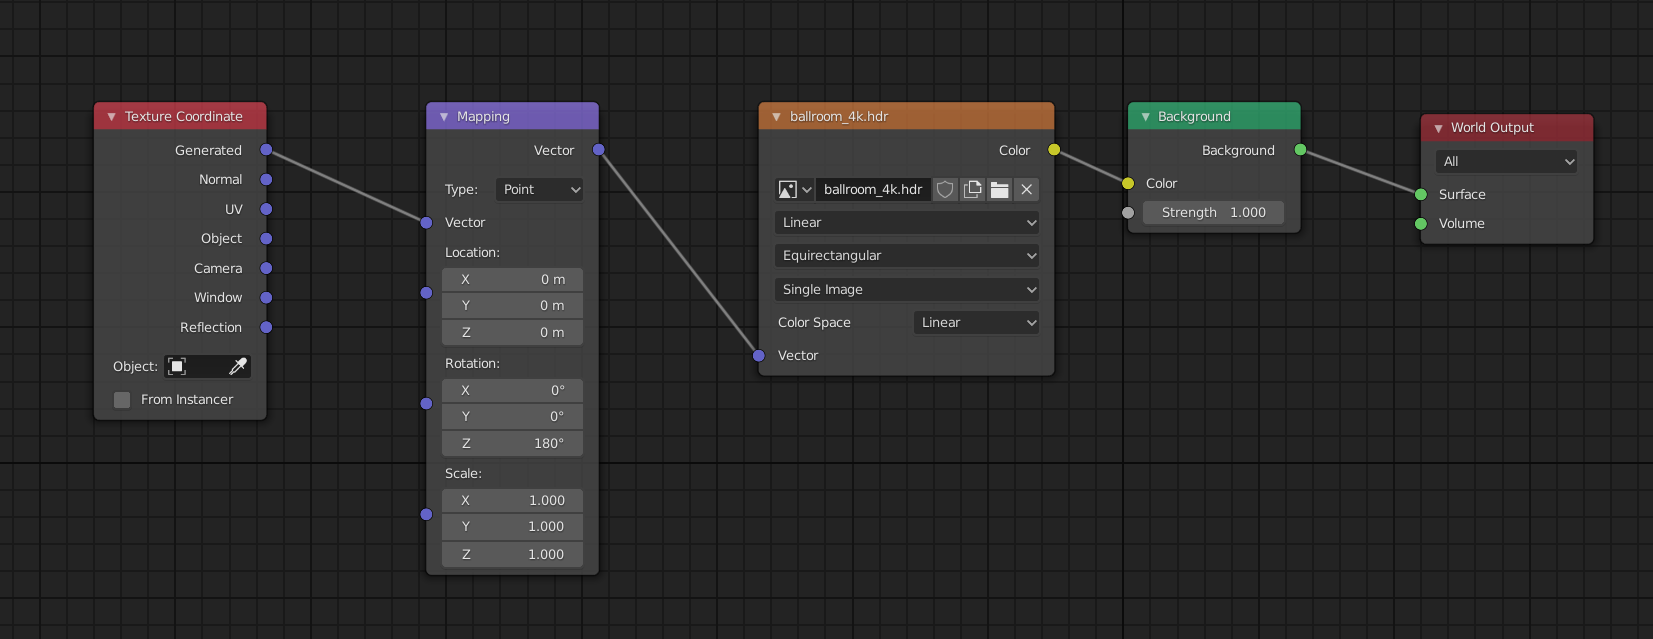
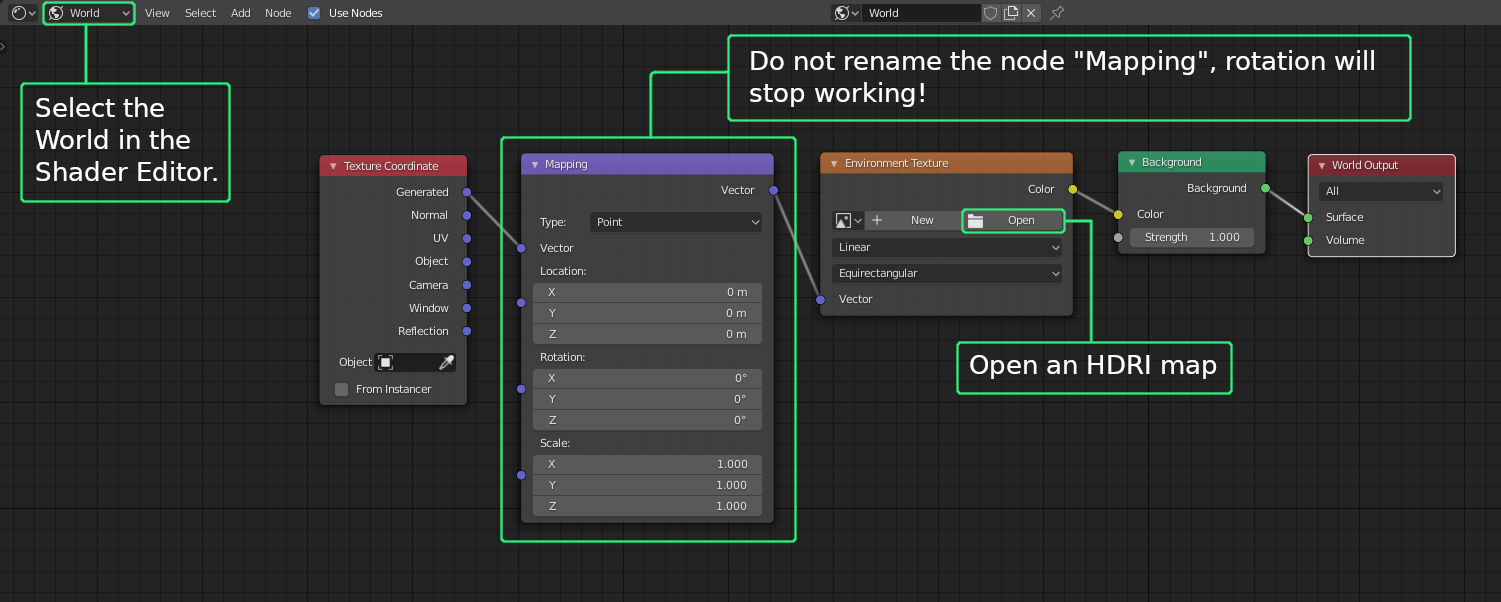
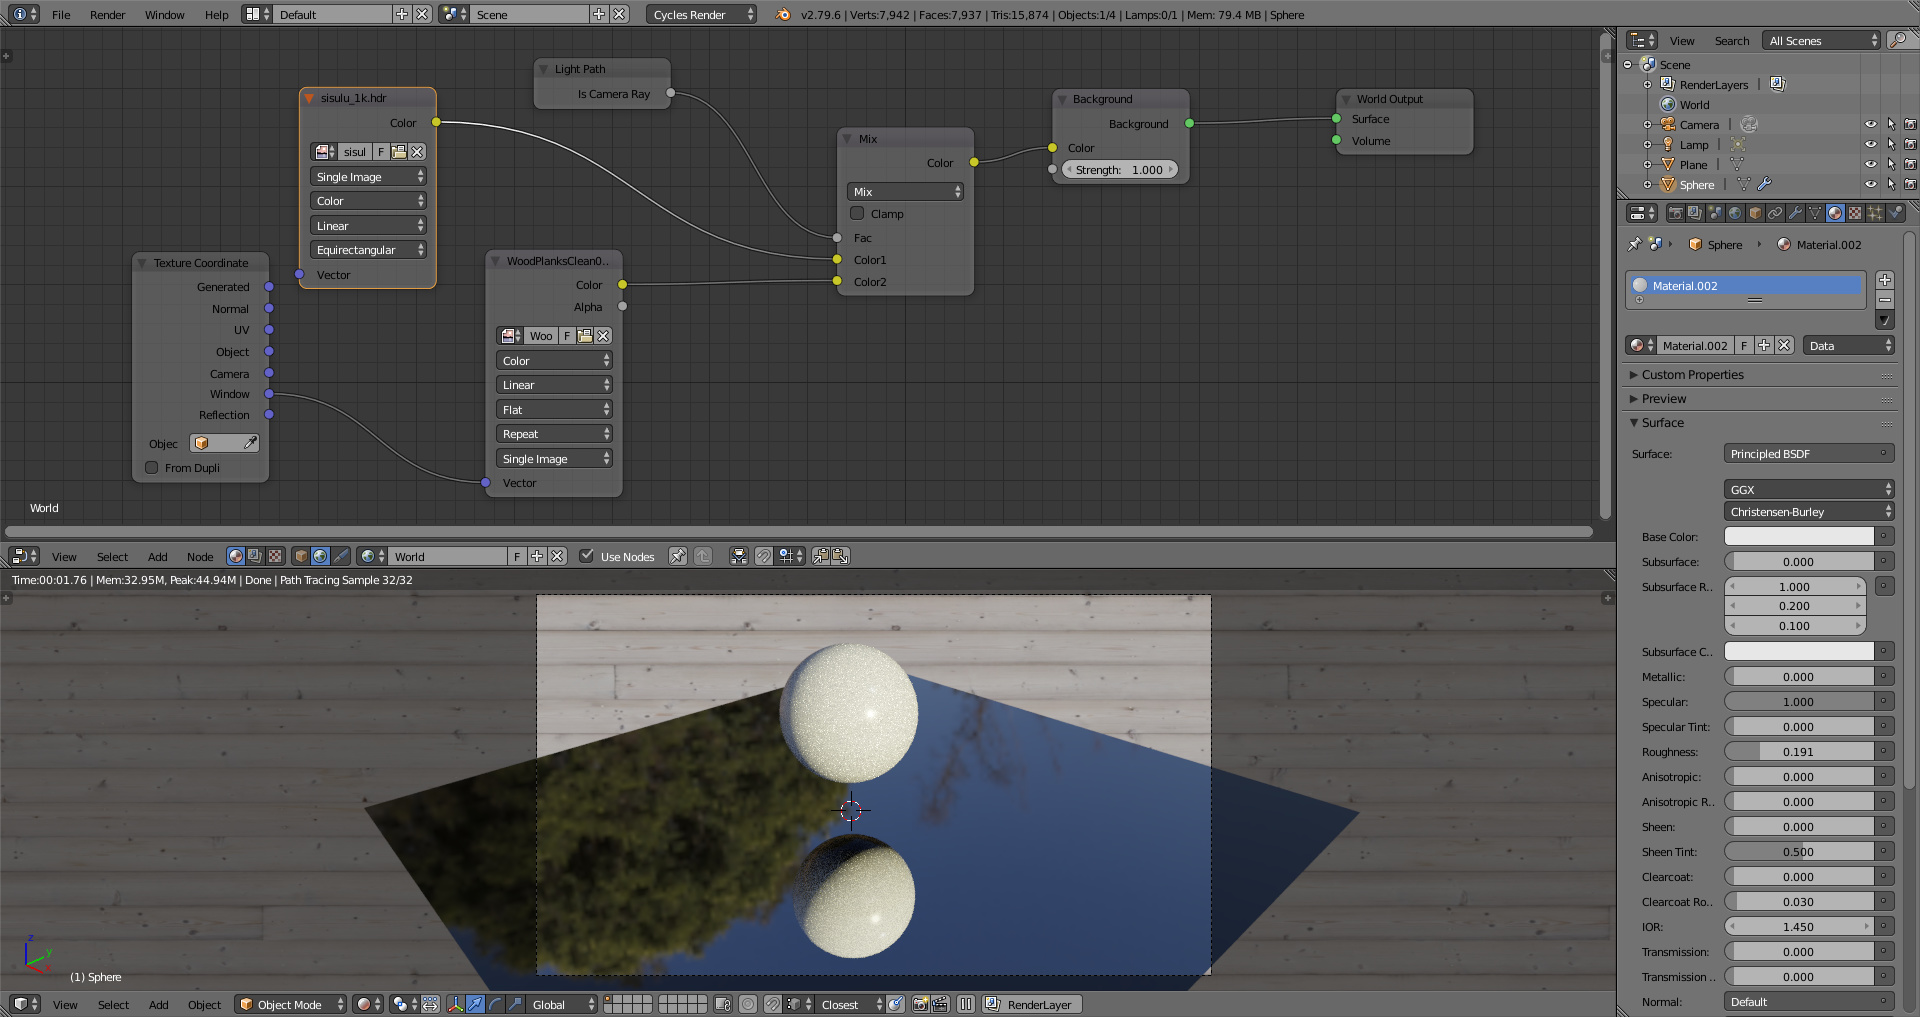
- Open the Shader Editor and select the World tab.
- Add an Environment Texture node and connect it to the Background node.
- Use the Open Image button to load your HDRI file.
- Adjust the Strength parameter to control the intensity of the lighting.
Advanced Tips for HDRI Usage
- Experiment with different HDRI maps to achieve various lighting effects.
- Use the Node Editor for additional control over the environment\"s influence.
- Consider the scale and orientation of your HDRI to match your scene\"s context.
Creating High-Quality HDR Environments
For those looking to create their own HDR environments, Blender offers tools to capture and process HDR images, enabling creators to produce custom lighting scenarios that perfectly match their vision.
Resources for HDRI
Platforms like Poly Haven offer a vast library of free HDRI maps, suitable for various types of projects and available for immediate use without any login requirements.
Conclusion
Integrating HDRI into Blender projects significantly enhances the quality and realism of 3D renders. By utilizing the tips and techniques outlined above, artists can effectively simulate real-world lighting conditions, elevating their visualizations to new heights.
_HOOK_
How to Use HDRI in Blender
- Open the Shader Editor and select the World tab.
- Add an Environment Texture node and connect it to the Background node.
- Use the Open Image button to load your HDRI file.
- Adjust the Strength parameter to control the intensity of the lighting.
Advanced Tips for HDRI Usage
- Experiment with different HDRI maps to achieve various lighting effects.
- Use the Node Editor for additional control over the environment\"s influence.
- Consider the scale and orientation of your HDRI to match your scene\"s context.

Creating High-Quality HDR Environments
For those looking to create their own HDR environments, Blender offers tools to capture and process HDR images, enabling creators to produce custom lighting scenarios that perfectly match their vision.
Resources for HDRI
Platforms like Poly Haven offer a vast library of free HDRI maps, suitable for various types of projects and available for immediate use without any login requirements.
How do I add an HDRI in Blender for enhancing my renders?
To add an HDRI in Blender for enhancing your renders, follow these steps:
- Select the World tab from the Properties Editor panel.
- From the Surface dropdown menu, add Background.
- In the Color section, click the button on the right with a circle in the center.
- Select \'Environment texture\' from the options.
- Now you can load the HDRI file you want to use for your scene.
Conclusion
Integrating HDRI into Blender projects significantly enhances the quality and realism of 3D renders. By utilizing the tips and techniques outlined above, artists can effectively simulate real-world lighting conditions, elevating their visualizations to new heights.
_HOOK_
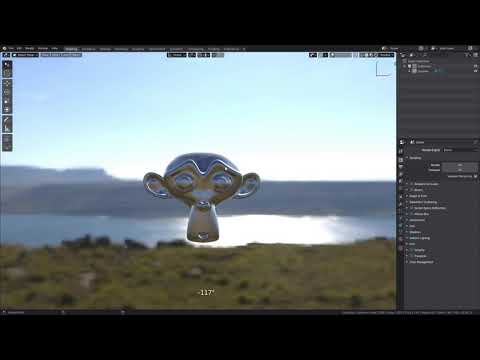
How to Use HDRIs in Blender 3.0 Tutorial
Tutorial: Join us for an informative and engaging tutorial that will teach you valuable skills in a simple and easy-to-follow manner. Whether you\'re a beginner or an expert, this tutorial is sure to enhance your knowledge and creativity. Lighting: Dive into the world of lighting with our captivating video that showcases the importance of proper lighting techniques. Watch as we demonstrate how lighting can transform a space and create a warm and inviting ambiance.
How to Light Your Scenes with HDRIs in Blender
In this Blender tutorial I will show you how to light your scene\'s with HDRIs. ○ Get Free HDRIs from Poly Haven: ...
Advanced Tips for HDRI Usage
- Experiment with different HDRI maps to achieve various lighting effects.
- Use the Node Editor for additional control over the environment\"s influence.
- Consider the scale and orientation of your HDRI to match your scene\"s context.
Creating High-Quality HDR Environments
For those looking to create their own HDR environments, Blender offers tools to capture and process HDR images, enabling creators to produce custom lighting scenarios that perfectly match their vision.
Resources for HDRI
Platforms like Poly Haven offer a vast library of free HDRI maps, suitable for various types of projects and available for immediate use without any login requirements.
Conclusion
Integrating HDRI into Blender projects significantly enhances the quality and realism of 3D renders. By utilizing the tips and techniques outlined above, artists can effectively simulate real-world lighting conditions, elevating their visualizations to new heights.
_HOOK_
Conclusion
Integrating HDRI into Blender projects significantly enhances the quality and realism of 3D renders. By utilizing the tips and techniques outlined above, artists can effectively simulate real-world lighting conditions, elevating their visualizations to new heights.
Introduction to HDRI and Its Importance in Blender
High Dynamic Range Imaging (HDRI) is a powerful technique in Blender that significantly enhances the realism and depth of scenes by providing a more dynamic range of luminance between the lightest and darkest areas of an image. This technology captures a wider range of light and shadow details, allowing for the creation of more lifelike and visually appealing digital environments.
The use of HDRI in Blender is crucial for artists and designers seeking to achieve photorealistic renders. By utilizing HDRI maps as environment textures, users can simulate real-world lighting conditions with remarkable accuracy. This method illuminates scenes using a spherical panorama that includes both direct light sources and ambient light, enabling the rendering of complex light interactions such as reflections, refractions, and shadows with a higher degree of realism.
Integrating HDRI into Blender projects brings several benefits:
- Enhanced Lighting: HDRI provides a rich, natural light setup that mimics real-world conditions, automatically improving the quality of the lighting in a scene without the need for extensive lighting setups.
- Realistic Reflections and Shadows: The comprehensive range of light values in an HDRI map allows for the accurate depiction of reflections and shadows, making them appear more realistic and integrated within the scene.
- Efficient Workflow: Using HDRI maps for lighting is both time-efficient and effective, reducing the need for multiple light sources while achieving superior results.
- Atmospheric Depth: The inclusion of environmental details in HDRI maps adds depth and context to scenes, contributing to a more immersive viewer experience.
Furthermore, the versatility of HDRI in Blender extends to various applications, from architectural visualization and product rendering to animation and visual effects, making it an indispensable tool for creators aiming for the highest level of realism in their projects. As the Blender community continues to grow, the accessibility and development of high-quality HDRI maps have become more widespread, offering an abundance of resources for artists to leverage in their creative endeavors.
In summary, HDRI plays a pivotal role in Blender by providing artists with the tools to create more dynamic, realistic, and visually stunning imagery. Its importance cannot be overstated, as it directly impacts the visual quality and emotional depth of digital content, setting new standards for photorealism in 3D rendering.
Step-by-Step Guide to Setting Up HDRI in Blender
Setting up HDRI (High Dynamic Range Imaging) in Blender enhances the realism and depth of your 3D scenes by providing better lighting conditions. Follow this step-by-step guide to integrate HDRI into your Blender projects effectively:
- Choose Your HDRI Image: Start by selecting an HDRI image that matches the mood and lighting conditions you wish to replicate in your scene. Various online platforms offer free and premium HDRI maps tailored for different environments and lighting setups.
- Open Blender: Launch Blender and either start a new project or open an existing one where you intend to apply HDRI lighting.
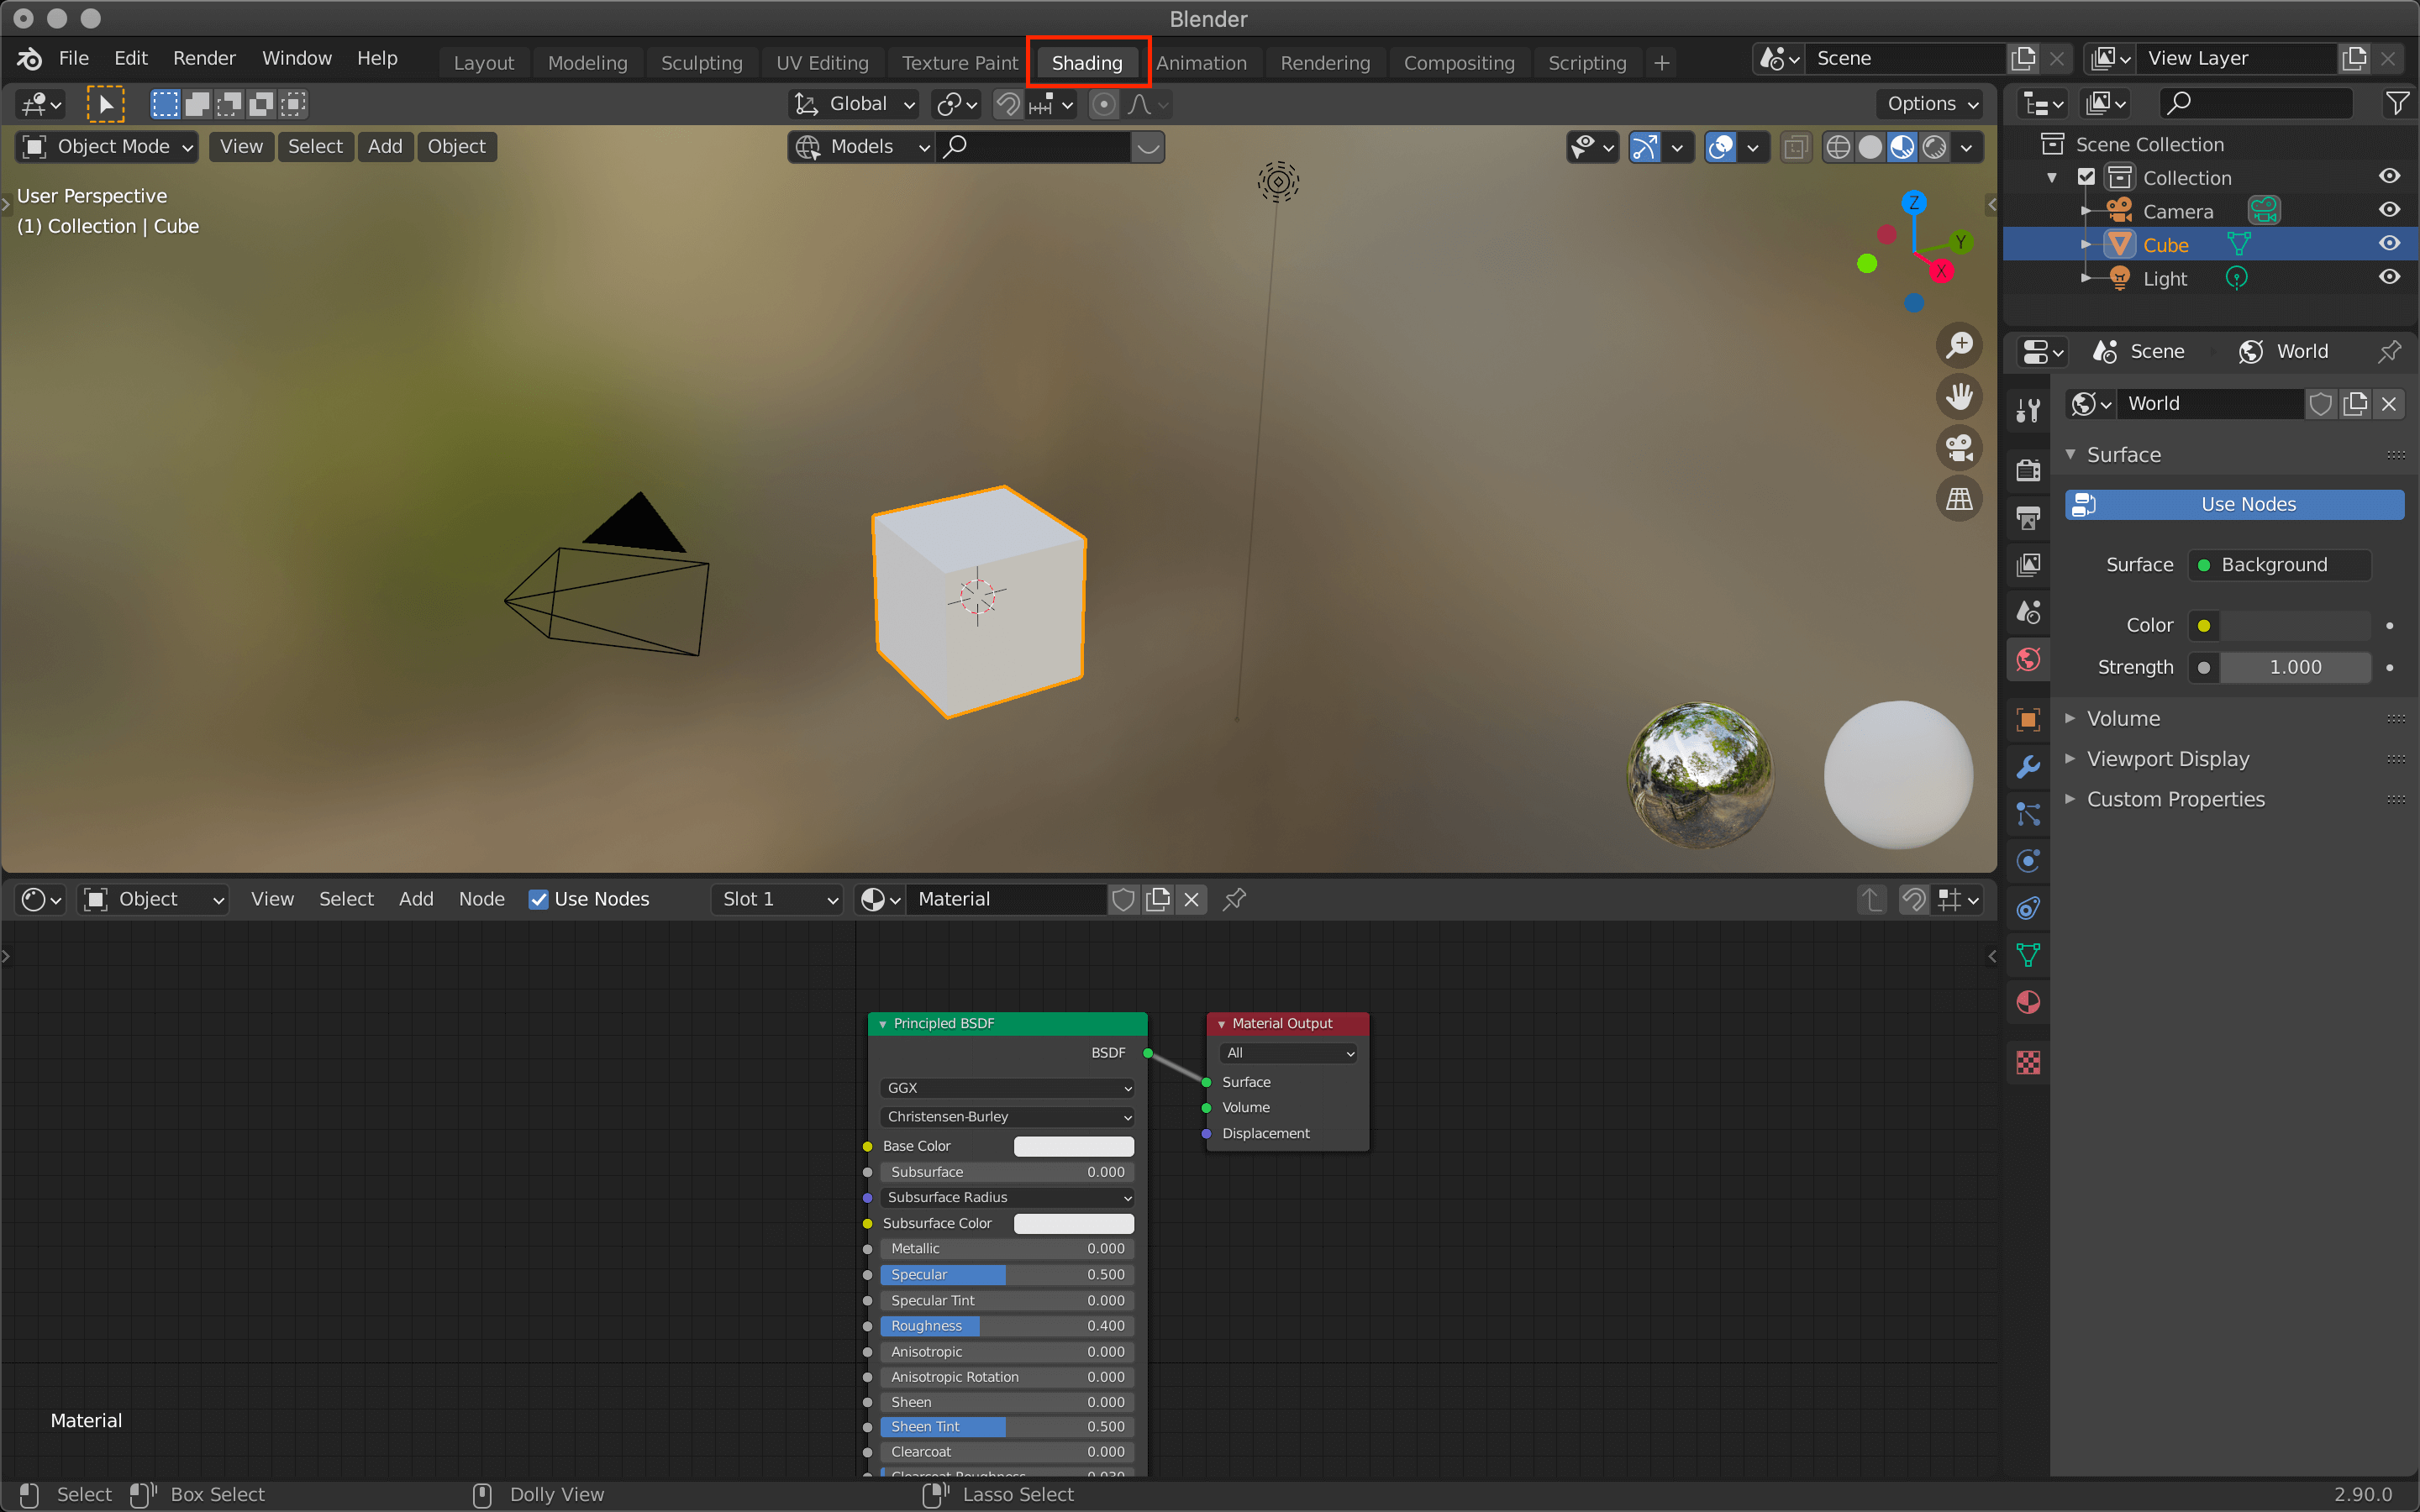
- Set Up the Environment Texture: Navigate to the World settings in the Properties panel. Under the Surface section, find the Color field and select \"Environment Texture\". Click \"Open\" to browse and load your chosen HDRI image file.
- Adjust the HDRI Settings: With the HDRI map loaded, you can adjust its orientation and intensity. To do this, go to the Shader Editor and select the World icon. Use nodes like Mapping and Texture Coordinate to rotate the HDRI and the Strength parameter under the Environment Texture node to control its intensity.
- Preview Your Scene: Switch the viewport shading mode to \"Rendered\" to preview how the HDRI affects your scene. This allows you to see the changes in lighting and reflections in real-time, helping you make further adjustments as needed.
- Final Adjustments: Depending on your scene\"s requirements, you may need to tweak the HDRI settings further for optimal results. Consider adjusting the scale, rotation, and intensity of the HDRI map to perfectly match your vision.
- Render Your Scene: Once you are satisfied with the lighting setup, proceed to render your scene. HDRI lighting will contribute to achieving a more realistic and dynamic outcome in your renders.
This guide should help you understand the basics of setting up HDRI in Blender for enhanced lighting and realism in your projects. Experimenting with different HDRI maps and settings can lead to impressive results that add depth and life to your 3D scenes.
Benefits of Using HDRI for Realistic Rendering
High Dynamic Range Imaging (HDRI) has revolutionized the way digital artists create and render scenes in Blender. The technique offers numerous advantages for achieving photorealism and enhancing the visual quality of renders. Here are the key benefits of using HDRI for realistic rendering in Blender:
- Natural Lighting: HDRI captures real-world lighting conditions, including the brightness of the sky and the nuances of sunlight and shadows. This results in more natural and lifelike lighting in renders, closely mimicking how objects appear in their natural environments.
- Improved Shadows and Highlights: The wide range of luminance values in HDRI maps allows for better representation of shadows and highlights, contributing to the depth and detail of the scene. This dynamic range ensures that details are not lost in very bright or very dark areas, enhancing the overall realism.
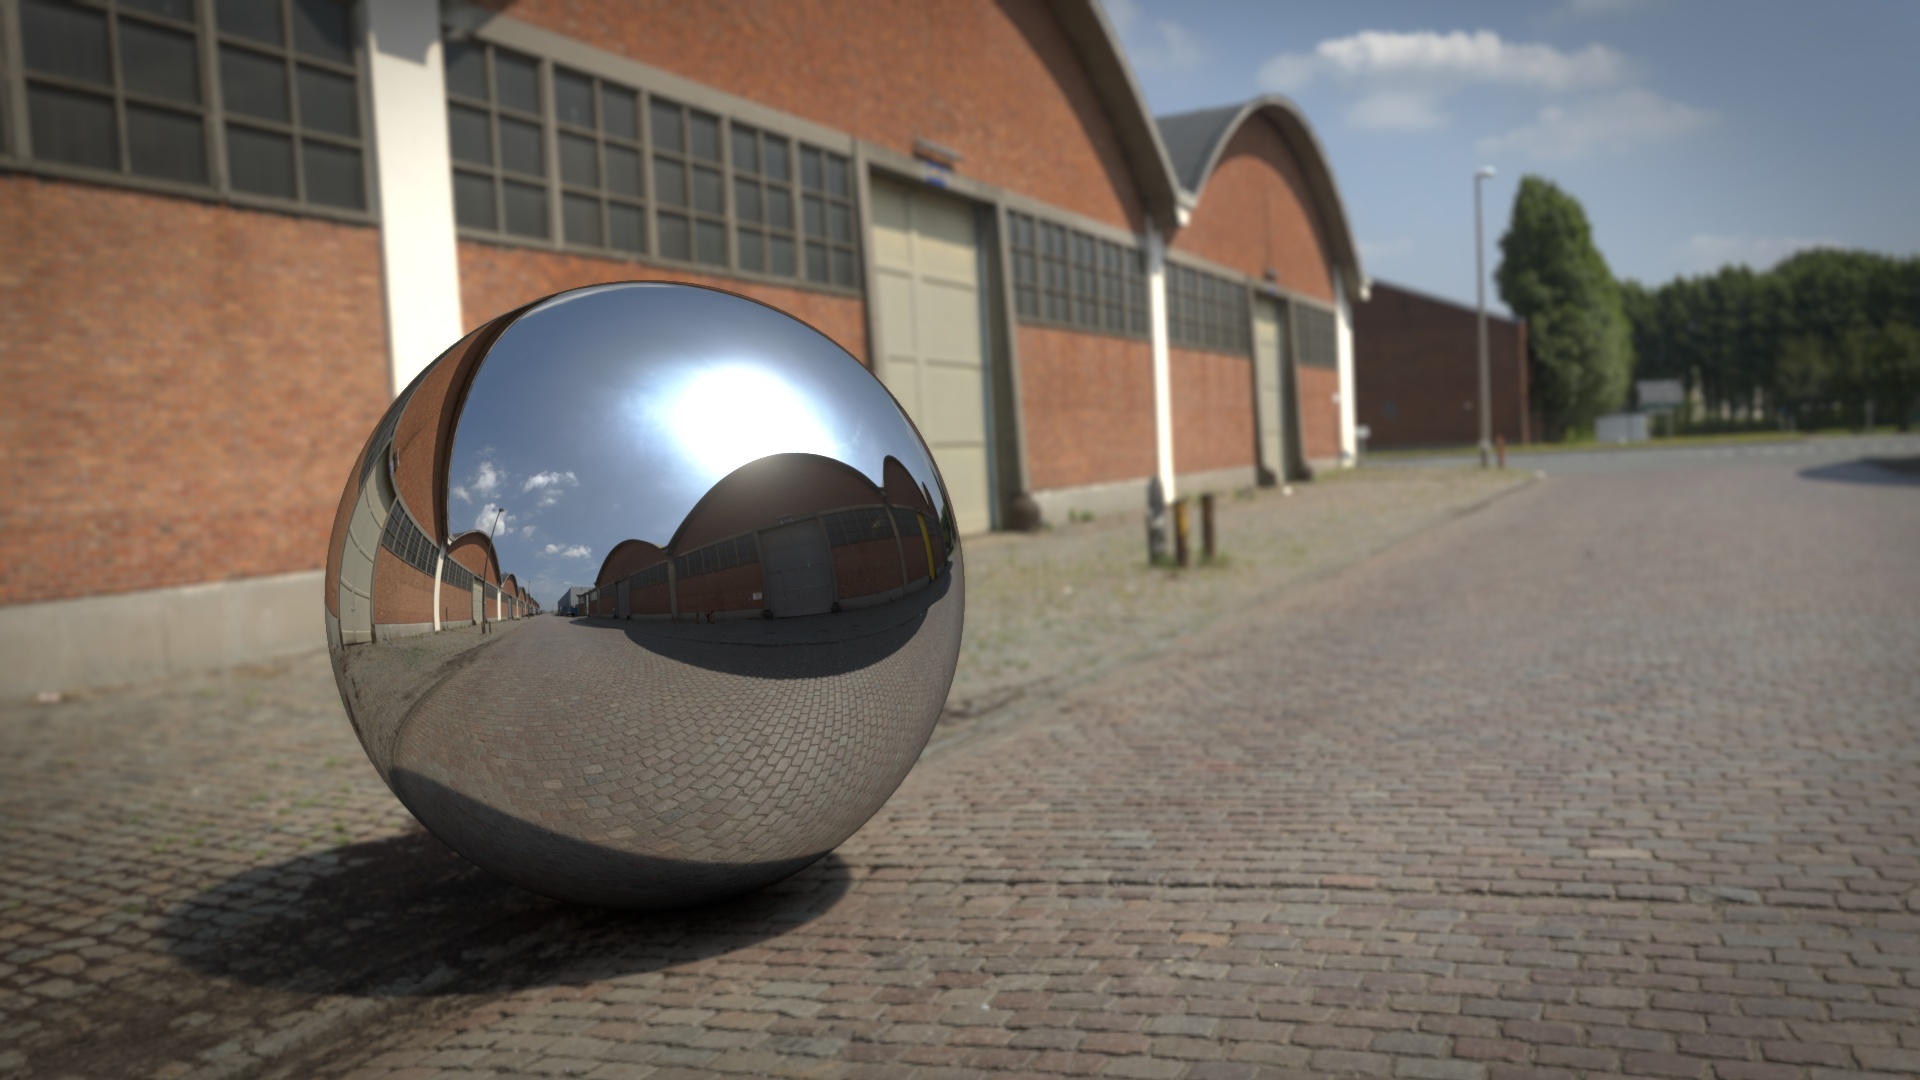
- Realistic Reflections: HDRI provides accurate environmental reflections on surfaces, which is crucial for materials like metals, glass, and water. These reflections contribute significantly to the realism of the scene, as they are based on actual environmental lighting.
- Atmospheric Effects: The use of HDRI can introduce atmospheric conditions such as a sunny day, cloudy sky, sunset, or night scene into your render, adding mood and context to the scene without the need for additional texturing or lighting setup.
- Efficiency: Setting up lighting for 3D scenes can be complex and time-consuming. HDRI simplifies this process by providing a single, comprehensive lighting solution that includes both direct and indirect lighting, significantly reducing setup time and allowing artists to focus on other aspects of their project.
- Versatility: HDRI maps are versatile and can be used in a wide range of scenes, from interior renders to outdoor landscapes. This adaptability makes them an invaluable tool in an artist\"s toolkit, providing solutions for various lighting scenarios.
- Enhanced Depth and Dimension: The subtle lighting variations captured in HDRI maps contribute to a greater sense of depth and dimension in the scene, making the digital environment more engaging and believable to the viewer.
In conclusion, HDRI is an essential technique for anyone looking to achieve realistic rendering in Blender. Its ability to replicate real-world lighting conditions, along with its efficiency and versatility, makes it a game-changer in the field of digital art and animation.
Choosing the Right HDRI for Your Scene
Selecting the appropriate HDRI (High Dynamic Range Imaging) for your scene in Blender is crucial for achieving the desired mood, lighting quality, and realism. Here\"s a comprehensive guide to help you make the best choice:
- Consider the Scene\"s Setting: Reflect on the environment your scene is set in. Whether it\"s indoor, outdoor, urban, or natural, the setting will largely dictate the type of HDRI you should choose. For instance, an urban scene may benefit from an HDRI with cityscape lighting, while a natural scene would look best with a forest or mountain range HDRI.
- Analyze the Lighting Conditions: The time of day, weather, and season play significant roles in the ambiance of your scene. HDRI maps vary from sunny days to overcast skies and golden sunsets. Select an HDRI that matches the specific lighting conditions you aim to replicate.
- Resolution and Quality: While the resolution may not significantly impact the lighting effect, a higher resolution HDRI provides better details for reflections on surfaces. Opt for a balance between resolution and performance, especially if your project involves close-up shots where reflections play a key role.
- Dynamic Range: A good HDRI should have a wide dynamic range to accurately represent both the brightest and darkest parts of the image. This ensures your scene is lit realistically, with proper contrast and depth.
- Color Tones: The overall color tone of the HDRI can affect the mood of your scene. Warm tones can create a cozy, inviting atmosphere, while cool tones might suggest a more somber or mysterious setting. Choose an HDRI that complements the color palette of your scene.
- Test Multiple HDRIs: Experiment with several HDRIs to see how each one impacts your scene. Sometimes, an unexpected choice can provide the most compelling lighting conditions.
- Customization and Editing: Some HDRIs may require adjustments to fit perfectly into your scene. Tools within Blender allow you to rotate, scale, and modify the intensity of the HDRI to achieve the desired effect.
By carefully selecting the right HDRI for your scene, you enhance the realism, depth, and emotional impact of your renders in Blender. The perfect HDRI not only illuminates your scene but also brings it to life, making the choice a pivotal part of the rendering process.
_HOOK_
Adjusting HDRI Settings for Optimal Results
Optimizing HDRI settings in Blender can significantly improve the realism and visual appeal of your renders. Here\"s a guide to fine-tuning your HDRI setup for the best possible outcomes:
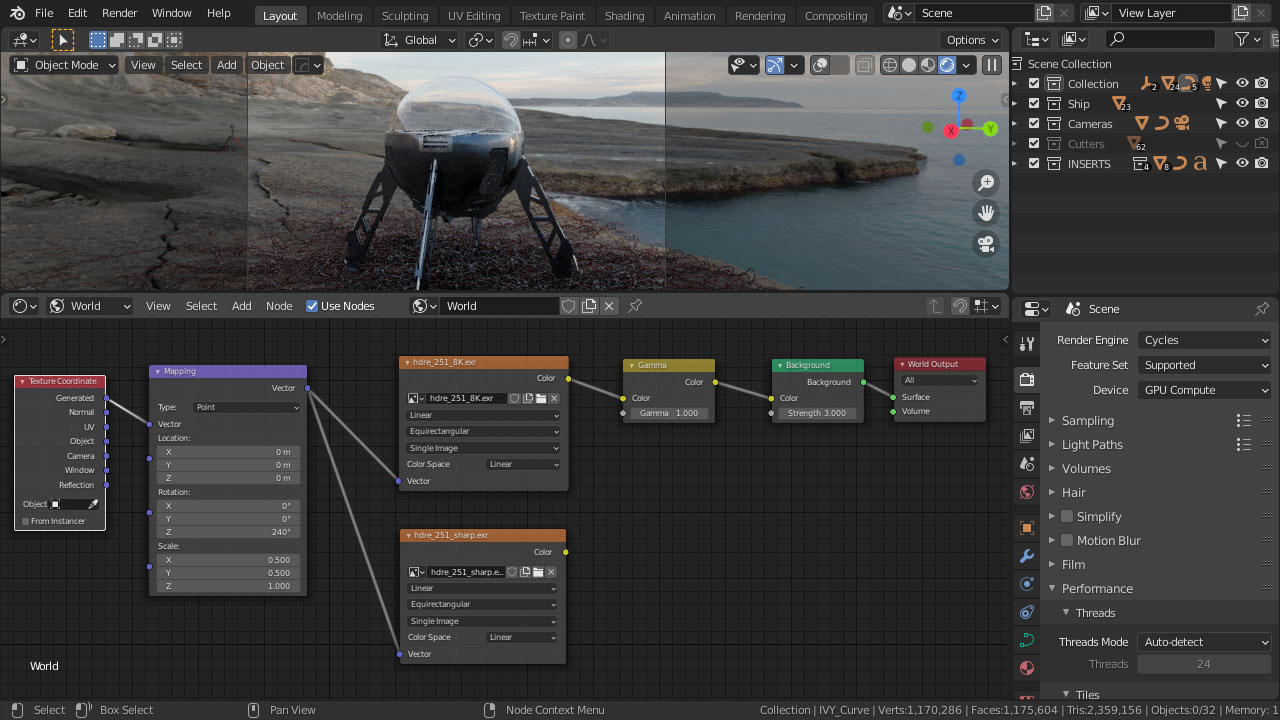
- Access the World Settings: Begin by selecting the World tab in the Properties panel. This is where you\"ll adjust the HDRI settings.
- Use Nodes for HDRI: Ensure that the \"Use Nodes\" option is activated. This allows for greater control over the HDRI by accessing its node setup in the Shader Editor.
- Adjust the Strength: In the Shader Editor, find the Environment Texture node. You can increase or decrease the Strength value to control the intensity of the HDRI lighting. A higher value results in brighter lighting, while a lower value dims the scene.
- Modify the Rotation: To change the direction of the lighting and shadows in your scene, add a Mapping node between the Texture Coordinate and Environment Texture nodes. Adjust the Z rotation to rotate the HDRI and alter the lighting direction.
- Scale the HDRI: If needed, you can also scale the HDRI using the Mapping node. This can be useful for adjusting the appearance of the background or the scale of shadows and highlights.
- Tweak the Color Balance: For artistic or mood purposes, you may want to modify the colors of your HDRI. Add a Hue/Saturation node after the Environment Texture node to adjust the hue, saturation, and value for different effects.
- Preview Changes in Rendered View: Switch to Rendered view mode to see how your adjustments affect the scene. This real-time feedback allows you to make iterative changes until you achieve the desired look.
- Save Your Setup: Once satisfied with the settings, save your Blender file. Consider creating presets for different lighting conditions to streamline your workflow in future projects.
Adjusting the HDRI settings in Blender enables you to customize the lighting to match your scene\"s specific needs, enhancing both the realism and the artistic quality of your renders.
Advanced Techniques in HDRI Lighting
Enhancing your Blender projects with HDRI lighting involves more than just selecting and applying an HDRI map. Advanced techniques can significantly improve the realism and visual impact of your renders. Here are some sophisticated methods to elevate your HDRI lighting:
- Layering Multiple HDRIs: For complex scenes, consider layering multiple HDRIs to create a more dynamic lighting environment. This technique allows for the combination of different lighting conditions, such as mixing a sunset HDRI with a night sky HDRI for a twilight effect.
- Using Light Portals: In interior scenes, light portals can be used in conjunction with HDRI to enhance the accuracy of light distribution, especially in areas where natural light enters through windows or doorways.
- Adjusting HDRI with Nodes: The Shader Editor in Blender allows for precise adjustments to the HDRI through the use of nodes. For instance, using the ColorRamp node to modify the intensity or color of specific parts of the HDRI, enhancing the overall mood of the scene.
- Creating Custom HDRIs: For unique lighting conditions or specific artistic effects, consider creating your own HDRIs. This can be done by photographing a scene with multiple exposures and combining them into a single HDRI map.
- HDRI Blending: Blend multiple HDRIs together using the Mix Shader in the Shader Editor. This method allows for the seamless integration of different lighting conditions within the same scene.
- Dynamic HDRI Editing: Utilize Blender\"s compositor to dynamically edit HDRI properties such as brightness, contrast, and saturation, allowing for real-time adjustments without the need to leave the Blender environment.
- Environment Reflection Control: Control how the HDRI affects reflections on surfaces by adjusting the Glossy Shader\"s settings. This is particularly useful for scenes that require precise control over reflective properties.
- Utilizing HDRIs for Backgrounds: Beyond lighting, HDRIs can also be used to provide realistic backgrounds for scenes. This technique saves time in modeling while ensuring that the lighting and background are in perfect harmony.
By mastering these advanced HDRI lighting techniques, you can achieve unparalleled realism and depth in your Blender renders, pushing the boundaries of digital artistry.
Creating Your Own HDRI Maps for Blender
Creating your own High Dynamic Range Imaging (HDRI) maps can be a rewarding way to achieve unique and personalized lighting in your Blender projects. This process involves capturing a wide range of luminance in real-world scenes to use as environmental lighting in 3D renders. Here\"s how to create your own HDRI maps:
- Equipment Preparation: You\"ll need a camera capable of manual exposure settings, a tripod, and ideally, a fisheye lens or a lens with a wide field of view. A panoramic head for the tripod can also help in getting more accurate alignment for your shots.
- Capture Multiple Exposures: To capture the full dynamic range of the scene, take multiple exposures at different settings. Start with a \"normal\" exposure, then adjust the shutter speed to capture both darker and lighter exposures. This set should cover everything from the darkest shadows to the brightest highlights without clipping.
- Stitching Photos Together: Use software like PTGui, Hugin, or Photoshop to stitch these multiple exposures into a single panoramic image. The software will merge the exposures, aligning and blending them to create a seamless panorama.
- Tone Mapping and Editing: After stitching, the panoramic image can be tone-mapped and edited for color correction or to adjust the dynamic range. This step is crucial for ensuring the HDRI map looks natural and matches your scene\"s requirements.
- Convert to HDRI: The final panoramic image needs to be saved in a format that supports HDR, such as .hdr or .exr. These formats retain the high dynamic range of your stitched panorama, making it ready for use in Blender.
- Importing into Blender: In Blender, go to the World settings and select \"Environment Texture\" in the Surface tab. Load your custom HDRI map here to start using it as the environmental lighting for your scene.
- Adjustments in Blender: You might need to adjust the scale, rotation, or intensity of your HDRI map within Blender to perfectly match your scene\"s lighting needs. This can be done using the Texture Coordinate and Mapping nodes in the Shader Editor.
Creating your own HDRI maps allows for unparalleled customization and realism in lighting your Blender projects. It gives you the freedom to capture and utilize the exact lighting conditions you envision, adding depth and authenticity to your renders.
Common Challenges and Solutions in HDRI Setup
Setting up HDRI in Blender can come with its set of challenges, but understanding these common issues and knowing how to address them can enhance your workflow and render quality significantly. Below are some challenges you might encounter and solutions to overcome them:
- Difficulty in Adjusting HDRI Orientation: Sometimes, getting the HDRI to light your scene from the correct angle can be tricky. Using the Node Wrangler addon, you can easily add Texture Coordinate and Mapping nodes to rotate the HDRI. This allows for precise control over the direction of the environmental lighting.
- Managing HDRI Intensity: If the lighting from your HDRI feels too strong or too weak, adjusting its intensity is crucial. This can be done by modifying the strength value in the World settings or directly within the Shader Editor by changing the value in the Background node that connects to the Environment Texture node.
- Creating Realistic Shadows: Achieving realistic shadows with HDRI lighting can sometimes be a challenge, especially in scenes that require a high level of detail. Adding a plane under your model and setting it as a Shadow Catcher in the Object properties can help create more realistic shadows that enhance the depth and realism of your scene.
- HDRI Visibility in Renders: In some cases, you might not want the HDRI to be visible in your final render, preferring it to only influence the lighting and reflections. This can be achieved by setting the Film option to Transparent in the Render settings, allowing the HDRI to contribute to the scene\"s lighting and reflections without being directly visible.
Understanding these solutions will help you navigate the complexities of HDRI setup in Blender, ensuring that you can achieve the desired lighting effects and render quality for your projects.
Resources for Free and High-Quality HDRI Maps
Finding the right HDRI (High Dynamic Range Imaging) maps can significantly impact the realism and quality of your Blender projects. Here are some of the best resources for free and high-quality HDRI maps:
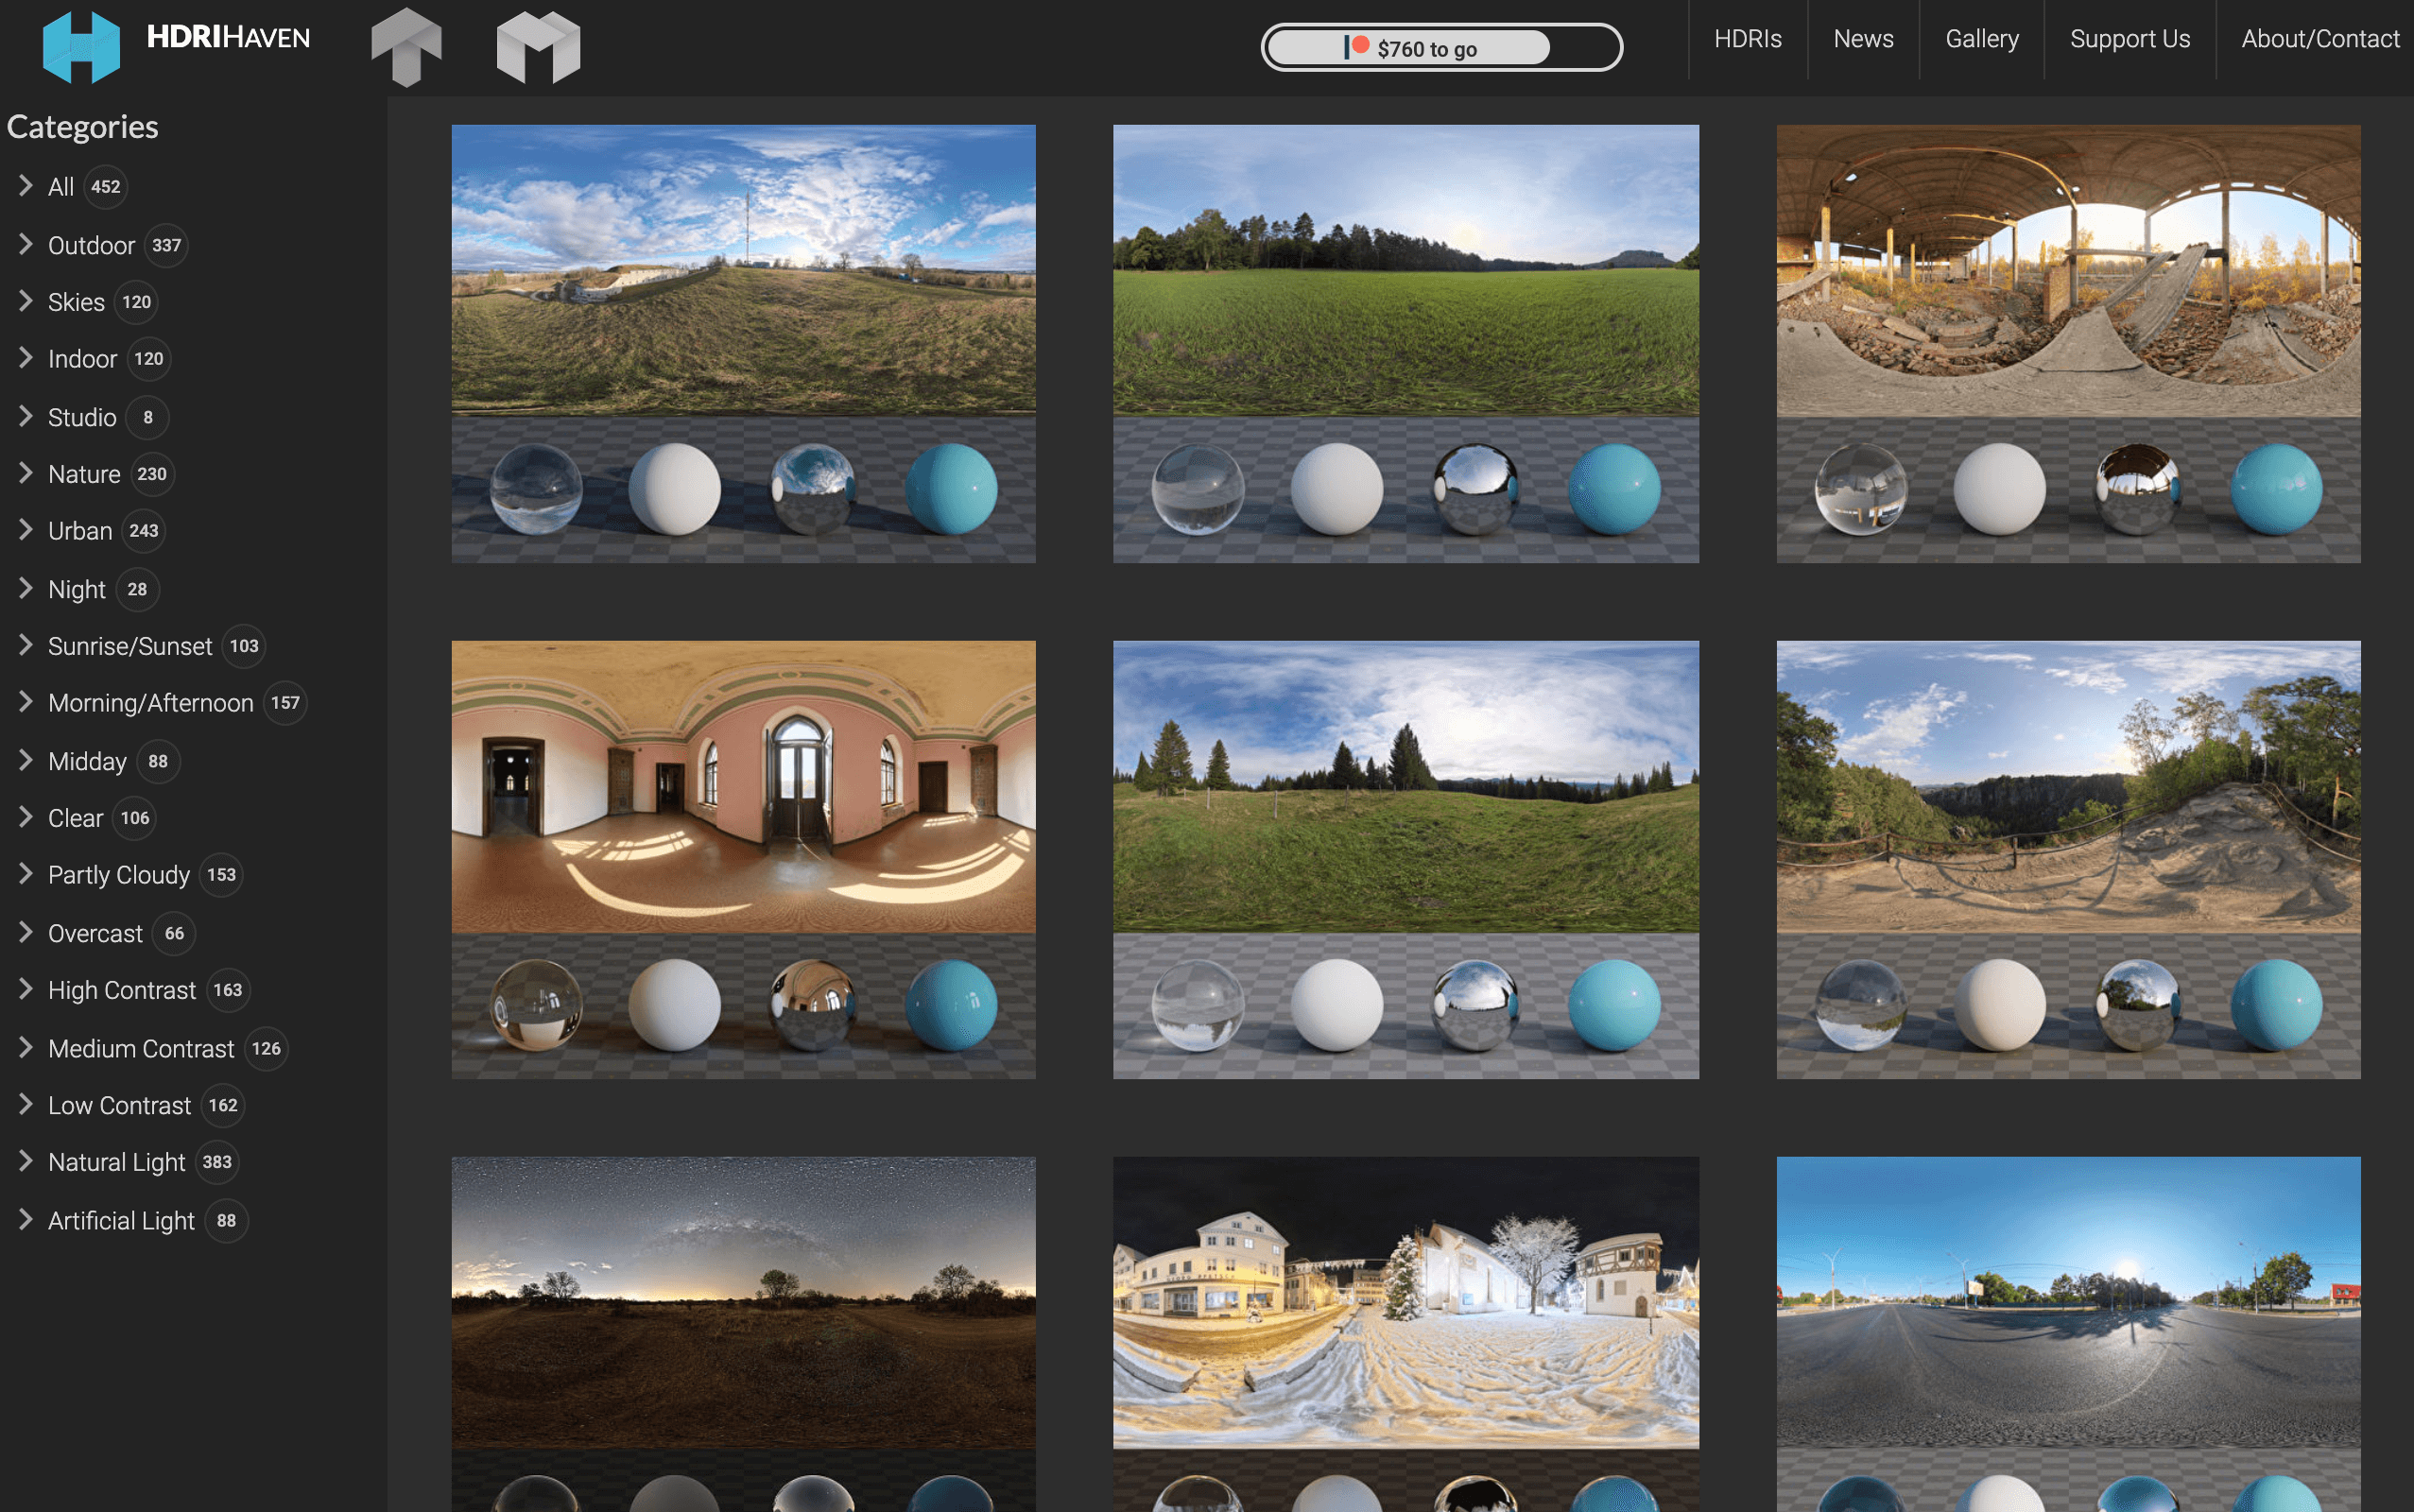
- Poly Haven: Formerly known as HDRI Haven, Poly Haven offers a wide range of free HDRI maps. It\"s a community-funded platform, ensuring that all resources are available for both hobbyists and professionals.
- HDRI Haven: Specifically dedicated to providing free HDRI maps, HDRI Haven is a go-to resource for artists looking for a variety of lighting conditions to enhance their 3D renders in Blender.
- HDRMAPS: Offers both free and premium HDRI maps. The free section includes a variety of outdoor and indoor conditions suitable for different types of Blender projects. HDRMAPS also provides tools for Blender to streamline the HDRI setup process.
- ambientCG: Provides free PBR materials, models, and HDRIs under the Public Domain license. Their collection includes unclipped HDRI skies that can add a realistic touch to any scene.
- HDRI Skies: Specializes in 360° HDRI sky maps. The free section offers maps in 2K resolution, perfect for personal and commercial use, with the option to purchase higher resolution maps.
These resources offer a wide range of HDRI maps, from natural landscapes and urban settings to studio lights and beyond, ensuring you can find the perfect lighting setup for your Blender project. Remember to support these platforms if you can, as many operate on a donation basis to keep their resources freely available.
_HOOK_
READ MORE:
Conclusion: Enhancing Your Blender Projects with HDRI
Incorporating HDRI (High Dynamic Range Imaging) into your Blender projects can dramatically elevate the quality and realism of your renders. HDRI provides a versatile and efficient method for simulating real-world lighting conditions, making it an indispensable tool in the digital artist\"s toolkit. By utilizing the techniques and resources outlined in this guide, you can harness the power of HDRI to bring your Blender projects to life with stunning detail and realism.
Whether you\"re working on architectural visualizations, product design, or digital art, HDRI can enhance your scenes with natural lighting, accurate shadows, and dynamic reflections. The ability to create your own HDRI maps or leverage high-quality free resources further expands your creative possibilities, allowing for unique and personalized lighting setups.
As you continue to explore and experiment with HDRI in Blender, remember the importance of selecting the right HDRI for your scene, adjusting settings for optimal results, and applying advanced techniques to overcome common challenges. With practice and patience, you\"ll find that HDRI can transform your renders, adding depth, realism, and emotional impact to your work.
In conclusion, HDRI is more than just a lighting solution; it\"s a way to bridge the gap between art and reality, enabling artists and designers to achieve photorealistic renders that were once thought impossible. Embrace the challenges and opportunities that HDRI lighting offers, and let it inspire you to push the boundaries of what can be achieved with Blender.
Unlock the full potential of your Blender projects with HDRI, the key to achieving unparalleled realism and depth. Explore our comprehensive guide to master HDRI lighting and transform your renders into captivating, photorealistic masterpieces.