Topic add hdri blender: Discover how to add HDRI in Blender and transform your 3D renders into lifelike masterpieces with enhanced realism, lighting, and shadows. Elevate your creative projects to new heights with this essential technique.
Table of Content
- Step-by-Step Guide to Adding HDRI in Blender
- Additional Resources
- Additional Resources
- Introduction to HDRI and Its Importance in Blender
- Step-by-Step Instructions on Adding HDRI in Blender
- How to add HDRI in Blender for realistic lighting effects?
- Choosing the Right HDRI for Your Project
- YOUTUBE: How to Add HDRi Environment Texture in Blender 2.92
- Adjusting HDRI Settings for Realistic Lighting and Reflections
- Advanced Techniques: Enhancing Scenes with HDRI
- Common Issues and Solutions When Adding HDRI in Blender
- Recommended Resources for Free HDRI Downloads
- Conclusion: Transforming Your 3D Renders with HDRI
Step-by-Step Guide to Adding HDRI in Blender
- Prepare Your HDRI File: Ensure you have the HDRI file you intend to use. HDRI files are typically available in .hdr or .exr formats.
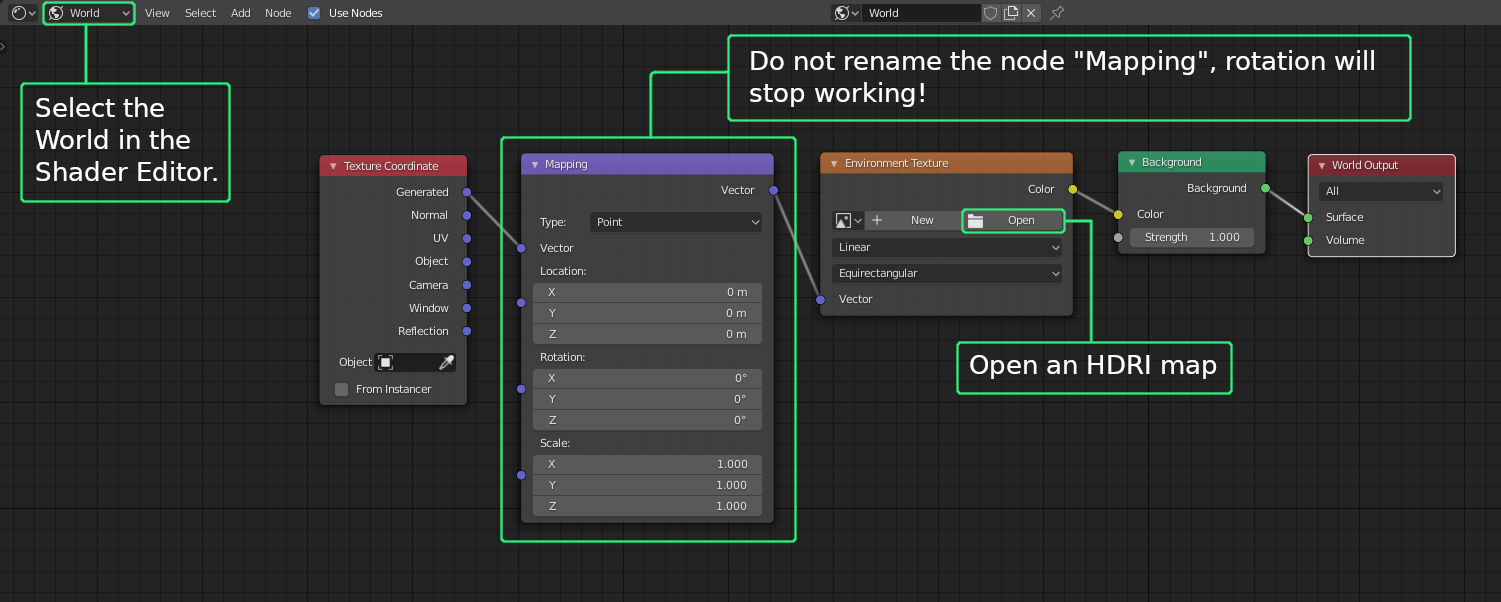
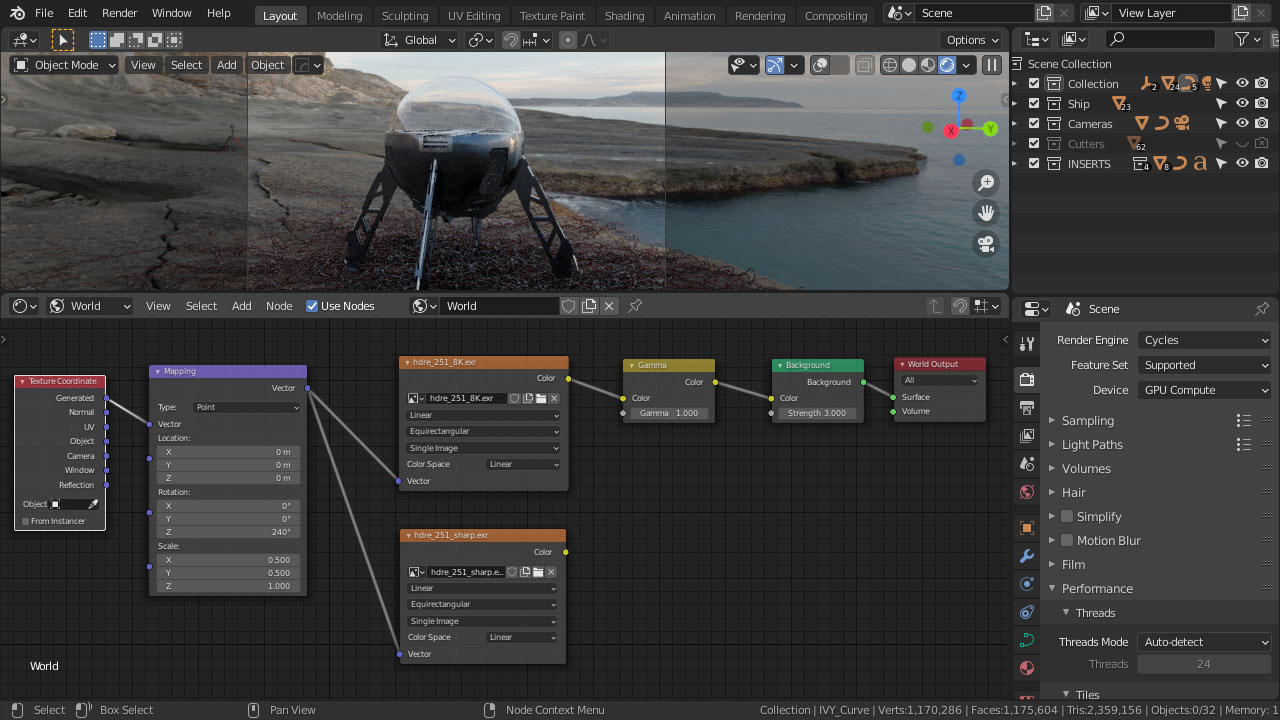
- Open Blender and Setup the Scene: Start Blender and open your project. Ensure you\"re in the \"Shading\" workspace for easier access to node editors.
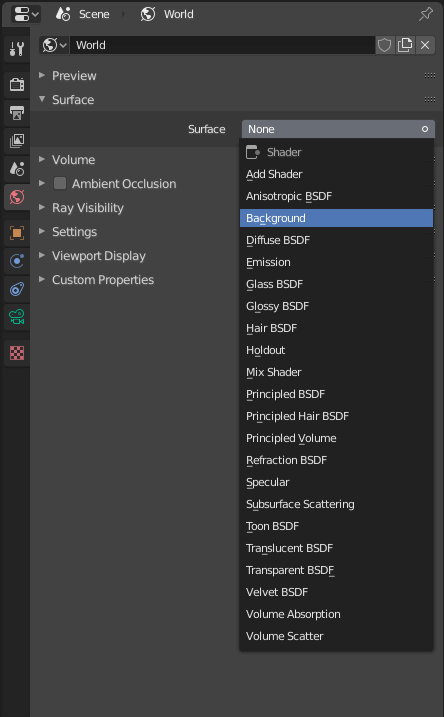
- Access the World Properties: In the \"World\" tab of the Properties Editor, find the \"Surface\" section.
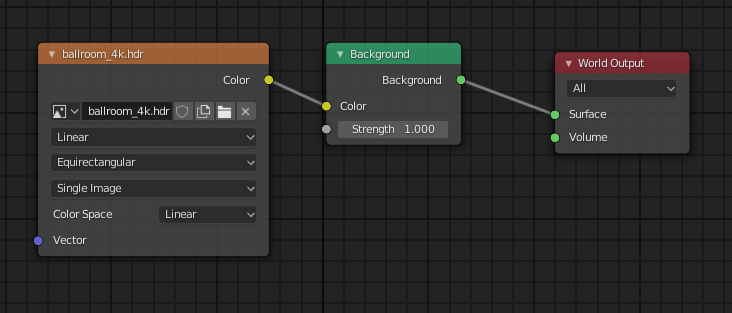
- Add Environment Texture: Click on the yellow dot next to \"Color\" and select \"Environment Texture\". Then, click \"Open\" to select your HDRI file.
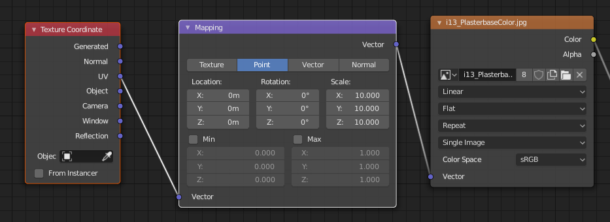
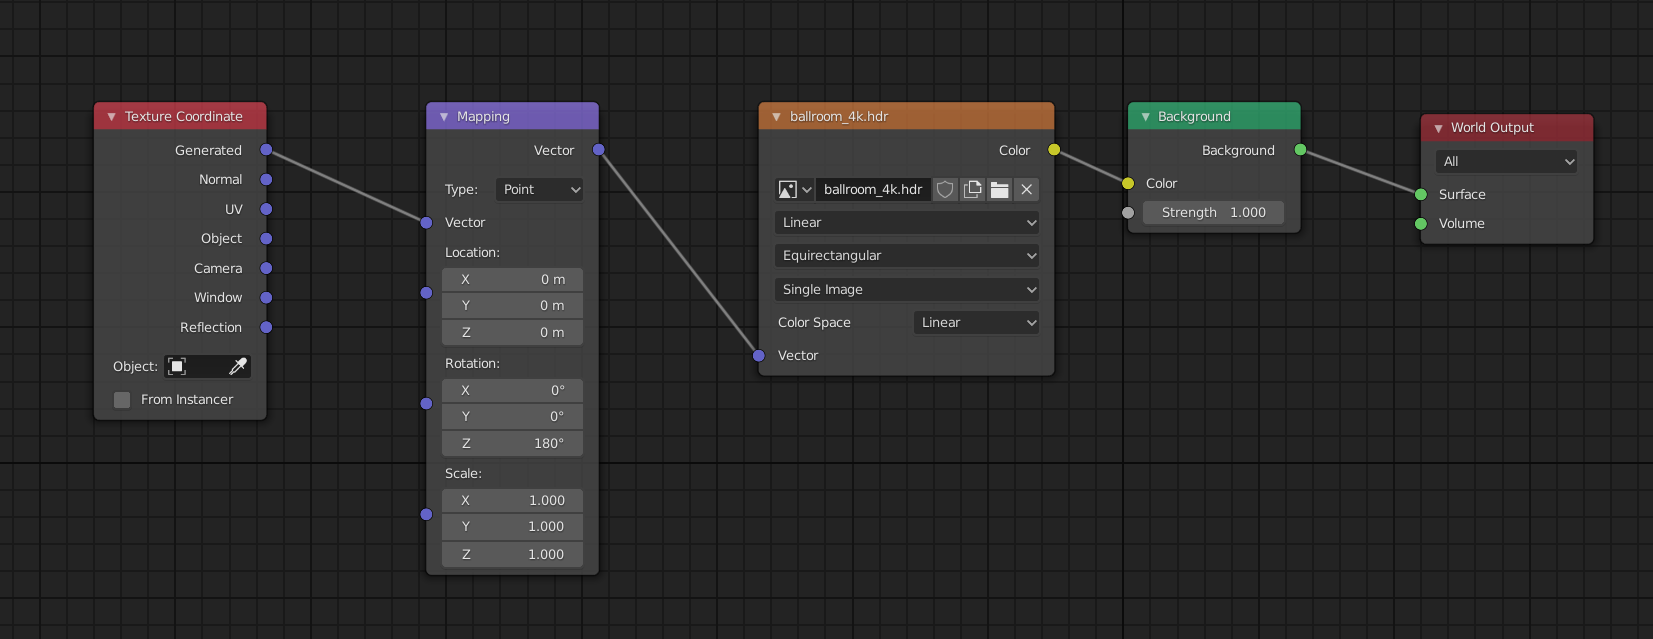
- Adjust the HDRI Settings: With the HDRI loaded, you can adjust its orientation and intensity. This might require adding a \"Mapping\" node and a \"Texture Coordinate\" node to your setup.
Tips for Effective HDRI Usage
- For better control over the HDRI orientation, connect a \"Mapping\" node between the Environment Texture and the World Output.
- Use a \"Texture Coordinate\" node set to \"Generated\" for more natural lighting effects.
- Adjust the strength of the HDRI in the \"World\" settings to balance the scene\"s lighting.

READ MORE:
Additional Resources
For those looking to dive deeper into HDRI settings and customization, consider exploring Blender add-ons such as HDRI Wizard, which offers enhanced control over HDRI settings including rotation, brightness, and color adjustments directly within the Blender interface.
Conclusion
Adding an HDRI background in Blender is a straightforward process that significantly enhances the realism of your 3D scenes. By following this guide and experimenting with different HDRI files and settings, you can achieve stunning, lifelike lighting and reflections in your renders.
Introduction to HDRI and Its Importance in Blender
High Dynamic Range Imaging (HDRI) plays a pivotal role in 3D visualization and rendering, offering enhanced realism through superior lighting and environmental effects. Utilizing HDRI in Blender empowers artists and designers to achieve more lifelike scenes with dynamic lighting and detailed reflections, mimicking real-world lighting conditions. This technique, leveraging images that contain a high range of luminance levels, allows for a more immersive and impactful visualization in 3D projects.
- HDRI offers unparalleled realism by accurately simulating how light interacts with objects, enhancing the overall quality of the render.
- It simplifies the lighting setup process, providing a comprehensive lighting solution that includes the sun, sky, and other ambient light sources.
- Using HDRI backgrounds can dramatically improve the ambiance of a scene, adding depth and a sense of place without the need for complex scene setups.
- HDRI is essential for creating realistic reflections and refractions on materials, significantly contributing to the believability of surfaces such as glass, water, and metal.
Integrating HDRI in Blender not only improves the aesthetic quality of renders but also streamlines the workflow for artists. By providing a single, comprehensive solution for both lighting and background, HDRI enables creators to focus more on composition and detail, pushing the boundaries of digital art and 3D design.
Step-by-Step Instructions on Adding HDRI in Blender
Adding HDRI (High Dynamic Range Imaging) to your Blender scenes can significantly enhance the realism and lighting quality. Here\"s a comprehensive guide to help you incorporate HDRI into your 3D projects:
- Start Blender and Select Your Scene: Open Blender and load the scene where you want to add the HDRI.
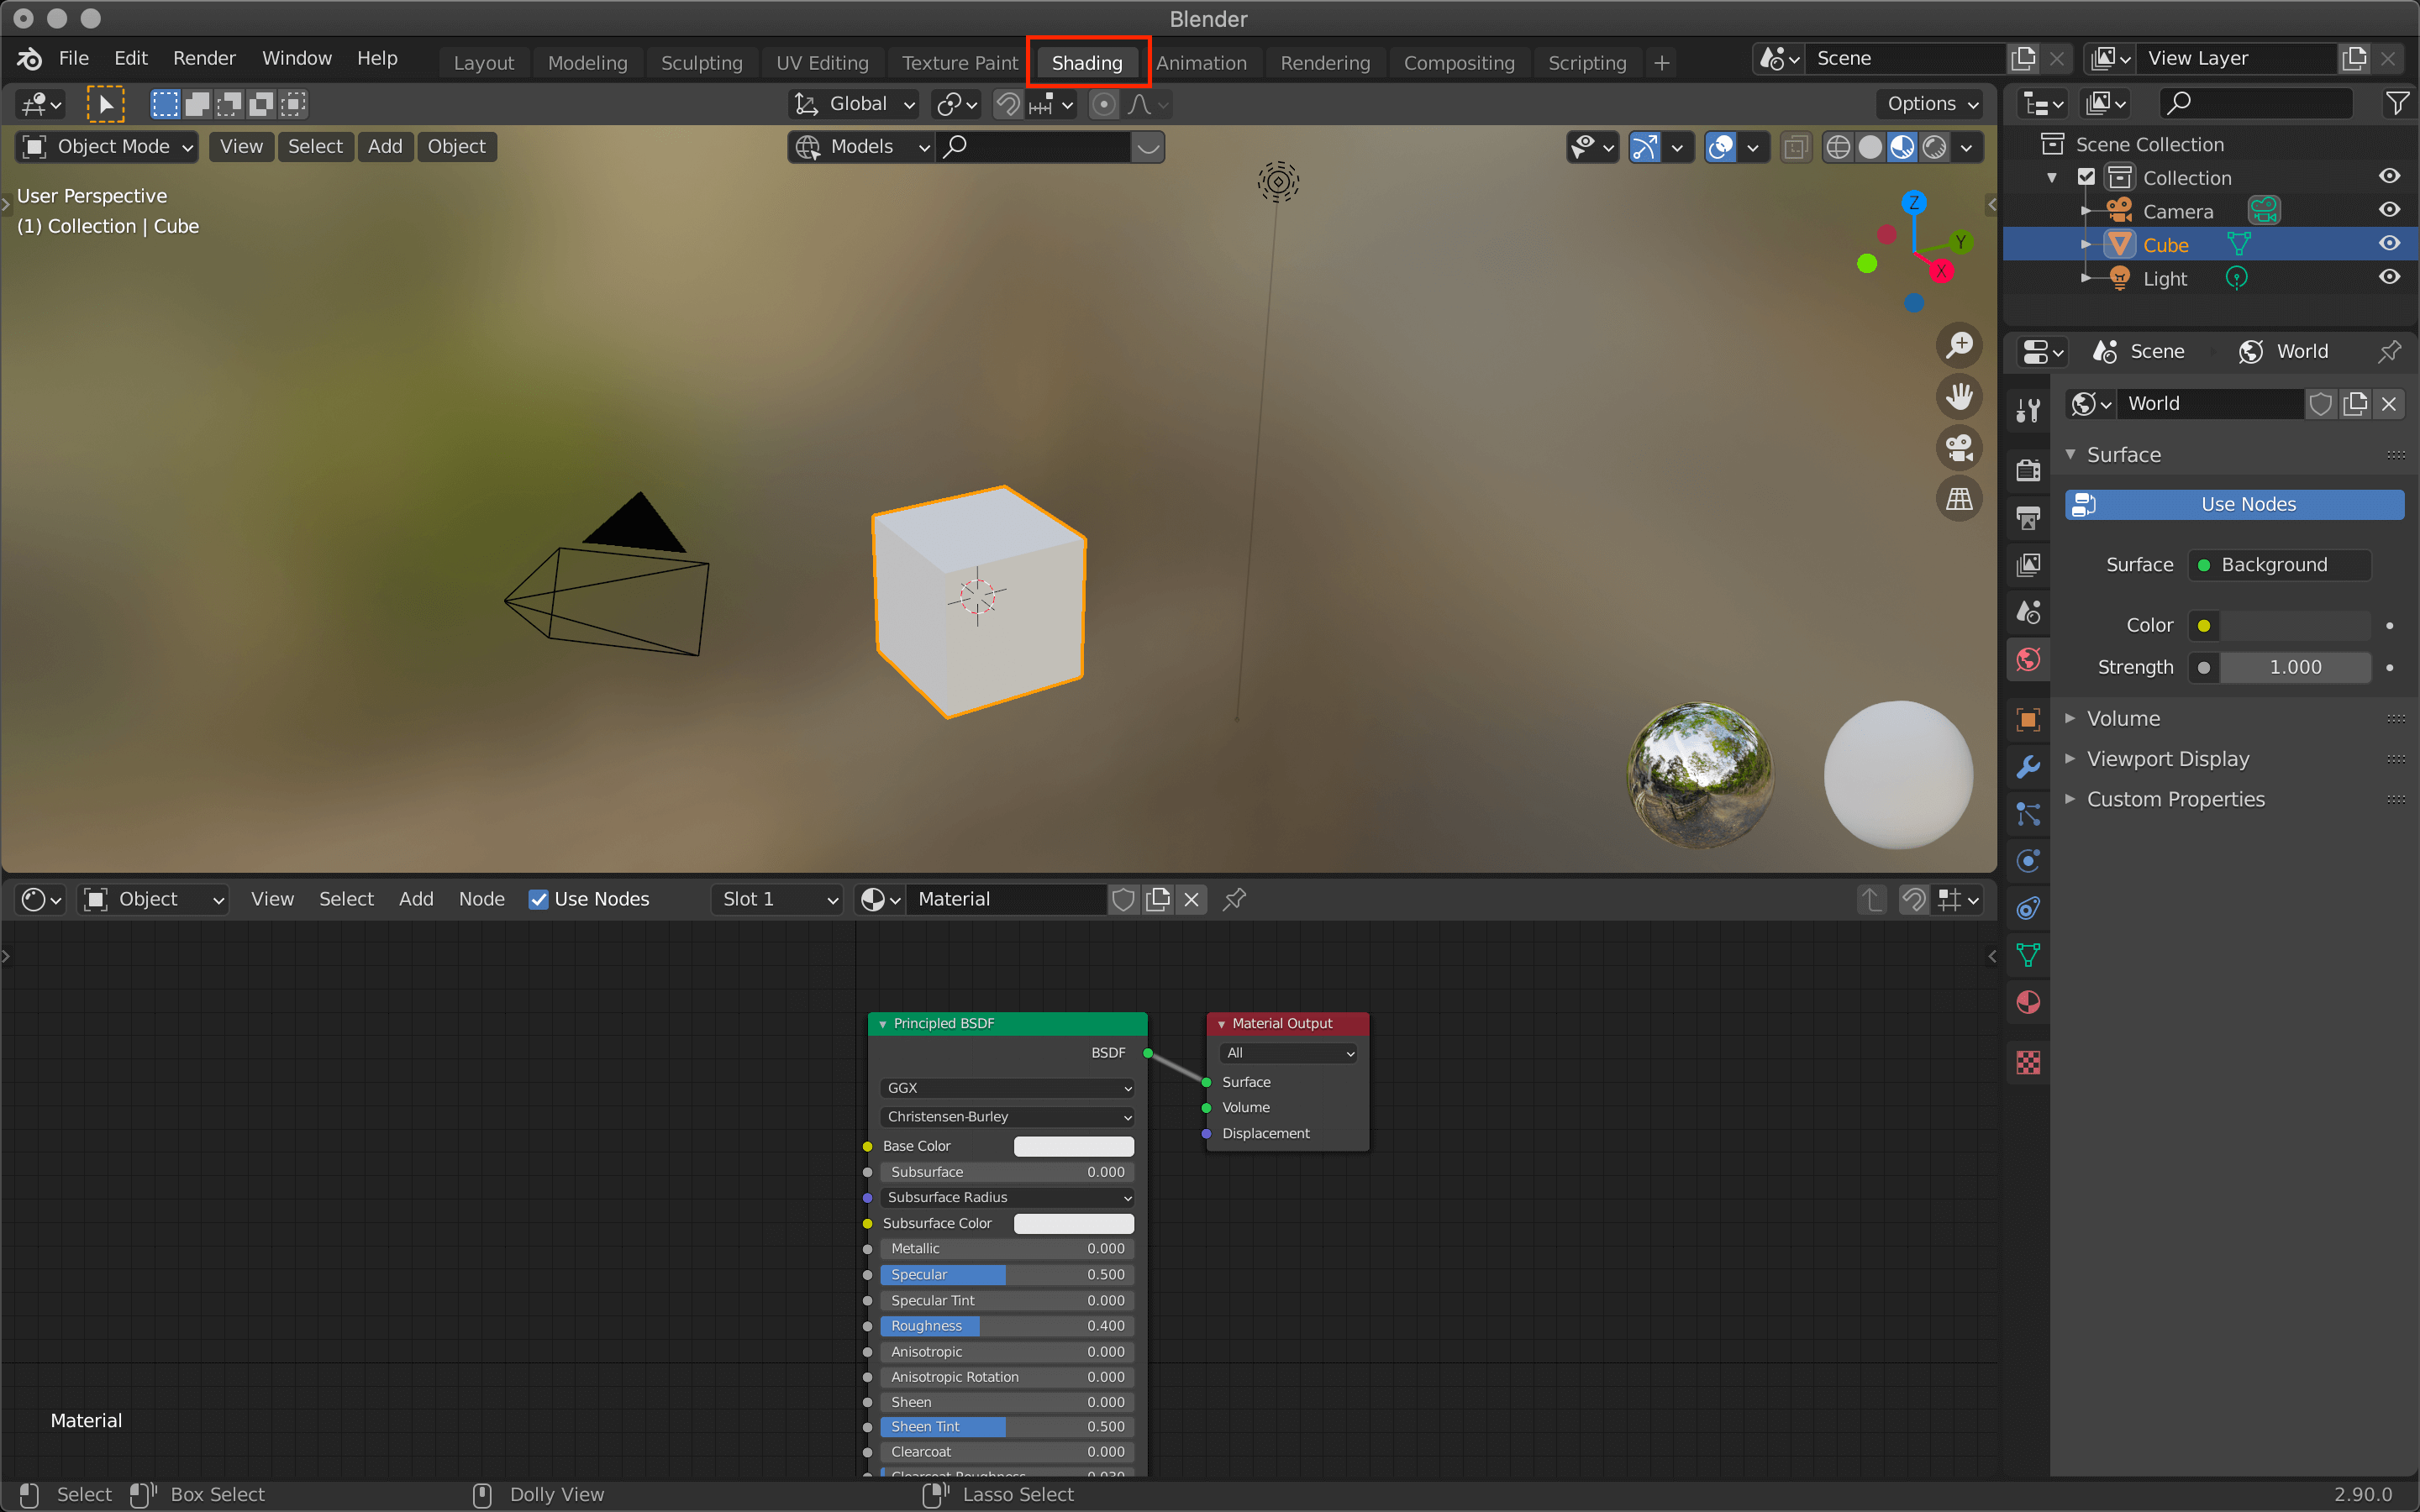
- Switch to the Shading Workspace: For easy access to shading options, switch to the Shading workspace from the top of the Blender interface.
- Access the World Settings: In the World properties tab, look for the Surface section and select the Color field.
- Add Environment Texture: Click on the dot next to the Color option and select \"Environment Texture\". Then, click \"Open\" to browse and select your HDRI file.
- Adjust Your HDRI: With your HDRI now set as the environment texture, you can adjust its rotation, scale, and intensity. This may involve adding a Mapping node and a Texture Coordinate node to fine-tune the HDRI settings to your liking.
- Preview Your Scene: Switch to rendered view to see how the HDRI affects your scene\"s lighting and reflections. Make further adjustments as needed to achieve your desired effect.
By following these steps, you can effectively add HDRI to your Blender scenes, enhancing the lighting and overall realism of your renders. Experiment with different HDRI images and settings to find the perfect mood and lighting for your projects.
_HOOK_
How to add HDRI in Blender for realistic lighting effects?
To add HDRI in Blender for realistic lighting effects, follow these steps:
- Open Blender and select the shading workspace.
- Go to the World tab in the Shader Editor.
- Click on the Use Nodes checkbox to enable node editing for the world.
- Click on the yellow circle button next to the Color input and choose Environment Texture.
- Click on Open and select the HDRI image you want to use for lighting.
- Connect the Color output of the Environment Texture node to the Color input of the Background node.
- You can adjust the strength of the HDRI by changing the value in the Strength input of the Background node.
- Switch to the Rendered view to see the realistic lighting effects of the HDRI in your scene.
Choosing the Right HDRI for Your Project
Choosing the appropriate HDRI (High Dynamic Range Imaging) for your Blender project is crucial for achieving the desired atmospheric effect and lighting. Here are some tips to help you select the best HDRI for your specific needs:
- Consider the Scene’s Atmosphere: Select an HDRI that matches the mood and setting of your scene. For instance, a sunny sky for outdoor scenes, or an industrial environment for urban settings.
- Look at the Dynamic Range: A higher dynamic range allows for more realistic lighting and shadow details. Choose HDRIs with a wide range of luminance levels.
- Resolution Matters: Higher resolution HDRIs provide more detail and better quality reflections. However, they also require more memory. Balance quality with performance based on your project\"s requirements.
- Compatibility with Your Scene: Ensure the HDRI’s lighting direction and source match the orientation and lighting setup of your 3D models and scene.
- Free vs. Paid HDRIs: There are many free HDRI resources available that offer quality images for various types of projects. However, paid HDRIs often provide unique and high-quality options for more demanding or specific needs.
Experimenting with different HDRIs can significantly impact the realism and emotional tone of your project. Take the time to test how each HDRI affects the lighting, shadows, and reflections in your scene to find the perfect match for your creative vision.
How to Add HDRi Environment Texture in Blender 2.92
Experience the mesmerizing world of HDRi in all its glory with our jaw-dropping video showcasing the stunning dynamic range and vivid colors that will transport you to another dimension.
Blender 3.4 How to Setup an HDRI Environment Background
Dive into the captivating realm of backgrounds with our visually captivating video that will inspire and elevate your creative projects, offering a plethora of options to enhance your visual storytelling.
Adjusting HDRI Settings for Realistic Lighting and Reflections
After adding an HDRI to your Blender project, fine-tuning its settings is crucial for achieving the most realistic lighting and reflections. Follow these steps to adjust your HDRI settings effectively:
- Adjust the Strength: In the World settings, you can modify the HDRI\"s strength to control the overall brightness and impact of the environment lighting on your scene.
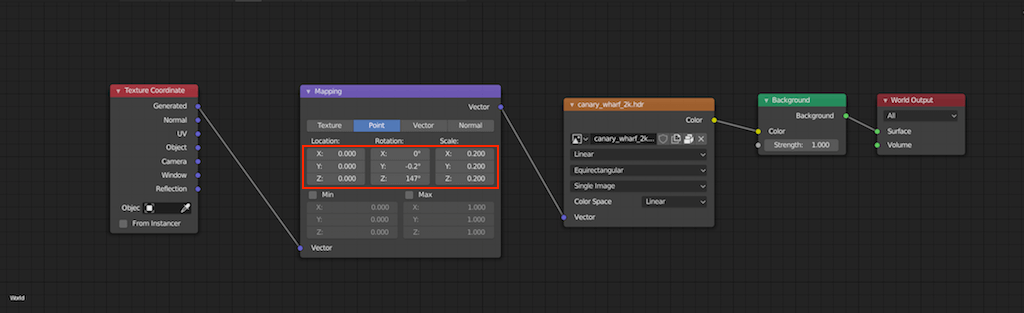
- Rotate the HDRI: To change the direction of the light and shadows, add a Mapping node in the Shader Editor and adjust the rotation values. This allows you to align the HDRI\"s lighting with your scene.
- Scale the HDRI: Using the same Mapping node, you can also scale the HDRI to adjust how it wraps around your scene, affecting the appearance of the background and reflections.
- Change the Location: Although less commonly needed, you can shift the HDRI\"s position relative to your scene for precise alignment or to achieve specific lighting effects.
- Use Nodes for Enhanced Control: For more advanced adjustments, combining Texture Coordinate and Mapping nodes provides you with detailed control over the orientation and scale of your HDRI.
- Apply Color Adjustments: To further integrate the HDRI with your scene\"s mood, consider tweaking its hue, saturation, and value using the Hue/Saturation node.
Experimenting with these settings allows you to maximize the potential of HDRI in Blender, creating scenes with rich, lifelike lighting and reflections that enhance the realism of your renders.

Advanced Techniques: Enhancing Scenes with HDRI
To take your Blender scenes to the next level with HDRI, incorporating advanced techniques can significantly boost the realism and visual appeal of your renders. Here are some sophisticated methods to enhance your scenes using HDRI:
- Blending Multiple HDRIs: For dynamic lighting effects, consider blending two or more HDRIs. This can create a more complex lighting scenario, mimicking different times of the day or weather conditions within a single render.
- Adjusting HDRI with Nodes: Utilize the Node Editor to tweak the HDRI\"s properties, such as brightness, contrast, and saturation, to better match the mood of your scene. This can also include color grading the HDRI to fit a specific time of day or lighting condition.
- Creating Depth of Field: Simulate a more realistic depth by applying a depth of field effect. This can help focus the viewer\"s attention on specific parts of the scene while using the HDRI to create a natural-looking background.
- Using HDRI for Reflections: Beyond lighting, HDRIs can be instrumental in achieving realistic reflections on surfaces. Adjust the roughness and specularity of materials to capture the subtle nuances of reflections created by the HDRI environment.
- Animating HDRI Settings: For dynamic scenes, consider animating the HDRI\"s properties, such as rotation or intensity, to simulate changing lighting conditions over time, adding a layer of realism and engagement to your animations.
By mastering these advanced HDRI techniques in Blender, you can significantly enhance the atmospheric and visual depth of your 3D scenes, leading to more immersive and compelling renders.
Common Issues and Solutions When Adding HDRI in Blender
While integrating HDRI into Blender enhances your scenes, you might encounter some common issues. Here are solutions to ensure a smooth process:
- HDRI Not Showing in the Background: Ensure you\"re in the rendered view mode. If it still doesn\"t appear, check the World settings to confirm the environment texture is correctly linked.
- Lighting Appears Flat or Dull: Increase the strength of the HDRI in the World settings. Adjusting the contrast and saturation can also add more depth to the lighting.
- Incorrect Orientation of Shadows: Use a Mapping node connected to the HDRI texture to rotate the environment. This allows you to align the lighting with your scene\"s perspective.
- Performance Issues with High-Resolution HDRIs: For a smoother workflow, consider using a lower resolution HDRI during the setup phase. Switch to a higher resolution only for final renders.
- HDRI Reflections Are Too Strong or Unrealistic: Modify the material properties of objects in your scene, especially the roughness values, to achieve more natural reflections.
Addressing these common issues will help you better utilize HDRI in Blender, leading to more realistic and visually appealing renders.
_HOOK_
Recommended Resources for Free HDRI Downloads
Finding high-quality HDRI maps for your Blender projects can be easy and cost-effective with these recommended resources. Each site offers a variety of HDRIs suitable for different types of scenes, from natural landscapes to urban settings:
- HDRI Haven: A popular choice among Blender users, offering a wide range of free HDRIs, all available in high resolution.
- CG Bookcase: Provides a collection of free HDRIs, including outdoor and studio environments, with new additions regularly.
- Texture Haven: Alongside textures, this site offers free HDRIs. It\"s a great resource for finding high-quality environmental textures and maps.
- Unsplash: While not specifically for HDRIs, Unsplash offers high-quality, free images that can be converted into HDRIs for Blender projects.
- BlenderNation: Occasionally features collections of free HDRIs or links to resources where artists can download them.
These resources provide a solid starting point for sourcing HDRIs, enhancing your Blender scenes without the need for a budget. Remember to check the usage rights for each resource to ensure your project complies with their guidelines.
READ MORE:
Conclusion: Transforming Your 3D Renders with HDRI
Integrating HDRI into your Blender projects can significantly elevate the quality and realism of your 3D renders. By providing detailed, dynamic lighting and reflections, HDRI helps in creating more immersive and visually appealing scenes. The process, from selecting the right HDRI to adjusting its settings, enhances not only the aesthetic appeal but also the depth and atmosphere of your renders. The availability of high-quality, free HDRI resources further ensures that artists can experiment and innovate without constraints, pushing the boundaries of digital art and 3D visualization. Embracing HDRI in Blender opens up a world of creative possibilities, allowing you to bring your visions to life with greater realism and impact.
Embrace the power of HDRI in Blender to revolutionize your 3D renders, unlocking unparalleled realism and depth. This guide illuminates the path to breathtaking visuals, transforming your creative workflow and elevating your projects.