Topic blender rotate hdri: Discover how to enhance your 3D art by mastering the technique of rotating HDRI in Blender, unlocking realistic lighting and breathtaking backgrounds for your scenes.
Table of Content
- Basic Steps for HDRI Rotation
- Adjusting HDRI Rotation
- Additional Tips and Tricks
- Conclusion
- Adjusting HDRI Rotation
- Additional Tips and Tricks
- Conclusion
- Additional Tips and Tricks
- Conclusion
- Conclusion
- What is the process for rotating an HDRI in Blender?
- Introduction to HDRI Rotation in Blender
- YOUTUBE: Blender 2.8 How to Rotate an HDRI Environment Background
- Step-by-Step Guide to Rotating HDRI
- Adjusting the Rotation Axis for Precise Control
- Utilizing Addons for Easier HDRI Manipulation
- Linking HDRI Rotation to Object Movement
- Common Challenges and Solutions
- Advanced Techniques for Realistic Lighting Effects
- Conclusion: Enhancing Your 3D Projects with Rotated HDRI
Basic Steps for HDRI Rotation
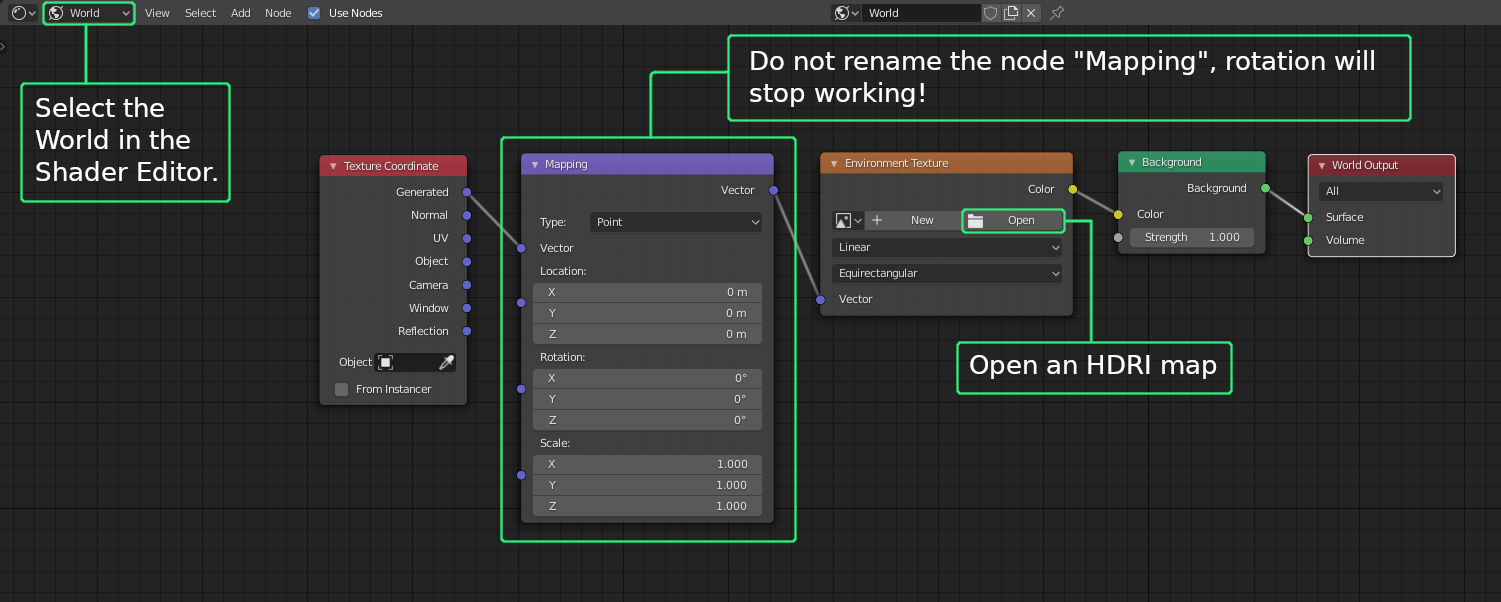
- Open the Shading workspace and switch to the World tab.
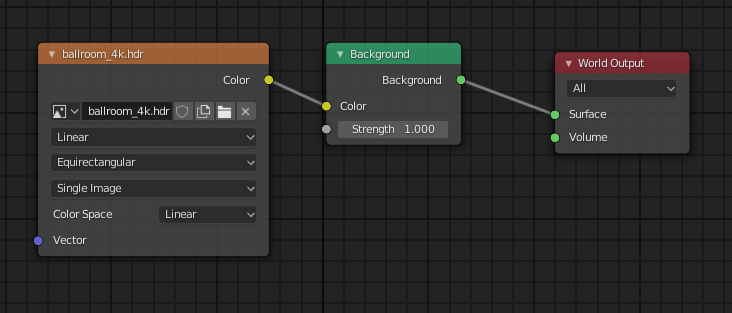
- Add your HDRI image using the Environment Texture node.
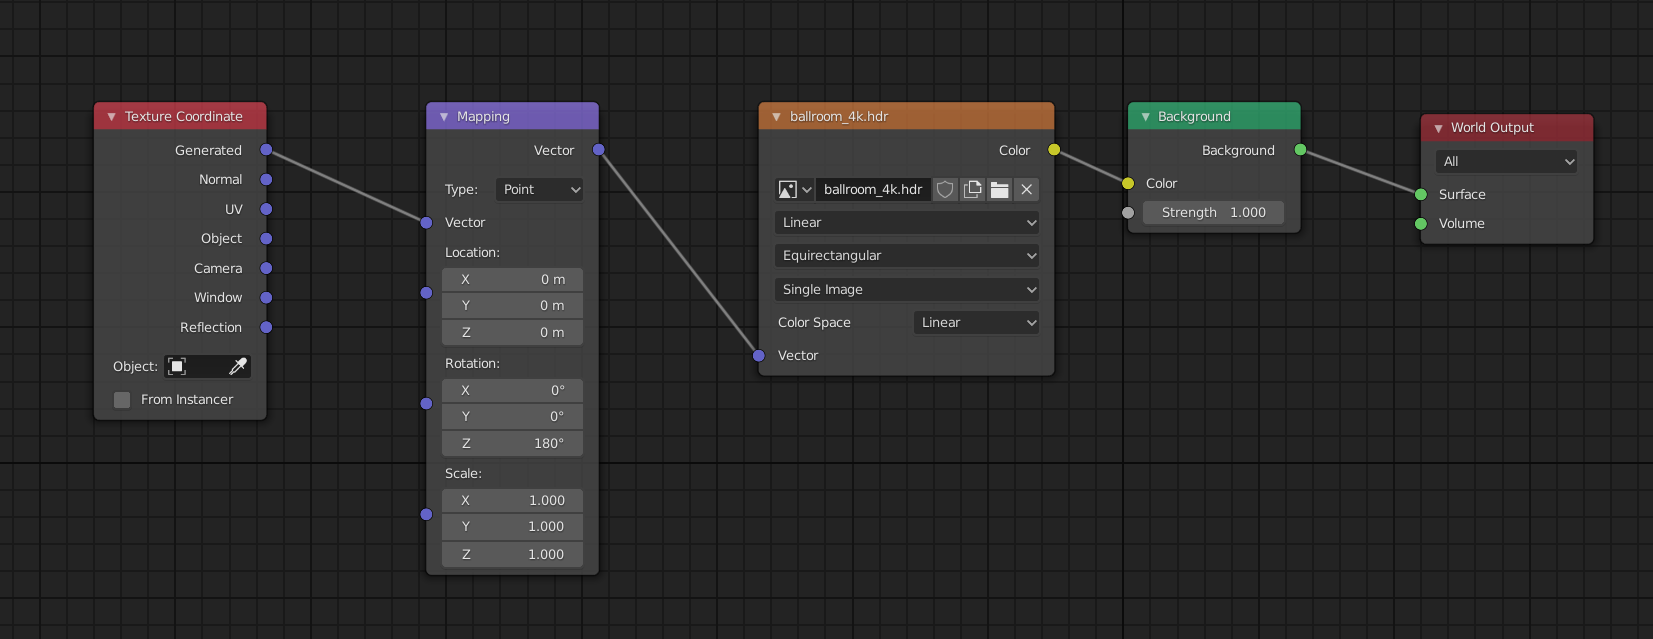
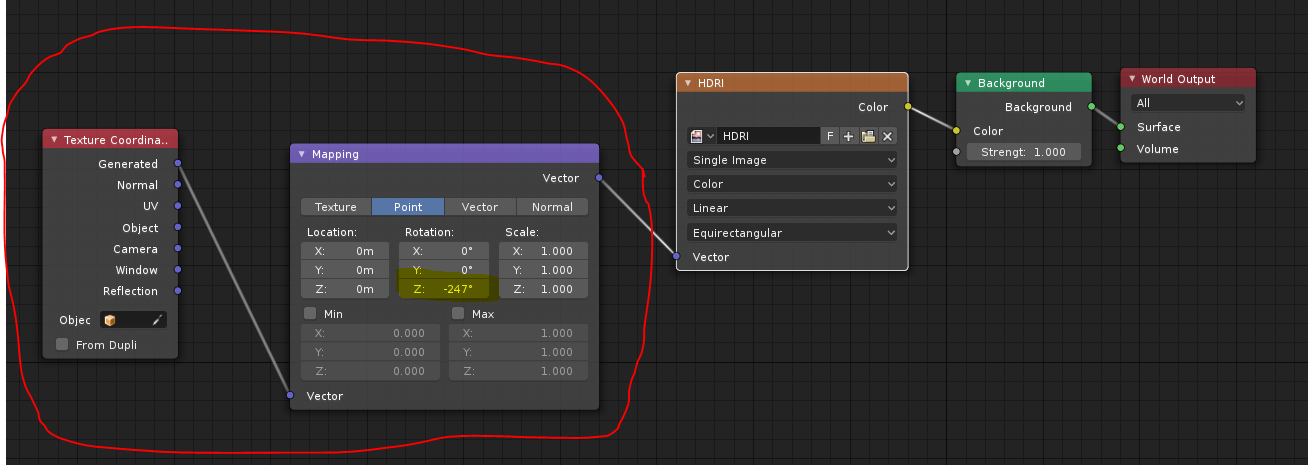
- Insert a Texture Coordinate node (from Input) and a Mapping node (from Vector).
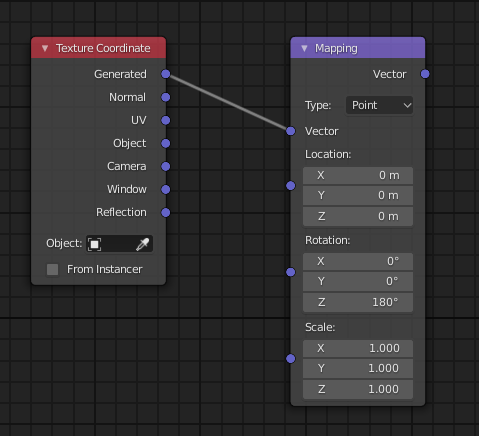
- Connect the Generated output of the Texture Coordinate to the Vector input of the Mapping node.
- Adjust the Z rotation value in the Mapping node to rotate the HDRI.
READ MORE:
Adjusting HDRI Rotation
For precise control over the HDRI rotation, focus on the Mapping node\"s rotation controls. Typically, rotation along the Z axis is used for spinning the HDRI without tilting it. However, X and Y axis rotations are available for achieving specific tilts or angles.
Additional Tips and Tricks
- To quickly rotate HDRI maps, consider using addons that enable rotation through shortcut keys, such as CTRL + ALT and mouse drag.
- For more advanced scenarios, rotating an HDRI can be linked to an object\"s rotation, allowing for dynamic adjustments within the scene.
Conclusion
Rotating an HDRI in Blender is an essential skill for 3D artists, allowing for the customization of lighting and background in renders. By following these steps and experimenting with the controls, you can achieve the desired atmosphere and realism in your projects.
Adjusting HDRI Rotation
For precise control over the HDRI rotation, focus on the Mapping node\"s rotation controls. Typically, rotation along the Z axis is used for spinning the HDRI without tilting it. However, X and Y axis rotations are available for achieving specific tilts or angles.

_HOOK_
Additional Tips and Tricks
- To quickly rotate HDRI maps, consider using addons that enable rotation through shortcut keys, such as CTRL + ALT and mouse drag.
- For more advanced scenarios, rotating an HDRI can be linked to an object\"s rotation, allowing for dynamic adjustments within the scene.
Conclusion
Rotating an HDRI in Blender is an essential skill for 3D artists, allowing for the customization of lighting and background in renders. By following these steps and experimenting with the controls, you can achieve the desired atmosphere and realism in your projects.

Conclusion
Rotating an HDRI in Blender is an essential skill for 3D artists, allowing for the customization of lighting and background in renders. By following these steps and experimenting with the controls, you can achieve the desired atmosphere and realism in your projects.
_HOOK_
What is the process for rotating an HDRI in Blender?
To rotate an HDRI in Blender, follow these steps:
- Open Blender and navigate to the Shading Tab.
- Select the World tab to access the settings for the world/background.
- Click on the \"Color\" box next to the Background and select \"Environment Texture\".
- Click on the button next to the \"Color\" field to open the file browser and select your HDRI image.
- To rotate the HDRI, locate the \"Mapping\" section under the \"Vector\" tab.
- Adjust the \"Rotation\" values (X, Y, Z) to rotate the HDRI as desired.
- You can experiment with different rotation values until you achieve the desired effect.
- Once you are satisfied with the rotation, you can proceed with your rendering or further adjustments.
Introduction to HDRI Rotation in Blender
Rotating High Dynamic Range Images (HDRI) in Blender offers unparalleled realism and depth to 3D scenes. This technique allows artists to simulate various lighting conditions and backgrounds, enhancing the visual appeal of their projects. Understanding how to effectively rotate HDRI maps is crucial for achieving desired atmospheric effects and integrating 3D models seamlessly into their environments.
HDRI rotation in Blender involves manipulating the environment background to align lighting and reflections according to the scene\"s requirements. This process is essential for artists looking to create photorealistic renders or those aiming to match the lighting of their 3D models with background images.
- Open Blender and switch to the Shading workspace.
- In the World properties, add an Environment Texture and select your HDRI file.
- To rotate the HDRI, use the Mapping node connected between the Environment Texture and the World Output.
- Adjust the Z rotation axis in the Mapping node to align the HDRI with your scene.
This initial step into HDRI rotation opens up a world of possibilities for enhancing your 3D artwork, making it a foundational skill for any Blender artist.
Blender 2.8 How to Rotate an HDRI Environment Background
Rotate: Watch this mesmerizing video showcasing the beauty of nature as the camera gracefully rotates, capturing every angle and detail. Let yourself be swept away by the stunning visuals and immerse in the magical world presented. HDRI: Immerse yourself in the world of High Dynamic Range Imaging through this captivating video. Experience the stunning visuals and vibrant colors in high definition like never before. Witness the true essence of realism in every frame.
Blender How to Rotate HDRI Environment Texture EASY
Download my FAVORITE Dispersion Glass Shader: https://gumroad.com/a/736075475/bljae Download my FAVORITE Materials: ...
Step-by-Step Guide to Rotating HDRI
Rotating an HDRI in Blender is a simple yet powerful technique to adjust the lighting and ambiance of your 3D scenes. Follow this detailed step-by-step guide to seamlessly integrate your models with their environments using HDRI maps.
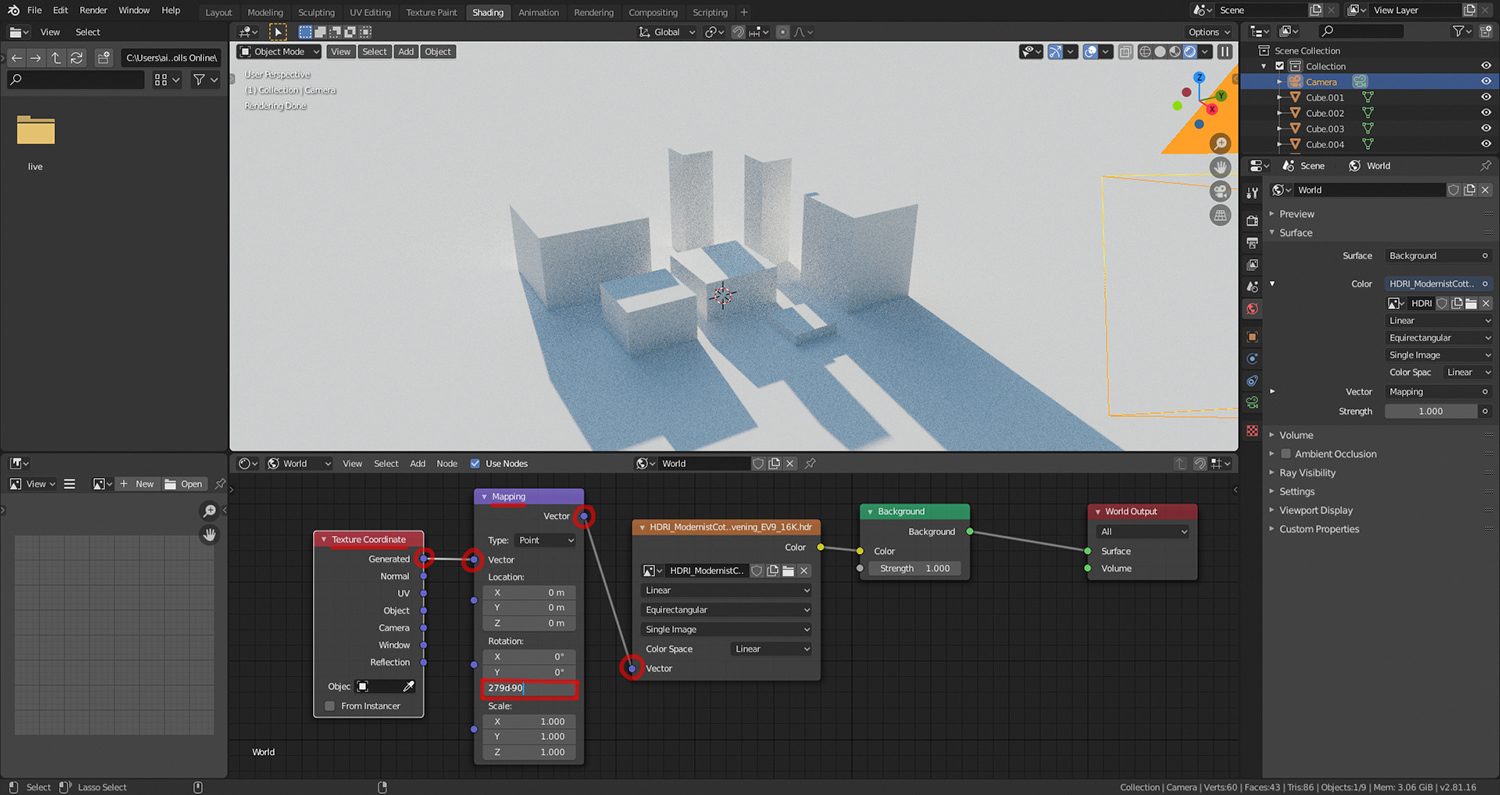
- Open Blender and Select the Shading Workspace: Start by opening Blender and switching to the Shading layout to access the nodes setup for world environment.
- Add an HDRI Image: In the World tab, use the Environment Texture node to load your HDRI image. This will be your scene\"s global lighting and background.
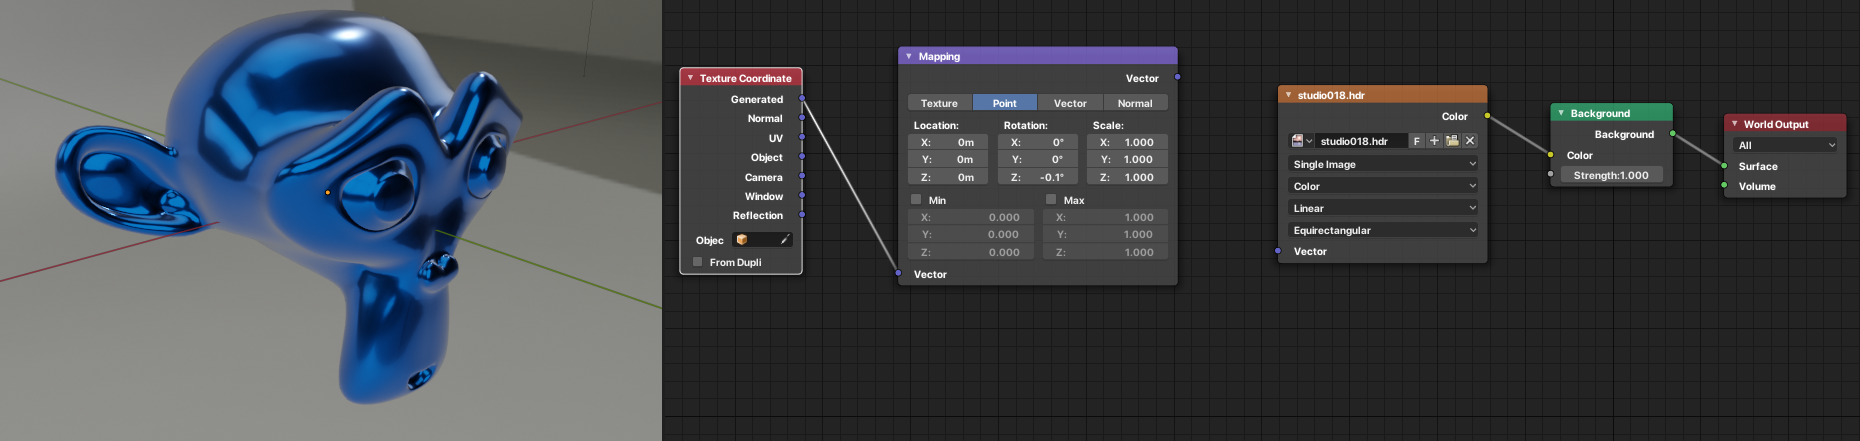
- Set Up the Nodes: Connect a Mapping node between the Environment Texture and the World Output. Also, add a Texture Coordinate node and link its Generated output to the Mapping node\"s Vector input. This setup allows for precise control over the HDRI\"s orientation.
- Rotate the HDRI: Within the Mapping node, adjust the rotation values. Typically, the Z-axis rotation alters the HDRI\"s horizontal alignment, which is most common for adjusting the lighting direction and background orientation.
- Preview and Adjust: As you make changes, preview the effect in the viewport. Adjust the rotation values as needed to achieve the desired lighting and background positioning.
This process not only enhances the realism of your scenes but also gives you creative control over the atmosphere and mood. Mastering HDRI rotation can significantly improve the visual quality of your 3D projects.
Adjusting the Rotation Axis for Precise Control
For artists seeking refined control over their scene\"s lighting and background alignment, adjusting the HDRI rotation axis in Blender is key. This section explores how to manipulate each axis for precise positioning of your environment texture.
- Understanding the Axes: Blender\"s Mapping node offers rotation controls for three axes: X, Y, and Z. The Z-axis typically controls the horizontal rotation, while the X and Y axes adjust the vertical orientation and tilt.
- Horizontal Rotation (Z-Axis): To rotate your HDRI around the scene horizontally, modify the Z-axis value in the Mapping node. This adjustment is crucial for aligning the sun or light direction with your scene.
- Vertical Adjustment (X-Axis): Altering the X-axis value tilts the HDRI forward or backward, helping to match the perspective of your scene with the environment.
- Lateral Tilt (Y-Axis): Adjusting the Y-axis value tilts the HDRI left or right. This can be used to simulate different times of day or to achieve specific lighting angles.
- Combining Axes for Complex Rotations: For more nuanced control, combine adjustments across different axes. This allows for the precise matching of HDRI lighting with the 3D models and scene setup.
By fine-tuning the rotation along these axes, artists can achieve a harmonious balance between their 3D models and the HDRI, enhancing the overall realism and depth of the scene.
Utilizing Addons for Easier HDRI Manipulation
Blender\"s functionality can be significantly enhanced with addons, making HDRI manipulation more intuitive and efficient. This section highlights key addons that streamline the process of rotating and adjusting HDRI environments.
- HDRI Sun Aligner: This addon simplifies the process of aligning the HDRI\"s sun position with your scene\"s lighting. It offers a user-friendly interface for adjusting the sun\"s angle directly within the viewport.
- Node Wrangler: While not specifically designed for HDRI manipulation, Node Wrangler includes features that facilitate easier connection and adjustment of nodes, including those used for HDRI rotation.
- Easy HDRI: Easy HDRI automates the process of loading and manipulating HDRI maps in Blender. It provides quick access to a library of HDRIs and intuitive controls for rotation and intensity.
- Gaffer: Gaffer is a lighting management addon that allows for fine-tuned control over HDRI environments. It features an intuitive interface for adjusting the rotation, scale, and intensity of HDRI maps.
Integrating these addons into your workflow can save time and enhance creativity, allowing for more dynamic and realistic lighting setups in your 3D projects.
_HOOK_
Linking HDRI Rotation to Object Movement
Creating dynamic and interactive 3D scenes often involves linking HDRI rotation to object movement, allowing for a more immersive and realistic environment. This technique can enhance the perception of depth and movement within a scene, making it especially useful for animation and virtual reality projects.
- Use Drivers for Dynamic Interaction: Blender\"s drivers can be used to link the rotation values of an HDRI to the movement or rotation of an object. This creates a responsive environment that adjusts its lighting based on object positions.
- Setting Up Drivers: Right-click on the rotation value in the Mapping node and choose \"Add Drivers\". Then, link this driver to the property of the moving object, such as its rotation axis.
- Adjusting Driver Settings: In the Graph Editor, fine-tune the driver settings to control how the HDRI rotation responds to object movement. This includes setting the type of influence and the rate of rotation change.
- Testing and Tweaking: Test the interaction by moving the linked object and observing the HDRI rotation. Adjust the driver settings as needed to achieve the desired effect.
This advanced technique not only adds a layer of realism to your scenes but also opens up new possibilities for creative storytelling and scene composition in Blender.
Common Challenges and Solutions
Working with HDRI rotation in Blender can sometimes present challenges, especially for beginners. This section addresses common issues and provides practical solutions to help you navigate through them smoothly.
- Challenge: Difficulty Aligning HDRI with Scene: Sometimes, getting the HDRI to align perfectly with your 3D scene can be tricky. Solution: Use precise rotation values in the Mapping node and consider employing addons like HDRI Sun Aligner for better alignment.
- Challenge: Lighting Does Not Match Scene Requirements: The HDRI lighting might not always match the mood or time of day for your scene. Solution: Adjust the intensity and color of the HDRI using the nodes in the Shading workspace, or select a different HDRI that better suits your needs.
- Challenge: Seamless Integration with Foreground Elements: Integrating HDRI backgrounds with foreground elements can sometimes result in inconsistencies. Solution: Use Blender\"s compositing tools to blend the elements more naturally, adjusting shadows and reflections as needed.
- Challenge: Performance Issues with High-Resolution HDRIs: High-resolution HDRI maps can slow down Blender\"s performance. Solution: Use lower resolution versions of your HDRIs during the setup phase, switching to high-resolution maps only for final renders.
Overcoming these challenges can significantly improve the realism and quality of your 3D projects, making the effort well worth it.
Advanced Techniques for Realistic Lighting Effects
Enhancing your 3D scenes with realistic lighting effects using HDRI rotation in Blender can elevate your artwork to new heights. This section delves into advanced techniques that can help achieve stunning, lifelike lighting and atmosphere in your renders.
- Using Light Portals for Indoor Scenes: Light portals can be used in conjunction with HDRI to improve the lighting of indoor scenes. They help direct the HDRI light more effectively into the scene, enhancing realism in enclosed environments.
- Adjusting HDRI Exposure and Contrast: For more dynamic lighting, tweak the exposure and contrast settings of your HDRI in the Shading workspace. This can help accentuate the mood and depth of your scenes.
- Creating Custom HDRIs for Specific Lighting Conditions: Sometimes, the best way to achieve the perfect lighting is by creating custom HDRIs. Blender allows you to stitch together multiple images to create an HDRI that matches your specific needs.
- Animating HDRI for Time-Lapse Effects: Animate the rotation and intensity of your HDRI to simulate time passing in your scene. This technique is great for showing transitions from day to night or for showcasing different lighting conditions over time.
- Layering Multiple HDRIs: For complex lighting setups, consider layering multiple HDRIs. This can be done by using the Mix Shader in Blender, allowing for the combination of different lighting environments within a single scene.
Applying these advanced techniques can significantly enhance the realism of your 3D renders, providing viewers with a more immersive and engaging experience.
READ MORE:
Conclusion: Enhancing Your 3D Projects with Rotated HDRI
Mastering the technique of rotating HDRI in Blender opens up a world of possibilities for 3D artists. By precisely controlling the lighting and background environments, you can bring a new level of realism and immersion to your projects. Whether you\"re working on still renders, animations, or interactive scenes, the ability to manipulate HDRI maps effectively can dramatically enhance the visual impact of your work.
- Experiment with different HDRI maps and rotation settings to find the perfect lighting for your scene.
- Utilize addons and Blender\"s built-in tools to streamline the HDRI manipulation process.
- Remember to consider performance, and use lower resolution maps for quicker previews before switching to high-resolution for final renders.
- Keep exploring advanced techniques and integrating them into your workflow for even more stunning results.
As you continue to explore and apply these strategies, your skill in creating compelling, lifelike scenes will grow, making your 3D projects stand out in the vast world of digital art.
Unlock the full potential of your 3D art by mastering HDRI rotation in Blender, enhancing your scenes with dynamic lighting and realistic environments that captivate and inspire.