Topic how to rotate hdri in blender: Discover the secrets of effortlessly rotating HDRI in Blender, enhancing your 3D projects with dynamic lighting and realistic environments. Master this crucial skill to bring your creative visions to life with stunning realism.
Table of Content
- Adding and Adjusting HDRI in Blender
- Rotating the HDRI
- Rotating the HDRI
- Introduction to HDRI in Blender
- How can I rotate an HDRI in Blender?
- Step-by-Step Guide to Adding an HDRI
- YOUTUBE: Blender 2.8 How to Rotate an HDRI Environment Background
- Understanding the Mapping Node for HDRI Rotation
- Adjusting HDRI Rotation: Tips and Techniques
- Advanced Techniques for HDRI Manipulation
- Common Issues and Solutions in HDRI Rotation
- Optimizing Your Workflow for HDRI in Blender
- Real-World Applications of HDRI Rotation
- Conclusion: Enhancing Your 3D Projects with HDRI
Adding and Adjusting HDRI in Blender
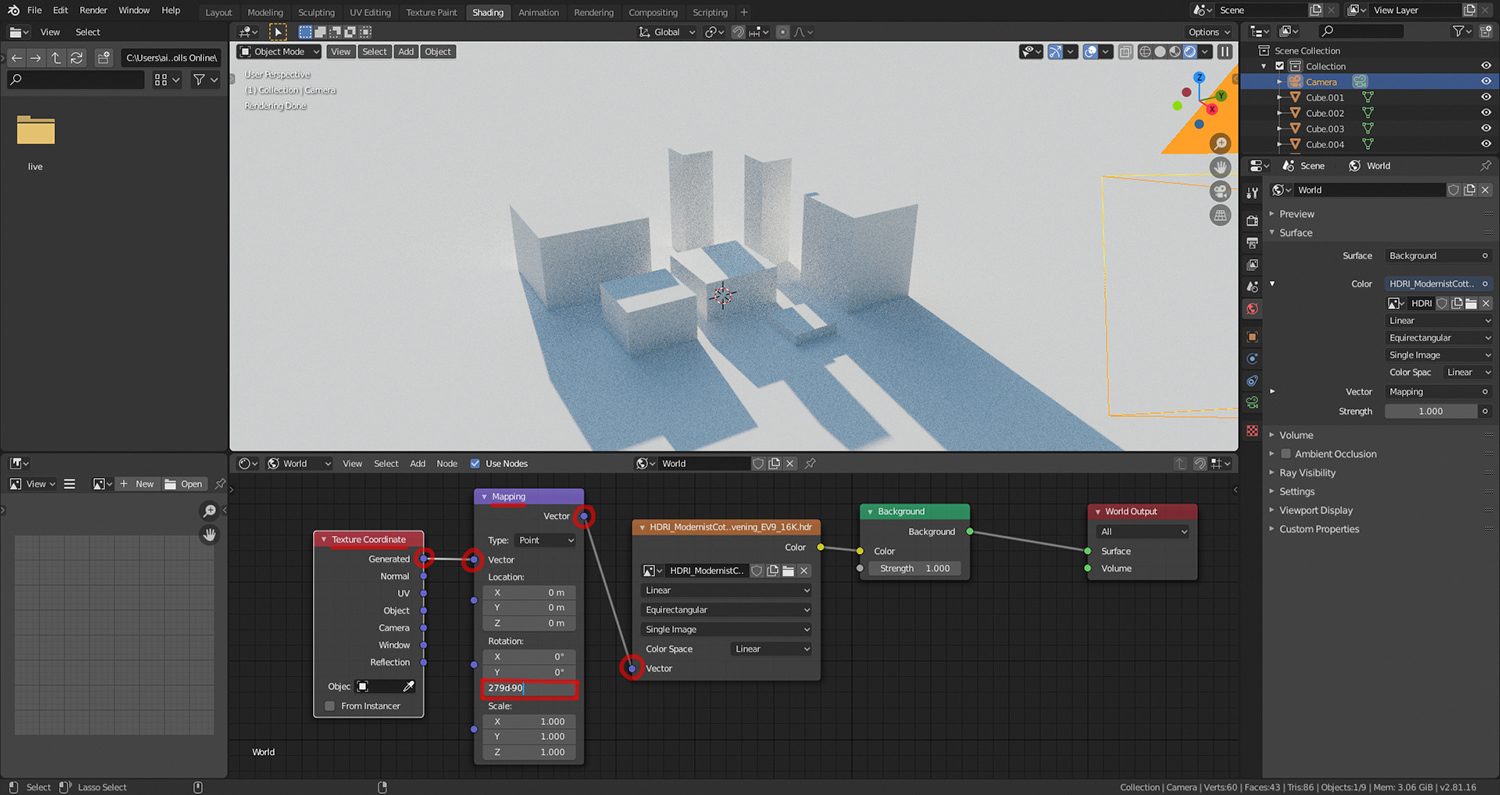
To begin, ensure you\"re in the Shading workspace and switch to the World tab. Here\"s how you can add and rotate your HDRI:
- Add your HDRI image via an Environment Texture node.
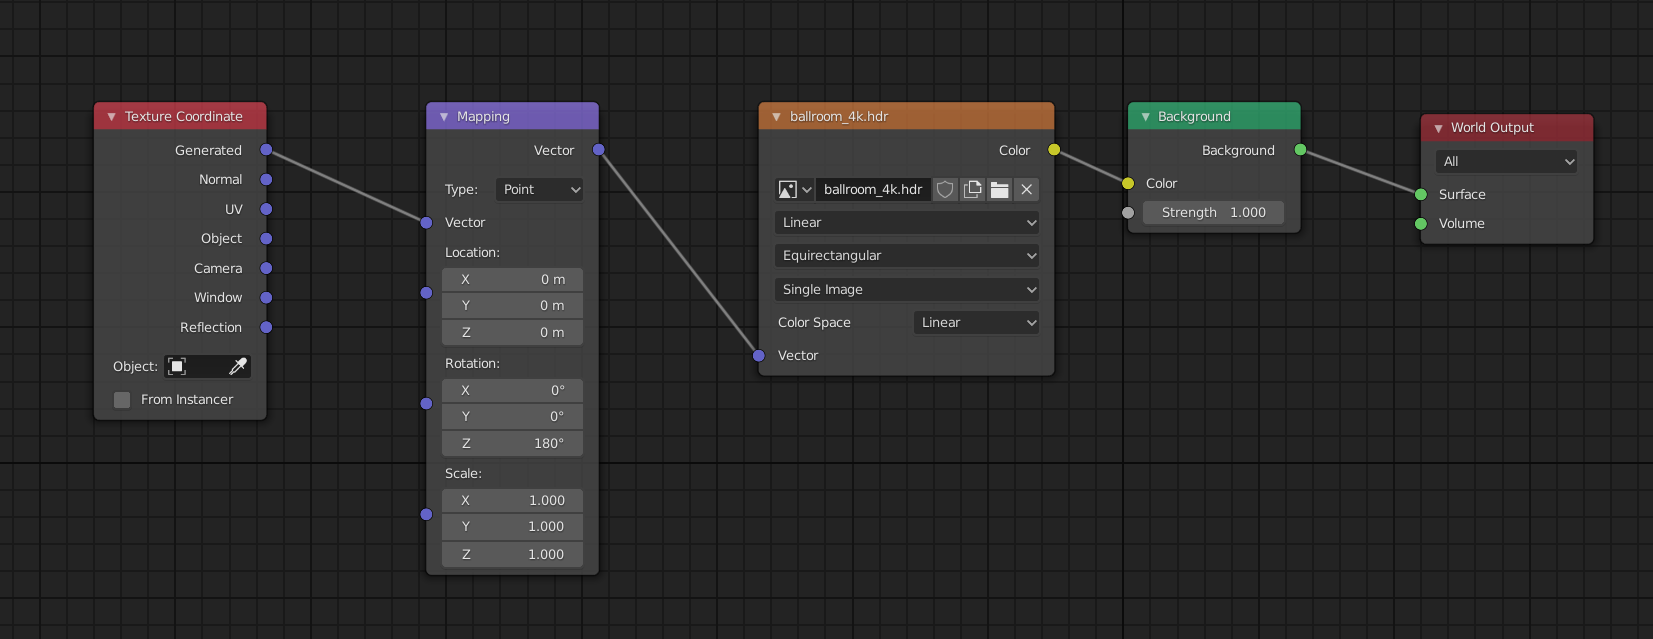
- Introduce a Texture Coordinate node (found under Input) and a Mapping node (located under Vector).
- Connect the Generated output of the Texture Coordinate node to the Vector input of the Mapping node.
- Finally, link the Vector output of the Mapping node to the Vector input of the Environment Texture node.
READ MORE:
Rotating the HDRI
Once your HDRI is set up:
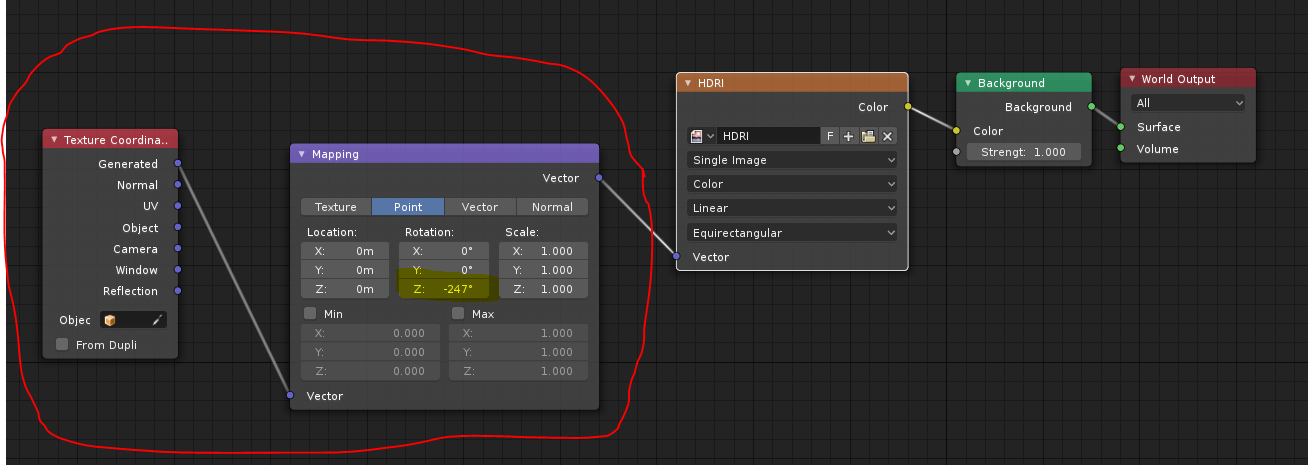
- Adjust the HDRI rotation by modifying the rotation values in the Mapping node, focusing primarily on the Z-axis for most scenarios. This spins the HDRI around your scene.
- Rotating on the X or Y axis can tilt the HDRI, offering different perspectives and lighting angles.
Additional Tips
- Experiment with different rotation values to best match the lighting and background to your scene\"s requirements.
- For more dynamic control, consider adding an Empty object and link its rotation to control the HDRI rotation for a more interactive approach.
- Adjusting the HDRI\"s rotation can significantly affect the mood, lighting, and feel of your scene, so take the time to explore various settings.
With these steps, you can effectively rotate your HDRI in Blender to suit any scene or project need, enhancing realism and depth in your 3D renders.
Rotating the HDRI
Once your HDRI is set up:
- Adjust the HDRI rotation by modifying the rotation values in the Mapping node, focusing primarily on the Z-axis for most scenarios. This spins the HDRI around your scene.
- Rotating on the X or Y axis can tilt the HDRI, offering different perspectives and lighting angles.
Additional Tips
- Experiment with different rotation values to best match the lighting and background to your scene\"s requirements.
- For more dynamic control, consider adding an Empty object and link its rotation to control the HDRI rotation for a more interactive approach.
- Adjusting the HDRI\"s rotation can significantly affect the mood, lighting, and feel of your scene, so take the time to explore various settings.
With these steps, you can effectively rotate your HDRI in Blender to suit any scene or project need, enhancing realism and depth in your 3D renders.
Introduction to HDRI in Blender
High Dynamic Range Imaging (HDRI) in Blender opens up a world of possibilities for 3D artists seeking to create realistic or visually striking environments. Utilizing HDRIs as environmental textures allows for dynamic lighting and reflections that mimic real-world scenarios, enhancing the overall realism of 3D scenes. The process involves importing your chosen HDRI into Blender, then using the Shading workspace to manipulate its properties for your scene.
Adding an HDRI is straightforward: within the World settings in the Shading Tab, you add your HDRI image via an Environment Texture. To rotate the HDRI, and thus adjust the lighting angle and shadows in your scene, Blender uses a combination of Texture Coordinate and Mapping Nodes. These nodes are added in the Shader Editor, allowing for precise control over the rotation and alignment of the HDRI environment.
- Start by entering the Shading workspace and switching your viewport to Rendered view to see live updates.
- Add a Texture Coordinate node and a Mapping node to your node setup. Connect the Generated output of the Texture Coordinate node to the Vector input of the Mapping node.
- Finally, link the Vector output of the Mapping node to the Vector input of your HDRI Environment Texture. This setup grants you control over the HDRI\"s rotation, particularly along the Z-axis for horizontal rotation, aligning the lighting as desired within your scene.
Adjusting the Z rotation value in the Mapping node allows for clockwise or counterclockwise rotation, enabling artists to match the lighting direction to specific needs, whether it\"s aligning the sun in a natural daylight scene or creating unique lighting effects for artistic projects. Blender\"s flexible node system ensures that adjustments to HDRI rotation are both intuitive and highly customizable, catering to a wide range of creative demands.

How can I rotate an HDRI in Blender?
To rotate an HDRI in Blender, follow these steps:
- Open Blender and go to the Shading workspace.
- Switch to the World tab.
- Add your HDRI image as you normally would, by using an Environment Texture node.
- Now, to rotate the HDRI, you can adjust the rotation of the Environment Texture node. This can be done by connecting a Texture Coordinate node to a Mapping node, and then connecting the Mapping node to the Vector input of the Environment Texture node.
- In the Mapping node, you can adjust the Rotation values to rotate the HDRI as desired. You can modify the values in the X, Y, and Z axes to achieve the desired rotation.
- Preview the changes in the rendered view to see the rotated HDRI effect on your scene.
_HOOK_
Step-by-Step Guide to Adding an HDRI
Adding an HDRI (High Dynamic Range Image) to your Blender scene can dramatically improve its lighting and realism. Here is a comprehensive guide to help you incorporate HDRI lighting into your projects.
- Start Blender and open your project: Ensure you have the scene ready where you want to add the HDRI.
- Switch to the Shading workspace: At the top of the Blender interface, find and click on the \"Shading\" tab to switch to the Shading workspace.
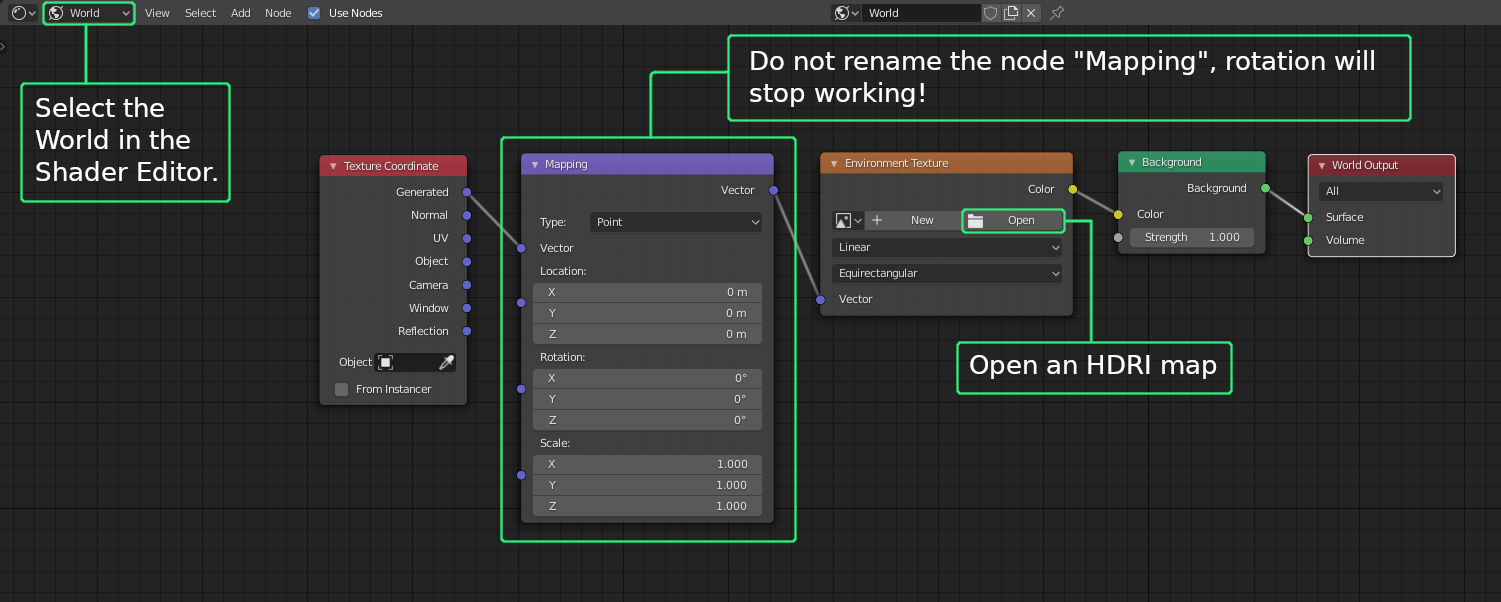
- Select the World Properties: In the Shader Editor, make sure you are working on the \"World\" shader, not the \"Object\" shader. This is crucial for applying the HDRI to the environment.
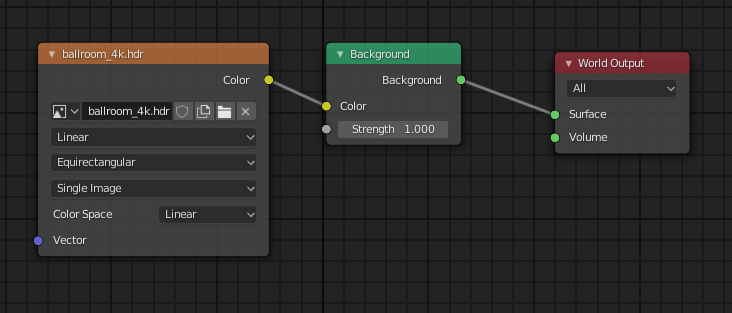
- Add Environment Texture: Press Shift + A in the Shader Editor to open the Add menu, navigate to \"Texture\", and then select \"Environment Texture\". Connect the Color output of the Environment Texture node to the Surface input of the World Output node.
- Load your HDRI: Click on \"Open\" in the Environment Texture node, and navigate to the HDRI image file you wish to use. Select the file and click \"Open Image\" to load it into your scene.
- Adjust the Viewport Shading: To see the effect of the HDRI on your scene, switch the viewport shading to \"Rendered\". This allows you to preview the lighting and reflections provided by the HDRI in real-time.
With these steps, you\"ve successfully added an HDRI to your Blender scene. You can now proceed to rotate and adjust the HDRI to fit your scene\"s lighting needs, enhancing the overall atmosphere and realism of your project.
Blender 2.8 How to Rotate an HDRI Environment Background
Rotate: \"Embark on a mesmerizing journey of creativity and innovation as you watch how artists skillfully rotate their creations to bring them to life in ways you never imagined. Don\'t miss it!\" HDRI: \"Experience the vivid beauty and depth of colors like never before with the magic of HDRI technology. Dive into a world of stunning visual detail and realism that will leave you in absolute awe.\"
Blender How to Rotate HDRI Environment Texture Easy
Download my FAVORITE Dispersion Glass Shader: https://gumroad.com/a/736075475/bljae Download my FAVORITE Materials: ...
Understanding the Mapping Node for HDRI Rotation
To effectively rotate an HDRI in Blender, understanding the use of the Mapping Node is crucial. This process begins in the Shading Tab by switching to the World setting and adding your HDRI through an Environment Texture. The real magic for rotation happens with the combination of a Texture Coordinate node and a Mapping Node.
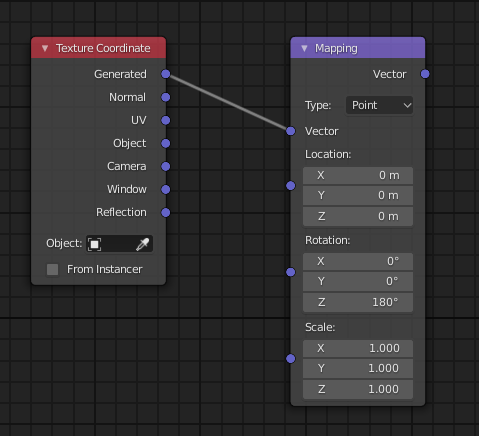
First, create a Texture Coordinate node (found under Input), then connect its \"Generated\" output to the \"Vector\" input of a Mapping Node (located under Vector). This setup allows you to control the orientation of your HDRI by manipulating the Mapping Node\"s parameters.
The Mapping Node offers control over location, rotation, and scale of the texture. For HDRI rotation, specifically, you\"ll want to adjust the Z rotation value. This action rotates the HDRI horizontally, aligning it perfectly with your scene\"s requirements. It\"s important to note that while you can rotate the HDRI on the X or Y axes, doing so will tilt the HDRI, potentially leading to an undesired effect unless that\"s your intention.
Adjusting the rotation settings on your Environment map through the Mapping Node allows for precise control over the HDRI\"s angle, affecting the direction and quality of light and shadows in your scene. This technique is especially useful for fine-tuning the lighting setup to match specific time of day or location conditions in your renders.
Remember, for these changes to be visually represented in your render, ensure you\"re using the Cycles renderer, as it supports shadows from HDRIs, unlike Eevee which may not display shadows from HDRI lighting without additional setup.
By mastering the Mapping Node for HDRI rotation, you can significantly enhance the realism and mood in your 3D projects, making it an essential skill for any Blender artist.
Adjusting HDRI Rotation: Tips and Techniques
Adjusting the rotation of an HDRI in Blender is a straightforward process that allows for precise control over the lighting and ambiance of your scene. Here are some tips and techniques to effectively rotate your HDRI:
- Begin by ensuring your HDRI is correctly imported into Blender. Access the Shader Editor and switch to the World settings.
- Add a Texture Coordinate node and a Mapping node to your node setup. Connect the Generated output of the Texture Coordinate node to the Vector input of the Mapping node.
- Adjust the Z rotation value in the Mapping node to rotate the HDRI horizontally. This will affect the direction of the light and shadows in your scene.
- For fine-tuning, consider the sun\"s position in your HDRI. Positive Z rotation values rotate the environment clockwise. To align the sun correctly, you might need to adjust the rotation based on the HDRI\"s sun bearing.
- If you\"re aiming for architectural accuracy or wish to match the lighting to a specific time of day, entering the correct sun bearing degree can align your HDRI precisely.
- Remember to switch to the Cycles renderer if you need accurate shadow casting from the HDRI. Eevee might not support shadows from HDRIs without additional settings.
These steps should guide you through adjusting the HDRI rotation to achieve the desired lighting effect in your Blender scene, enhancing realism or achieving the specific artistic look you\"re after.

Advanced Techniques for HDRI Manipulation
Mastering HDRI manipulation in Blender not only involves basic rotation but also employing advanced techniques to achieve more dynamic and realistic lighting effects in your 3D scenes. Here are some advanced strategies:
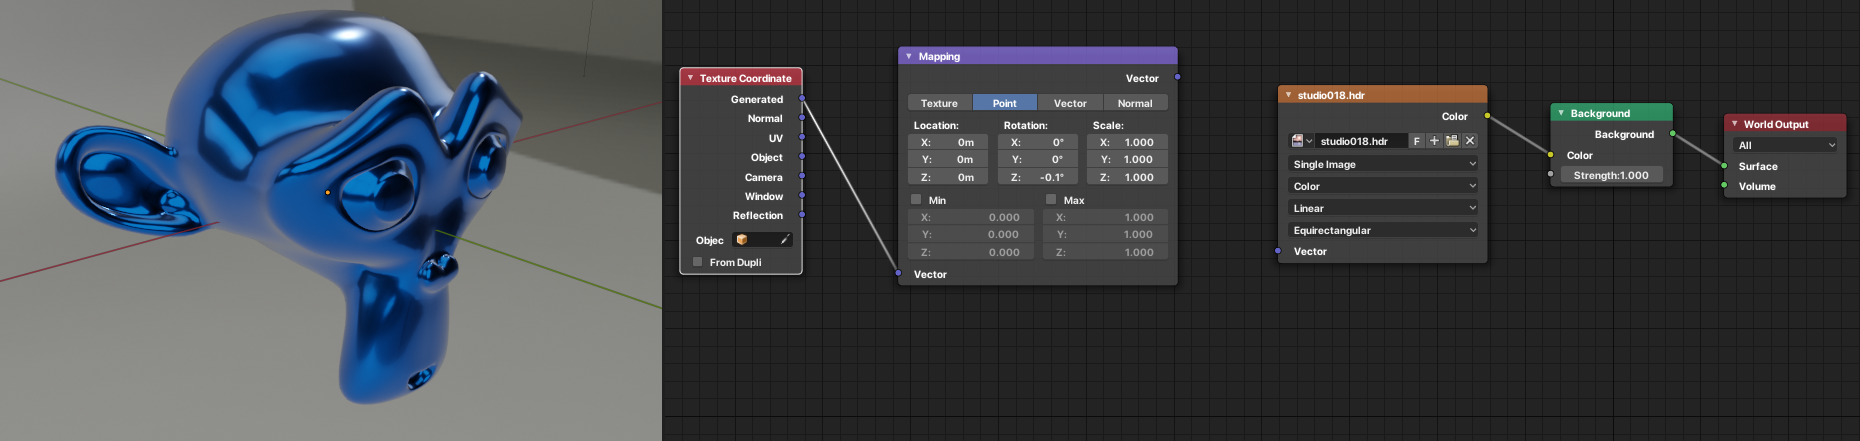
- Utilize the Texture Coordinate and Mapping nodes to precisely control the orientation and position of your HDRI. This allows for detailed adjustments beyond simple rotation, including tilting or scaling the HDRI for specific lighting effects.
- Experiment with different Mapping node settings to explore creative lighting scenarios. Adjusting the location, rotation, and scale parameters can dramatically change the mood and atmosphere of your render.
- For complex lighting setups, consider layering multiple HDRIs with varying intensities and rotations. This technique can simulate different times of day or weather conditions within the same scene.
- Implement node-based adjustments to modify the HDRI\"s brightness, contrast, or color directly within Blender\"s Shader Editor. This can be particularly useful for matching the HDRI\"s tone to the scene\"s artistic direction.
- Use Blender\"s Compositor to blend real footage or images with your 3D scene, allowing for seamless integration of 3D models into real-world environments. This advanced technique enhances the realism of architectural visualizations and product renderings.
By incorporating these advanced HDRI manipulation techniques, you can significantly elevate the visual quality of your projects. These methods provide a deeper level of control over the environmental lighting, enabling you to create more compelling and lifelike renders.
Common Issues and Solutions in HDRI Rotation
When working with HDRI backgrounds in Blender, users may encounter several common issues. This section provides solutions to these problems to ensure a smooth and efficient workflow.
- HDRI Not Rotating: Ensure you are using the Mapping and Texture Coordinate nodes correctly. The Generated output of the Texture Coordinate node should be connected to the Vector input of the Mapping node, which in turn connects to the Environment Texture node.
- Incorrect HDRI Orientation: Adjust the Z rotation value in the Mapping node to rotate the HDRI horizontally. If the HDRI appears tilted, check the rotation values on the X and Y axes and reset them if necessary.
- HDRI Lighting and Shadows Appear Off: Switch to the Cycles renderer if you\"re not seeing expected shadows or lighting effects, as Eevee may not support shadows from HDRI in the same way.
- Unable to Find the Rotation Settings: If you can\"t find the rotation settings, make sure you\"re in the Shader Editor, have selected World from the dropdown at the top, and have the Mapping node added to your node setup.
- HDRI Appears Blurry or Low Quality: Check the resolution of your HDRI. High-quality HDRIs are essential for producing crisp and detailed backgrounds. If necessary, source a higher resolution HDRI.
Addressing these common issues can significantly improve the realism and quality of your 3D scenes in Blender. Remember, experimenting with different settings and understanding how each node influences your HDRI can provide greater control and flexibility in your rendering projects.
_HOOK_
Optimizing Your Workflow for HDRI in Blender
Working with High Dynamic Range Imaging (HDRI) in Blender can significantly improve the realism and lighting quality of your 3D scenes. To ensure an efficient and effective workflow when using HDRIs, consider the following tips:
- Use Node Wrangler for Quick Setup: Enable the Node Wrangler addon in Blender\"s preferences. This addon allows for easy and fast setup of HDRI backgrounds with shortcuts like Ctrl+Shift+T to add textures, including HDRIs, automatically setting up the necessary nodes.
- Shortcut for Viewing HDRI Rotation: Utilize the Ctrl+Alt+left mouse button drag in the viewport to interactively rotate the HDRI in both Eevee and Cycles. This provides a quick way to adjust the lighting without going back and forth to the Shader Editor.
- Batch Import and Switch HDRI: Consider using addons or scripts that allow for batch importing and easy switching between different HDRIs. This can save time when trying to find the perfect lighting setup for your scene.
- Optimize HDRI Resolution: Use HDRI maps with appropriate resolutions. Higher resolutions provide better quality but can increase render times and memory usage. For test renders, consider using lower-resolution versions of your HDRIs.
- Customize HDRI with Blender\"s Compositor: After setting up your HDRI in the Shader Editor, you can further enhance or alter its appearance using Blender\"s Compositor. This can include changes in brightness, contrast, or color grading to better fit your scene\"s mood.
By incorporating these strategies into your workflow, you can streamline the process of using HDRIs in Blender, making it quicker to achieve the desired lighting and atmosphere for your projects.

Real-World Applications of HDRI Rotation
HDRI (High Dynamic Range Imaging) rotation in Blender is a powerful technique that finds application across various real-world scenarios. Understanding these applications can provide insights into how to effectively use HDRI rotation to enhance your 3D projects.
- Architectural Visualization: Architects and designers use HDRI rotation to simulate accurate lighting conditions based on geographical location and time of day, enhancing the realism of architectural renders.
- Product Photography: HDRI rotation is crucial for product photographers and CGI artists, allowing them to position the lighting to highlight product features optimally or create specific moods.
- Animation and Film: In animation and film production, HDRI rotation is used to match the 3D scene lighting with live-action footage, ensuring that the lighting direction and shadows are consistent across all elements.
- Game Development: Game developers utilize HDRI rotation for dynamic skyboxes that change according to the in-game time, contributing to a more immersive gaming experience.
- Artistic Expression: Artists and hobbyists explore HDRI rotation to experiment with different lighting conditions, discovering unique visual effects and atmospheres for their 3D scenes.
These applications highlight the versatility of HDRI rotation in Blender, demonstrating its significant impact on various fields within and beyond 3D modeling and rendering.
READ MORE:
Conclusion: Enhancing Your 3D Projects with HDRI
Integrating High Dynamic Range Imaging (HDRI) into your Blender projects can dramatically enhance the realism and visual appeal of your scenes. Through strategic rotation and manipulation of HDRIs, you can simulate various lighting conditions, from the soft hues of dawn to the vibrant tones of a sunset, adding depth and atmosphere to your renders.
HDRI rotation is a powerful tool in architectural visualization, product photography, animation, and other 3D projects. It allows for precise lighting setups that mimic real-world conditions, providing a more immersive experience for viewers. Whether you\"re aiming to match the lighting of live-action footage in a composite or simply wish to experiment with different environmental effects, mastering HDRI rotation can elevate your work to new heights.
- Remember to use the Texture Coordinate and Mapping nodes effectively to control the orientation and rotation of your HDRIs.
- Experiment with different HDRI sources to find the perfect match for your scene\"s mood and setting.
- Consider the resolution of your HDRI for optimal render quality and performance.
- Utilize Blender\"s Node Editor for further customization and refinement of your HDRI\"s appearance.
Incorporating HDRIs into your workflow not only improves the visual quality of your projects but also provides a versatile foundation for creative exploration and expression. As you continue to work with HDRIs, you\"ll discover new ways to enhance your scenes, making each project more compelling than the last.
Mastering HDRI rotation in Blender opens new horizons for enhancing your 3D projects, allowing you to achieve realistic lighting and breathtaking scenes. Embrace the power of HDRI to transform your renders and captivate your audience.