Topic blender how to render: Discover the secrets of Blender rendering with our ultimate guide, covering everything from basic steps to advanced techniques for creating stunning visuals efficiently. Dive into the world of 3D art today!
Table of Content
- Quick Start
- Choosing a Render Engine
- Rendering Tips
- Advanced Techniques
- Optimization
- Resources and Learning
- Choosing a Render Engine
- How can I activate viewport render in Blender to render from the current active view effectively?
- YOUTUBE: A BEGINNERS Guide to Rendering in Blender
- Rendering Tips
- Advanced Techniques
- Optimization
- Resources and Learning
- Rendering Tips
- Advanced Techniques
- Optimization
- Resources and Learning
- Advanced Techniques
- Optimization
- Resources and Learning
- Optimization
- Resources and Learning
- Resources and Learning
- Introduction to Rendering in Blender
- Choosing the Right Render Engine
- Quick Start: Basic Rendering Steps
- Understanding Render Settings for Quality and Speed
- Advanced Rendering Techniques
- Optimizing Your Renders in Blender
- Common Rendering Issues and Solutions
- Resources for Learning More About Blender Rendering
Quick Start
To quickly start a render in Blender, press F12. This initiates rendering based on your current scene and settings.

READ MORE:
Choosing a Render Engine
Blender offers multiple render engines, each with unique capabilities. The primary ones are Cycles and Eevee. Access these options in the properties panel under the camera icon, where you can select your preferred engine from the render engine dropdown.
Cycles
- Ray-trace based for ultra-realistic results.
- Supports CPU and GPU rendering.
- Utilizes unidirectional path tracing with multiple importance sampling.
Eevee
- Real-time render engine for quick previews and less demanding scenes.
- Great for animations and scenes where speed is a priority over absolute realism.
Rendering Tips
- Adjust render settings for quality or speed depending on your project needs.
- Use GPU rendering if supported by your hardware for faster render times.
- Experiment with light settings and materials to achieve the desired effect.
Advanced Techniques
For more advanced users, exploring node-based materials, lighting setups, and camera settings can greatly enhance the quality of your renders. Blender also supports animation rendering, allowing you to bring your models to life with movement.
Optimization
Optimizing your scenes and render settings can significantly reduce render times without compromising on quality. Consider simplifying models, reducing render samples, and using Blender\"s denoising features.
_HOOK_
Resources and Learning
For further learning, Blender\"s official website, YouTube tutorials, and online forums offer extensive resources. Experimentation and practice are key to mastering rendering in Blender.
Choosing a Render Engine
Blender offers multiple render engines, each with unique capabilities. The primary ones are Cycles and Eevee. Access these options in the properties panel under the camera icon, where you can select your preferred engine from the render engine dropdown.
Cycles
- Ray-trace based for ultra-realistic results.
- Supports CPU and GPU rendering.
- Utilizes unidirectional path tracing with multiple importance sampling.
Eevee
- Real-time render engine for quick previews and less demanding scenes.
- Great for animations and scenes where speed is a priority over absolute realism.
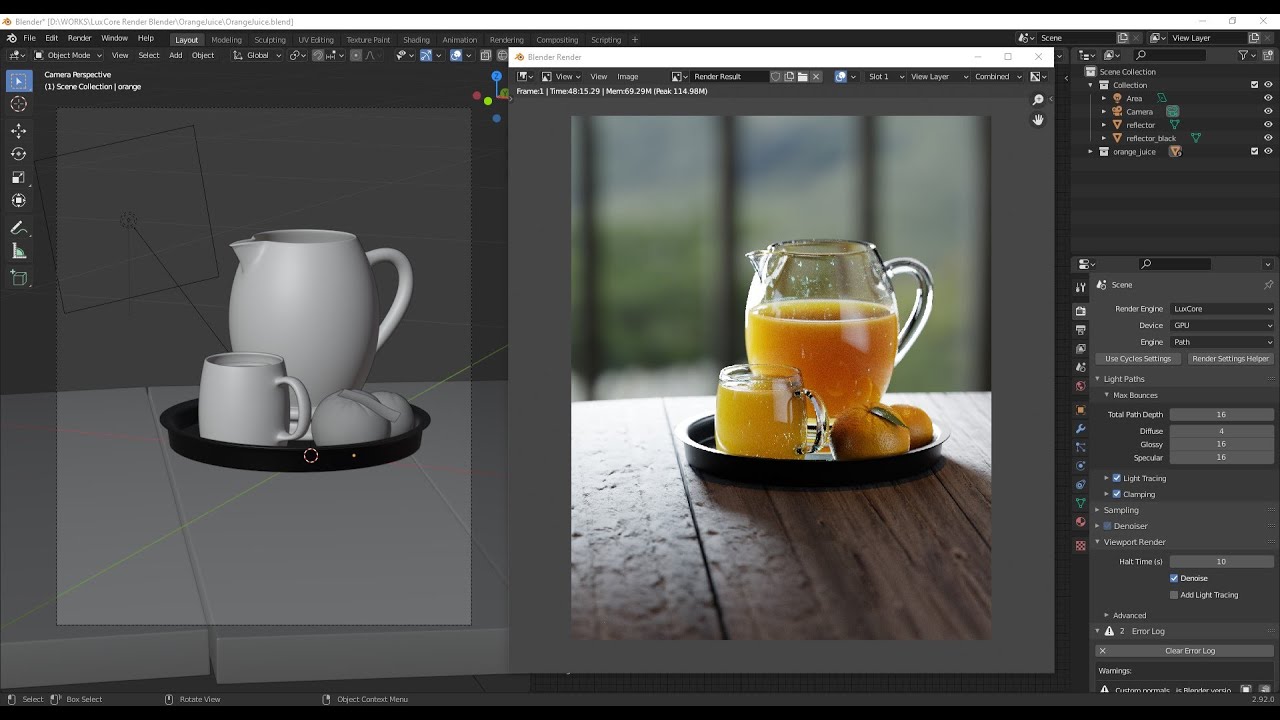
How can I activate viewport render in Blender to render from the current active view effectively?
To activate viewport render in Blender to render from the current active view effectively, follow these steps:
- Open Blender and navigate to the 3D viewport.
- Ensure that you are in the desired active view that you want to render.
- Click on the \"Render\" tab located in the top menu bar.
- From the dropdown menu, select \"Viewport Render Image\".
- Blender will then render the scene from the current active view.
A BEGINNERS Guide to Rendering in Blender
Guide: Dive into our comprehensive guide on exploring the hidden gems of the city. From must-visit landmarks to off-the-beaten-path cafes, this video will be your ultimate companion in discovering the best of what the city has to offer. Export: Join us on a journey to uncover the world of international trade and business opportunities through our informative video on the intricacies of the export industry. Learn how you can expand your horizons and take your business to new heights.
How to Export Video in Blender MP4 Video Format
Learn here How to Export Video in Blender to be in MP4 Video Format. If you like this short video check out my other tutorials: ...
Rendering Tips
- Adjust render settings for quality or speed depending on your project needs.
- Use GPU rendering if supported by your hardware for faster render times.
- Experiment with light settings and materials to achieve the desired effect.
Advanced Techniques
For more advanced users, exploring node-based materials, lighting setups, and camera settings can greatly enhance the quality of your renders. Blender also supports animation rendering, allowing you to bring your models to life with movement.
_HOOK_
Optimization
Optimizing your scenes and render settings can significantly reduce render times without compromising on quality. Consider simplifying models, reducing render samples, and using Blender\"s denoising features.
Resources and Learning
For further learning, Blender\"s official website, YouTube tutorials, and online forums offer extensive resources. Experimentation and practice are key to mastering rendering in Blender.
Rendering Tips
- Adjust render settings for quality or speed depending on your project needs.
- Use GPU rendering if supported by your hardware for faster render times.
- Experiment with light settings and materials to achieve the desired effect.
Advanced Techniques
For more advanced users, exploring node-based materials, lighting setups, and camera settings can greatly enhance the quality of your renders. Blender also supports animation rendering, allowing you to bring your models to life with movement.
Optimization
Optimizing your scenes and render settings can significantly reduce render times without compromising on quality. Consider simplifying models, reducing render samples, and using Blender\"s denoising features.
_HOOK_
Resources and Learning
For further learning, Blender\"s official website, YouTube tutorials, and online forums offer extensive resources. Experimentation and practice are key to mastering rendering in Blender.
Advanced Techniques
For more advanced users, exploring node-based materials, lighting setups, and camera settings can greatly enhance the quality of your renders. Blender also supports animation rendering, allowing you to bring your models to life with movement.
Optimization
Optimizing your scenes and render settings can significantly reduce render times without compromising on quality. Consider simplifying models, reducing render samples, and using Blender\"s denoising features.
Resources and Learning
For further learning, Blender\"s official website, YouTube tutorials, and online forums offer extensive resources. Experimentation and practice are key to mastering rendering in Blender.
Optimization
Optimizing your scenes and render settings can significantly reduce render times without compromising on quality. Consider simplifying models, reducing render samples, and using Blender\"s denoising features.
_HOOK_
Resources and Learning
For further learning, Blender\"s official website, YouTube tutorials, and online forums offer extensive resources. Experimentation and practice are key to mastering rendering in Blender.
Resources and Learning
For further learning, Blender\"s official website, YouTube tutorials, and online forums offer extensive resources. Experimentation and practice are key to mastering rendering in Blender.
Introduction to Rendering in Blender
Rendering in Blender transforms your 3D models into stunning images or animations, showcasing your work\"s true potential. This process involves calculating light, shadows, colors, and textures to create a final product that looks realistic or stylized, depending on your project needs. Whether you\"re a beginner or an advanced user, mastering rendering in Blender opens up a world of possibilities for your 3D creations.
Blender supports multiple rendering engines, each with its unique capabilities and settings. The most commonly used are Cycles and Eevee. Cycles, a ray-tracing render engine, offers photorealistic results by simulating real-world lighting conditions. Eevee, on the other hand, is a real-time render engine that provides faster results, making it ideal for previewing scenes or creating animations where time is of the essence.
Before diving into rendering, it\"s essential to understand the basic workflow:
- Set up your scene by adding objects, lights, and cameras.
- Choose your render engine based on the desired output quality and rendering speed.
- Adjust render settings to balance between quality and performance.
- Use materials and textures to define the appearance of your objects.
- Finally, render your scene to produce the final image or animation.
This introduction serves as your gateway to exploring the vast capabilities of Blender\"s rendering features. From here, you\"ll learn to select the right render engine, adjust settings for optimal performance, and apply advanced techniques to bring your visions to life.
Choosing the Right Render Engine
When selecting a render engine in Blender, the choice between Eevee and Cycles is pivotal, depending on your project\"s goals. Eevee is known for its speed and interactivity, offering real-time feedback which is ideal for quick previews, animations, and stylized visuals. It utilizes rasterization, similar to game engines, making it suitable for non-photorealistic styles like cartoonish or illustrative animations.
On the other hand, Cycles excels in photorealism, utilizing path tracing to simulate real-world lighting, making it perfect for high-quality still images and realistic animations. It shines in areas like architectural visualization and product rendering, where accurate lighting and shadows are crucial. However, its high-quality outputs come at the cost of longer render times and greater computing power requirements.
For projects where time is not a constraint and photorealism is the goal, Cycles is the preferred choice. In contrast, Eevee is favored for its quick rendering times, making it suitable for real-time previews and animations, especially in the game development and animation industries. Many Blender users start with Eevee during the modeling process and switch to Cycles for the final render to leverage the strengths of both engines.
Aside from Eevee and Cycles, Blender supports third-party render engines like Redshift and Octane, known for their fast rendering speeds and high-quality results. Redshift, a biased GPU rendering engine, offers quick renderings, while OctaneRender provides unbiased rendering capabilities with remarkable speed.
Ultimately, the choice of render engine depends on the specific needs of your project, whether it be speed, interactivity, or photorealistic quality. Considering the strengths and limitations of each engine will guide you to the best choice for your workflow.
Quick Start: Basic Rendering Steps
To begin rendering in Blender, first, choose between the built-in render engines: Eevee for real-time performance or Cycles for photorealistic results. The choice significantly affects the rendering process, with Eevee being faster and Cycles offering higher accuracy and quality at the cost of speed.
- Scene Preparation: Start by setting up your scene with 3D objects, lighting, materials, and textures. Ensure the camera is positioned to capture your scene from the desired perspective.
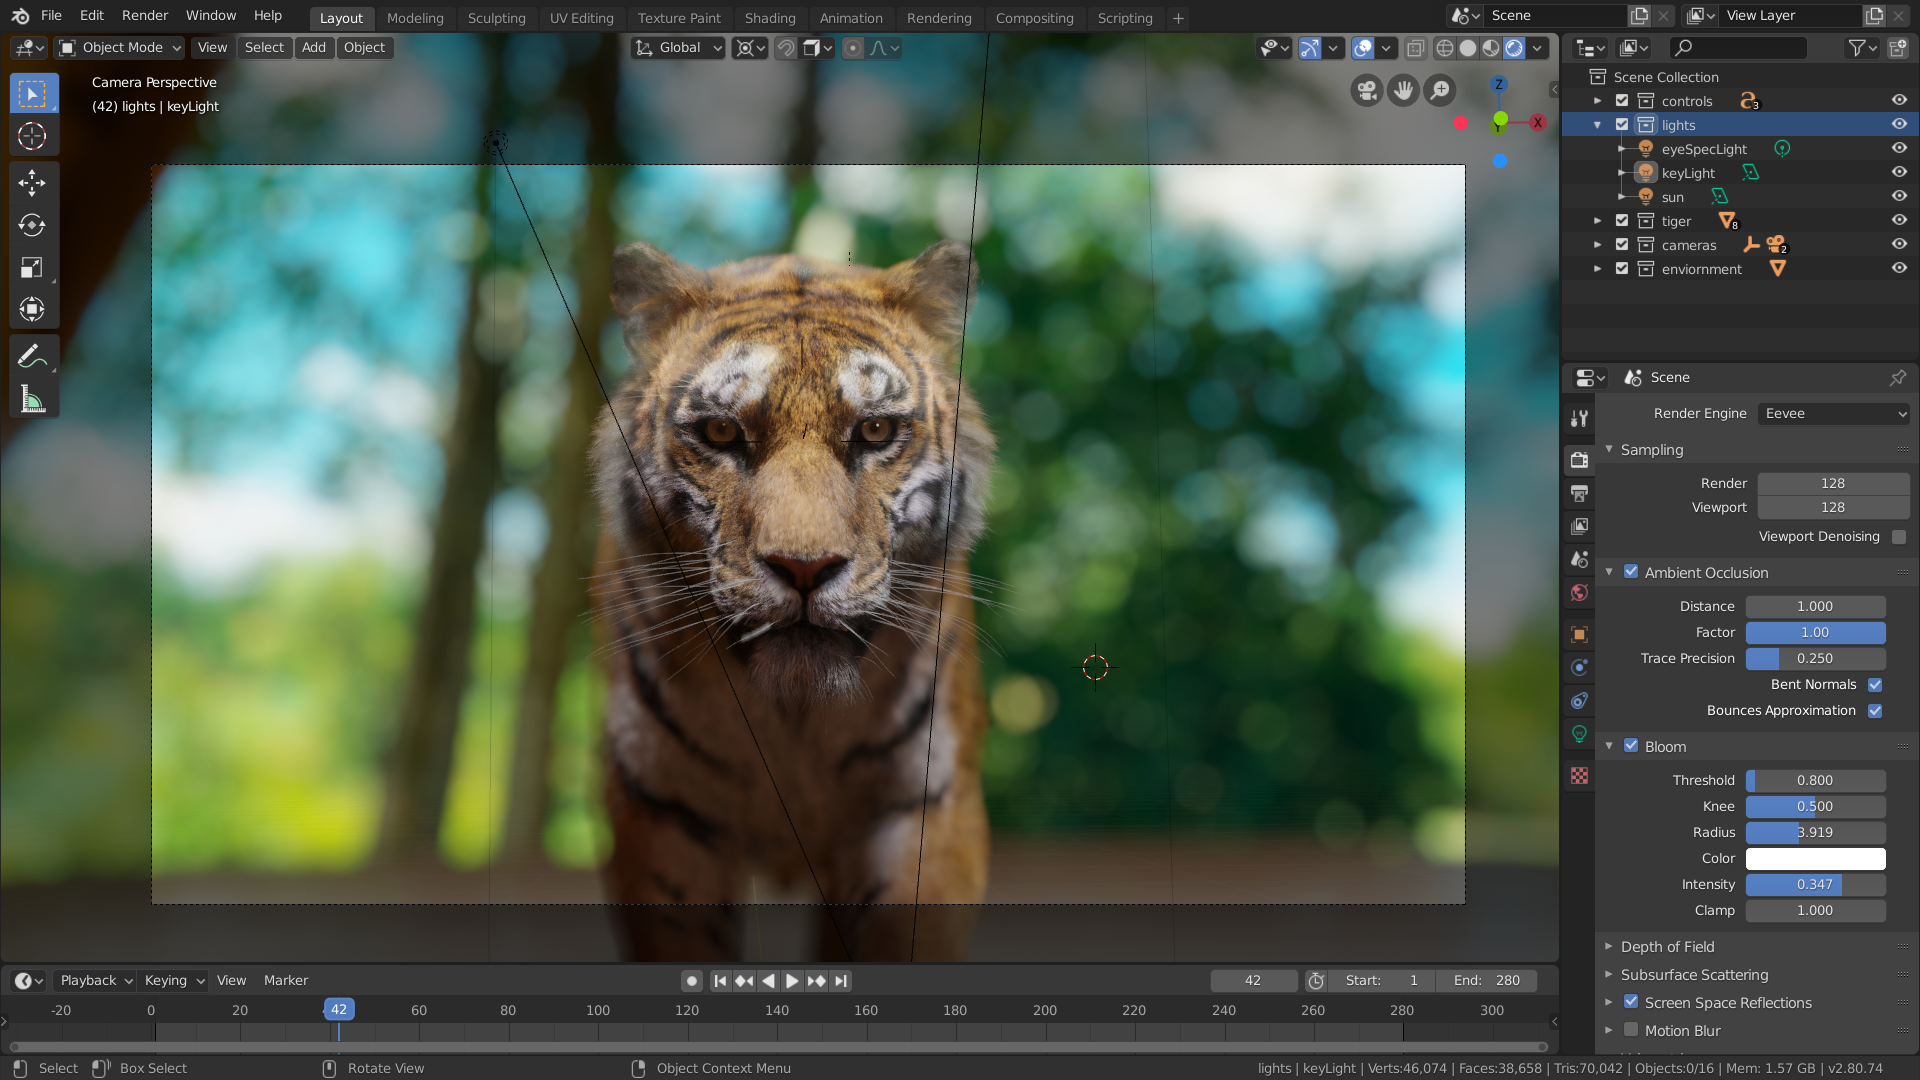
- Selecting a Render Engine: In the properties panel, under the camera icon, choose your render engine (Eevee or Cycles) from the dropdown menu.
- Configure Render Settings: Adjust settings like resolution and output format in the output properties tab to meet your project requirements.
- Rendering: Press F12 to render a still image. For animations, use Ctrl+F12 or navigate to Render > Render Animation. Ensure you have specified an output folder and file format for the frames.
- Previewing Renders: Use the rendered viewport shading mode to get a real-time preview of how your scene looks with the selected render engine.
- Saving Your Render: After rendering, save your image or animation by navigating to the \"Image\" menu and selecting \"Save As\". Choose your preferred file format and save location.
For animations, it\"s crucial to set up frames, configure timelines, and ensure the camera and lighting enhance the movement and realism of your scene. Blender allows for real-time previews with Eevee, aiding in adjusting animations before final rendering.
To enhance or adjust your final rendered image, explore post-processing options in Blender for color correction or adding effects. Finally, the rendered output can be saved or exported for further use or sharing.
Rendering in Blender, whether for still images or animations, involves careful preparation of your scene and understanding the capabilities of the selected render engine. By following these steps, you can create captivating visuals and animations tailored to your creative needs.
_HOOK_
Understanding Render Settings for Quality and Speed
Mastering render settings in Blender is crucial for optimizing both quality and speed of your renders. The choice between Eevee and Cycles impacts your project\"s rendering time and visual fidelity. Eevee, being a rasterized engine, offers speed suitable for real-time performance, whereas Cycles, a ray-traced engine, excels in accuracy, producing images that closely mimic real-world lighting.
- Choosing the Render Engine: Select between Eevee for faster, real-time rendering and Cycles for photorealistic outputs.
- Render Samples: Adjusting render samples is a direct way to control quality and speed. Higher samples increase quality but also rendering time.
- Resolution: Higher resolution settings improve the detail and clarity of your render but at the cost of increased render times. You can find these settings under the output properties tab.
- Adaptive Sampling: A feature in Cycles that automatically adjusts the number of samples based on the noise level, reducing render times without sacrificing quality.
- Denoising: Denoisers like Optix, OpenImageDenoise, and NLM can significantly reduce noise in renders, allowing for lower sample counts and faster render times.
- Light Paths: Adjusting the number of light bounces can help manage the render\"s balance between realism and computation time.
- Viewport Rendering: For quick previews or draft renders, use the viewport rendering option for a faster alternative to full rendering.
For animations, it\"s vital to set up an output folder and file format ahead of rendering to ensure a smooth workflow. Denoising and adaptive sampling are particularly beneficial for animation renders, helping mitigate flickering and reducing render times.
Keep in mind, using the GPU for rendering can significantly accelerate the process, especially for Cycles. However, this may require adjusting your Blender settings to utilize your hardware efficiently.
Ultimately, balancing render settings for quality and speed involves understanding the demands of your project and the capabilities of your hardware. Experimenting with different settings can help you find the optimal configuration for your needs.
Advanced Rendering Techniques
Blender\"s Eevee and Cycles engines offer advanced rendering techniques that can significantly enhance the realism and quality of your projects. Here are some sophisticated methods to elevate your renderings:
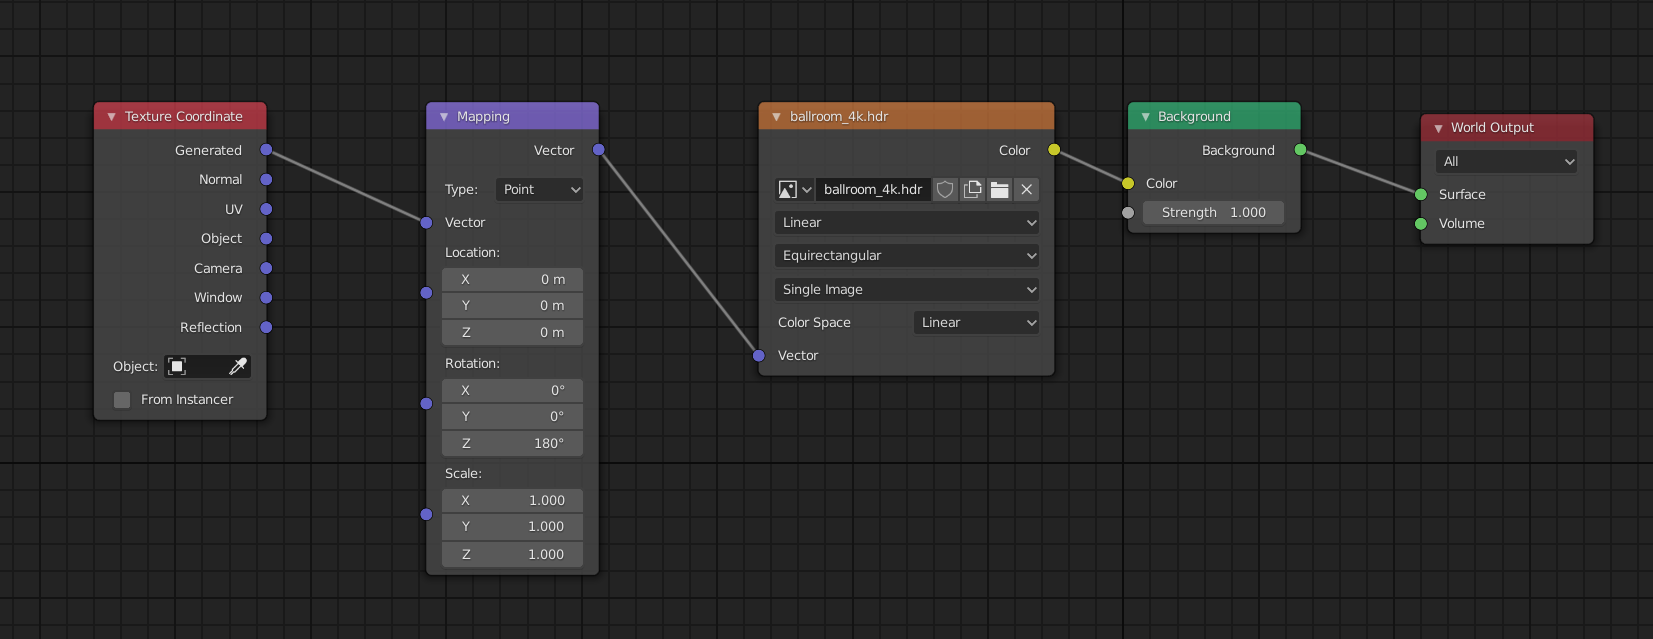
- Indirect Lighting in Eevee: Utilize the Irradiance Volume to simulate global illumination, capturing bounced light in your scenes for added realism. Place the Irradiance Volume strategically and bake the lighting to see subtle yet impactful enhancements in your render.
- Emissive Objects: In Eevee, make objects emit light by assigning them emissive materials and recalculating irradiance. This technique allows for dynamic lighting effects from objects themselves, enhancing the scene\"s ambiance.
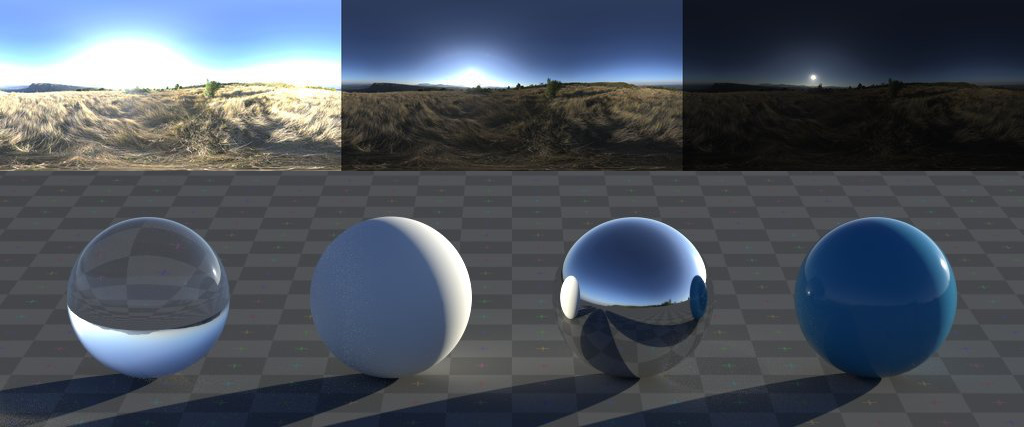
- Refractive Materials: Achieve realistic glass and transparent materials by adjusting the Transmission value in the Principled BSDF material settings. Use Index of Refraction (IOR) values to simulate various materials accurately.
- Sub-Surface Scattering (SSS): Simulate light passing through thin, translucent materials like skin, wax, or liquids to add depth and lifelike qualities to your models. Adjust SSS settings to refine the effect based on the material\"s properties.
Exploring alternative renderers like Cycles and Freestyle can also offer unique advantages and challenges. Cycles provide physically-accurate lighting through global illumination, enhancing realism. Freestyle, on the other hand, adds non-photorealistic rendering options for artistic edge effects.
Remember, switching renderers or incorporating advanced techniques may require adjustments to materials, lighting, and render settings. While high-quality renderers offer impressive results, they may also increase rendering times. Balancing quality settings and rendering capabilities of your hardware is key to efficient workflows.
For more detailed explorations of these techniques and to further enhance your rendering skills, visiting the original resources can provide in-depth tutorials and examples. Whether you\"re aiming for photorealism or stylized effects, mastering these advanced rendering techniques can significantly elevate the quality of your Blender projects.
Optimizing Your Renders in Blender
Optimizing your renders in Blender involves a series of steps that can significantly reduce render times without compromising on quality. Whether you\"re using Cycles or Eevee, these techniques will help you achieve faster renders:
- Switch to GPU Rendering: Utilizing your GPU for rendering can drastically reduce render times compared to using your CPU. This is especially true for Nvidia graphics cards with CUDA support.
- Reduce Light Bounces: Light bounces contribute to the realism of your renders but can also increase render times. Adjusting the maximum number of bounces in your render settings can help balance quality and speed.
- Optimize Tile Size: For GPU rendering, larger tile sizes (e.g., 256x256) can speed up the process, while smaller tile sizes (e.g., 16x16) may be more efficient for CPU rendering.
- Reduce Samples: Decreasing the number of samples in your render settings can significantly reduce noise and render times. Experiment with the lowest number of samples you can use without noticeably affecting the quality of your render.
- Adaptive Sampling: This feature allows Blender to dynamically adjust sample counts in less noisy areas of your scene, focusing computational power where it\"s needed most and reducing overall render times.
- Use Denoising: Denoising can clean up noise in your renders, allowing you to use lower sample counts. Blender offers several denoising options, including the AI-powered Optix and OpenImageDenoise.
- Fast GI Approximation: For scenes that don\"t require precise global illumination, enabling Fast GI Approximation can reduce render times by simplifying light calculations.
- Turn Off Caustics: If your scene does not contain glass or other refractive materials, disabling caustics can prevent unnecessary calculations and speed up rendering.
- Reduce Resolution for Previews: Rendering at lower resolutions for previews can save time, allowing for quicker iterations. Use higher resolutions only for your final render.
- Optimize Modifiers: Excessive subdivision levels can increase render times. Adjusting or reducing the levels on modifiers like Subdivision Surface can help maintain a balance between detail and efficiency.
Implementing these optimization techniques can help streamline your Blender workflow, saving you time while still producing high-quality renders. Remember, each project is unique, so it\"s worth experimenting with these settings to find the best configuration for your specific needs.
For more detailed guides and tips on optimizing your Blender renders, visit the following resources:
- Threedee.design
- Blender Guru
- Artisticrender.com
Common Rendering Issues and Solutions
Blender users often encounter several common issues when rendering their projects. These issues can range from black frames in the final output to objects missing from the render. Here\"s a guide to solving some of these frequent problems:
- Blender Renders Black Frames: This issue might occur due to incorrectly connected compositing nodes. Ensure your render layers\" image output is correctly connected to the composite node in the compositor workspace. Verify that \"use nodes\" is enabled and that Compositing and Sequencer are checked in the output properties post-processing section.
- Missing Objects in Final Render: Objects may be missing if they are disabled for rendering or if a particle system is set not to render the emitter. Check the outliner for the camera icon next to objects and ensure it\"s enabled. Also, review particle systems for each object and ensure \"Show emitter\" is checked.
- Clipping Issues: Objects disappearing at certain distances from the camera, known as clipping, can be adjusted by modifying the camera\"s clipping start and end settings in the lens section of the camera\"s object data properties.
- Interface and Viewport Issues: For problems before rendering, like zoom limitations or missing reference images, adjusting the 3D cursor position or switching between Perspective and Orthographic views can help. Disabling hardware acceleration or on-screen effects may solve glitchy interface issues.
- Hardware Bottlenecks: Slow performance or crashes might be due to hardware limitations. Optimizing your Blender file by simplifying geometry, reducing the number of particles, or using lower resolution textures can alleviate these issues. Updating graphics card drivers and ensuring compatibility with your Blender version are also crucial steps.
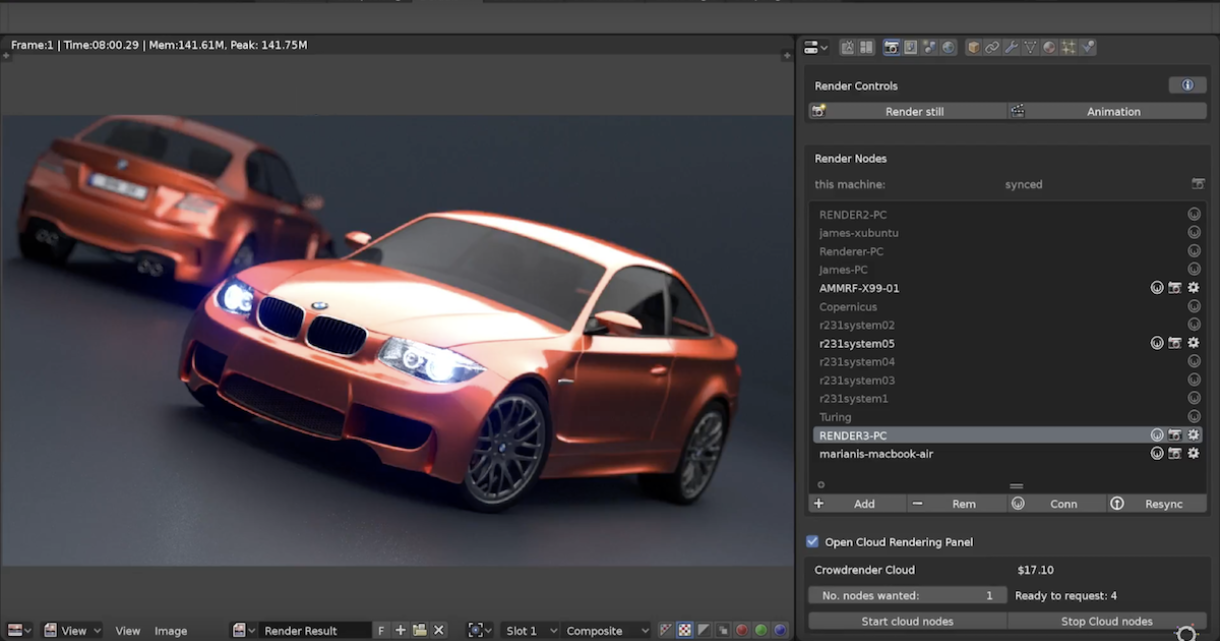
For more specific solutions, including adjusting render settings for better performance or using cloud-computing services for enhanced processing power, consider exploring detailed guides and resources available within the Blender community.
READ MORE:
Resources for Learning More About Blender Rendering
Mastering Blender rendering requires access to the best learning resources. Whether you\"re a beginner or looking to advance your skills, these resources offer comprehensive tutorials, courses, and insights into Blender\"s rendering capabilities:
- Official Blender Tutorials: Blender.org provides an array of tutorials for all skill levels, covering the fundamentals to advanced techniques in rendering, modeling, and more.
- Blender Studio First Steps: Blender Studio offers a \"Blender 2.8 Fundamentals\" series that is perfect for beginners, including sections on rendering settings and techniques.
- Blender Guru: Known for high-quality tutorials and engaging videos by Andrew Price, Blender Guru is a fantastic place to learn about rendering and much more.
- CG Cookie: Offering training around 3D animations, game art, and visual effects, CG Cookie is a great platform for learning Blender with a focus on animation and rendering.
- Blender Nation: A resource for finding 3D models and assets, Blender Nation also offers insights and tutorials related to Blender rendering.
- Udemy Blender Courses: Udemy hosts a wide range of Blender courses, including beginner to advanced rendering techniques.
- Blend Swap: Blend Swap provides models under Creative Commons licenses, useful for practicing rendering with real-world assets.
- CG Masters: A platform offering both paid and free video tutorials, CG Masters covers various aspects of Blender, including rendering.
- Concept Art Empire: Features tutorials focused on specific Blender rendering tasks, such as creating nature scenes, hair for characters, and realistic cityscapes.
Each of these resources offers unique insights and tutorials that cater to different aspects of Blender rendering. From the basics of setting up your first render to advanced techniques like creating realistic hair or nature scenes, there\"s something for everyone looking to enhance their Blender skills.
Embark on a transformative journey with Blender, unlocking the full potential of your creative projects. This comprehensive guide illuminates the path from beginner basics to advanced rendering techniques, ensuring your visions come to life with stunning realism and efficiency.
_HOOK_