Topic how to render on blender: Discover the secrets of rendering in Blender and transform your 3D models into stunning visuals. This comprehensive guide covers everything from basic techniques to advanced settings, empowering you to bring your creative visions to life.
Table of Content
- Basic Rendering Steps
- Rendering Engines
- Advanced Rendering Settings
- Rendering Tips
- Conclusion
- Rendering Engines
- Advanced Rendering Settings
- Rendering Tips
- How can I render on Blender to create realistic images and animations?
- Conclusion
- YOUTUBE: How to Render an Image in Blender Tutorial
- Advanced Rendering Settings
- Rendering Tips
- Conclusion
- Rendering Tips
- Conclusion
- Conclusion
- Introduction to Blender Rendering
- Choosing the Right Rendering Engine
- Basic Rendering Steps in Blender
- Advanced Rendering Techniques
- Optimizing Render Settings for Quality and Speed
- Lighting and Material Setup for Realistic Renders
- Rendering Animations in Blender
- Common Rendering Issues and How to Solve Them
- Utilizing Blender’s Compositing Features for Post-Production
- Conclusion: Best Practices and Tips for Efficient Rendering
Basic Rendering Steps
- To render a still image, press F12.
- For rendering an animation, use Ctrl+F12.
- Alternatively, navigate to the Render menu and select either Render Image or Render Animation.

READ MORE:
Rendering Engines
Blender includes several rendering engines, each with unique features and capabilities:
- Cycles: A ray-trace based production engine known for its stunning ultra-realistic rendering.
- Eevee: A real-time render engine that provides faster rendering times with good quality for real-time preview.

Advanced Rendering Settings
Adjusting advanced settings can significantly impact the quality and speed of your render:
- Navigate to Edit > Preferences to select the rendering device under the Cycles render devices section.
- Utilize features like multi-core CPU rendering, GPU acceleration, and more to enhance rendering performance.
Rendering Tips
- Experiment with different sampling rates and lighting settings to achieve the desired effect.
- Use the video sequencer for converting rendered images into a movie file.
- Understand the importance of frame setup and timelines for animation rendering.
Conclusion
Rendering in Blender might seem daunting at first, but by following these steps and experimenting with various settings, you can achieve impressive results. Whether you\"re working on still images or animations, Blender offers the tools you need to bring your creations to life.
_HOOK_
Rendering Engines
Blender includes several rendering engines, each with unique features and capabilities:
- Cycles: A ray-trace based production engine known for its stunning ultra-realistic rendering.
- Eevee: A real-time render engine that provides faster rendering times with good quality for real-time preview.

Advanced Rendering Settings
Adjusting advanced settings can significantly impact the quality and speed of your render:
- Navigate to Edit > Preferences to select the rendering device under the Cycles render devices section.
- Utilize features like multi-core CPU rendering, GPU acceleration, and more to enhance rendering performance.

Rendering Tips
- Experiment with different sampling rates and lighting settings to achieve the desired effect.
- Use the video sequencer for converting rendered images into a movie file.
- Understand the importance of frame setup and timelines for animation rendering.
How can I render on Blender to create realistic images and animations?
To create realistic images and animations in Blender, follow these steps:
- Set up your scene by adding objects, lights, and cameras.
- Adjust the materials and textures of your objects to achieve the desired look.
- Position your camera to frame the scene the way you want.
- Go to the Render tab in the top menu and choose the desired render engine (Eevee or Cycles).
- Adjust the render settings such as resolution, samples, and output format.
- If using Cycles, set up your materials with realistic shaders and textures.
- Enable global illumination and realistic lighting in your scene.
- Press the Render button to start the rendering process.
- Wait for the rendering to complete and save the image or animation to your desired location.
Conclusion
Rendering in Blender might seem daunting at first, but by following these steps and experimenting with various settings, you can achieve impressive results. Whether you\"re working on still images or animations, Blender offers the tools you need to bring your creations to life.
_HOOK_
How to Render an Image in Blender Tutorial
Blender: \"Discover the endless possibilities of creating stunning visuals and animations with Blender! Unleash your creativity and dive into the world of 3D design and animation. Watch how to bring your ideas to life with Blender.\" Tutorial: \"Ready to level up your skills? Join us for an insightful tutorial packed with tips and tricks to enhance your knowledge. Learn something new and valuable in a step-by-step guide. Watch the tutorial now!\"
Blender Beginner Tutorial: How to Render in Blender 3.4
Hey hey, here\'s part 1, 2, 3, and 4 of this tutorial series Part 1 - https://youtu.be/HJSGoKbNBnQ Part 2 ...
Advanced Rendering Settings
Adjusting advanced settings can significantly impact the quality and speed of your render:
- Navigate to Edit > Preferences to select the rendering device under the Cycles render devices section.
- Utilize features like multi-core CPU rendering, GPU acceleration, and more to enhance rendering performance.
Rendering Tips
- Experiment with different sampling rates and lighting settings to achieve the desired effect.
- Use the video sequencer for converting rendered images into a movie file.
- Understand the importance of frame setup and timelines for animation rendering.
Conclusion
Rendering in Blender might seem daunting at first, but by following these steps and experimenting with various settings, you can achieve impressive results. Whether you\"re working on still images or animations, Blender offers the tools you need to bring your creations to life.
_HOOK_
Conclusion
Rendering in Blender might seem daunting at first, but by following these steps and experimenting with various settings, you can achieve impressive results. Whether you\"re working on still images or animations, Blender offers the tools you need to bring your creations to life.
Introduction to Blender Rendering
Blender is equipped with powerful rendering capabilities that allow users to transform their 3D models into stunning images or animations. Understanding the basics of rendering in Blender is essential for achieving the desired output.
- To render a still image, press F12.
- For animations, press Ctrl+F12 or navigate to the render menu and choose Render Animation.
- Blender offers multiple rendering engines, including Cycles for ultra-realistic results and Eevee for real-time rendering.
Rendering in Blender involves several steps and settings that can be adjusted to improve the quality and efficiency of the final output. It\"s important to explore and understand these settings to maximize the potential of your renders.
- Select the rendering engine based on your project needs.
- Adjust render settings such as resolution, sampling, and lighting for optimal results.
- Use Blender’s compositing features for post-production enhancements.
By familiarizing yourself with Blender\"s rendering process and experimenting with different settings, you can unlock the full potential of your 3D projects and bring your creative visions to life.
Choosing the Right Rendering Engine
Blender supports several rendering engines, each with unique strengths, making the choice of the right engine crucial for your project\"s needs.
- Eevee: Blender\"s real-time render engine, ideal for quick previews and less computationally intensive renders. It\"s known for good performance and quality balance.
- Cycles: A ray-tracing render engine that produces photorealistic results. It\"s more computationally intensive but ideal for high-quality final renders.
- Workbench: Primarily used for modeling and layout stages, not recommended for final renders but great for quick viewport previews.
- Freestyle: A non-photorealistic render engine perfect for creating line-based artistic effects, such as blueprints or cartoon-like renders.
Choosing the right engine depends on your project requirements:
- For real-time feedback and quick iterations, Eevee is recommended.
- For high-quality, photorealistic images and animations, Cycles is the better choice.
- For artistic or stylized renders, consider Freestyle or exploring external plugins and renderers that integrate with Blender.
Experimenting with different engines and settings is key to understanding their impact on render quality and time, enabling you to make the best choice for your specific needs.
Basic Rendering Steps in Blender
Rendering in Blender converts your 3D scenes into images or animations. This process is straightforward but requires understanding of a few basic steps to get started.
- Scene Preparation: Ensure your scene is ready for rendering by setting up objects, lighting, materials, and camera angles.
- Choose Rendering Engine: Decide between Eevee for real-time rendering or Cycles for photorealistic outcomes.
- Adjust Render Settings: Navigate to the Render tab to configure settings such as output resolution, file format, and sampling rates for quality and performance balance.
- Render: Press F12 to render a still image or Ctrl+F12 for an animation. Alternatively, use the Render menu for these actions.
- Review and Save: Once rendered, review your image or animation. If satisfied, save your work. For animations, you may need to set the output path before rendering.
These basic steps provide a foundation for rendering in Blender. As you become more familiar with Blender\"s rendering capabilities, you can explore advanced settings for improved results.
Advanced Rendering Techniques
Advanced rendering in Blender leverages the capabilities of both Eevee and Cycles render engines, employing techniques such as Indirect Lighting, Emissive Objects, and handling Refractive Materials, to enhance realism and visual appeal in renders.
Indirect Lighting
For a more realistic look in Eevee, adding an Irradiance Volume to calculate bounced light is crucial. This process simulates global illumination, which is more naturally handled by Cycles through path tracing. Proper placement and adjustment of the Irradiance Volume, followed by baking the indirect lighting, significantly improve the scene\"s realism.
Emissive Objects
Eevee requires specific steps to make objects emit light, similar to using Emitter shaders in Cycles. This involves the use of irradiance and adjusting material properties to ensure objects can effectively act as light sources within the scene.
Refractive Materials
Creating realistic glass or transparent materials in Eevee involves tweaking the Transmission value of the Principled BSDF material and understanding the limitations of Eevee\"s non-path tracing nature for accurate refractions.
Sub-Surface Scattering
Sub-surface scattering (SSS) in Eevee mimics light absorption and scattering inside translucent materials. Adjusting SSS settings enhances the realism of materials like skin, wax, or liquids by simulating the way light penetrates and diffuses through them.
Besides these techniques, exploring Cycles\" global illumination, Freestyle for non-photorealistic renders, and leveraging external renderers can expand creative possibilities. Each renderer and technique has its unique set of advantages and trade-offs, from the speed and interactivity of Eevee to the accuracy and detail of Cycles and beyond.
When advancing in rendering techniques, be mindful of the specifics of each engine and material settings, as switching between renderers might necessitate adjustments to achieve the desired outcome. High-quality renders demand patience and computational resources, especially with renderers designed for realism and complex lighting effects.
Experimenting with these advanced techniques allows for a broader range of visual effects and finer control over the final look of your projects in Blender.
_HOOK_
Optimizing Render Settings for Quality and Speed
Optimizing your render settings in Blender can significantly reduce render times while maintaining quality. Here are some advanced techniques to achieve faster rendering:
- Update Blender: Use the latest version for improved optimization and features.
- Choose the Right Renderer: Evaluate if Eevee can achieve your desired results for faster rendering compared to Cycles.
- Enable Denoisers: Utilize Intel\"s Open Image Denoise for cleaner outputs with fewer samples.
- Adaptive Sampling: This feature allows Blender to allocate more samples to complex areas and fewer to simpler ones, optimizing render times.
- Light Paths: Reduce the max bounces of light paths to decrease calculation times without significantly affecting the realism of your scene.
- Fast GI Approximation: This can reduce render times by simplifying how light bounces are calculated, especially useful for animations where precise global illumination isn\"t necessary.
- Optimize Geometry and Particles: Simplify your scene\"s geometry, use instances instead of duplicates, and manage particle systems efficiently to reduce render strain.
- GPU Rendering: If available, use a GPU for rendering as it\"s significantly faster than a CPU for tasks in Blender.
- Tile Size Optimization: Adjust the tile size for rendering. Larger tiles are generally better for GPU, and smaller for CPU.
- Baking: Pre-calculate lighting, shadows, and textures by baking them into your scenes. This can drastically reduce render times for complex scenes.
- Disable Unnecessary Effects: Shadows, ray tracing, and other computationally expensive effects should be evaluated and disabled if not critical for the final output.
Experiment with these settings to find the best balance between render quality and speed for your specific project requirements. Remember, the effectiveness of each technique can vary depending on the complexity of your scene and your hardware capabilities.
Lighting and Material Setup for Realistic Renders
Creating realistic renders in Blender requires a detailed approach to lighting and material setup. This section guides you through the essential steps to achieve photorealism in your projects.
- Understanding the Basics of Lighting
- Lighting is crucial in rendering because it significantly affects the mood, depth, and realism of the scene. Begin by experimenting with three-point lighting, which includes a key light, fill light, and back light. This setup provides a balanced illumination that mimics real-world lighting conditions.
- Choosing the Right Light Sources
- Blender offers various light sources, such as point, sun, area, and spotlights. Use sun lights for natural outdoor lighting and area lights to simulate soft shadows and diffuse light for indoor scenes. Spotlights are perfect for highlighting specific areas or objects.
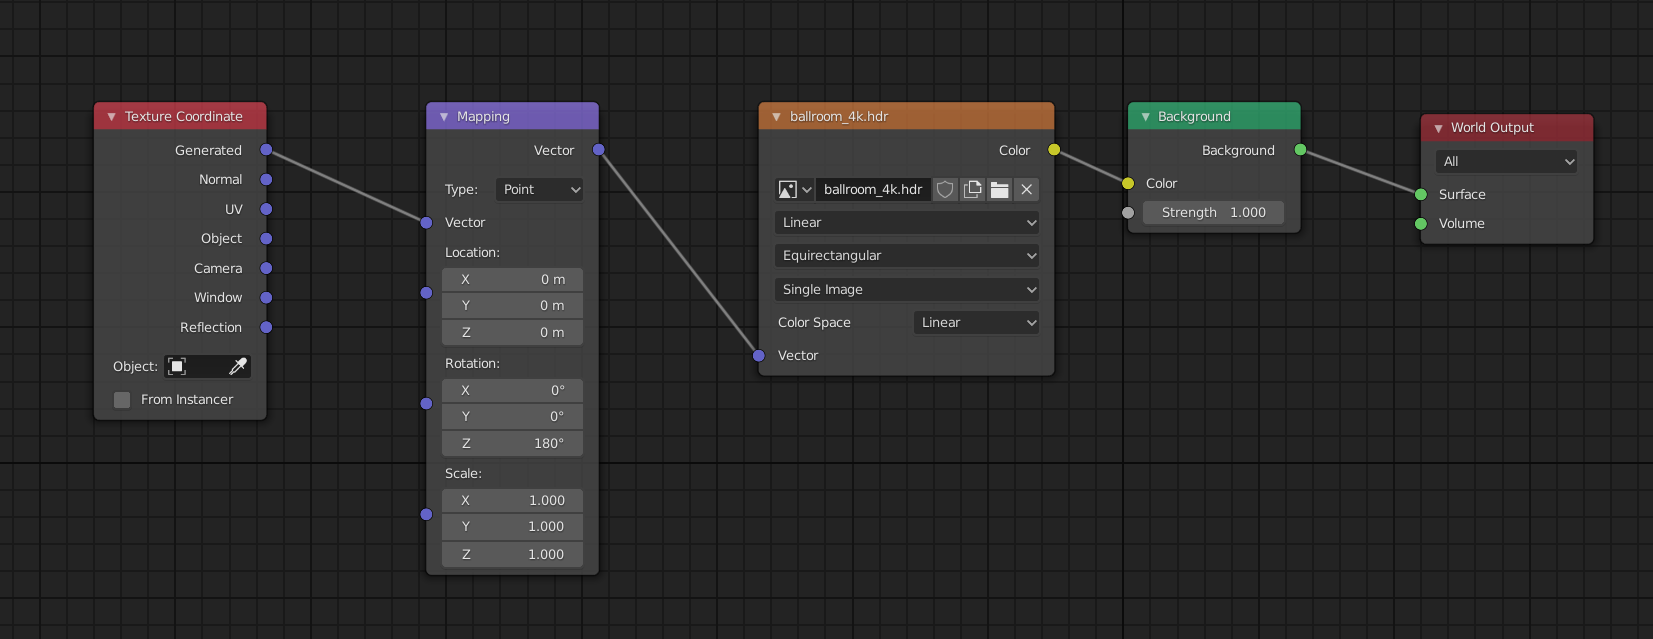
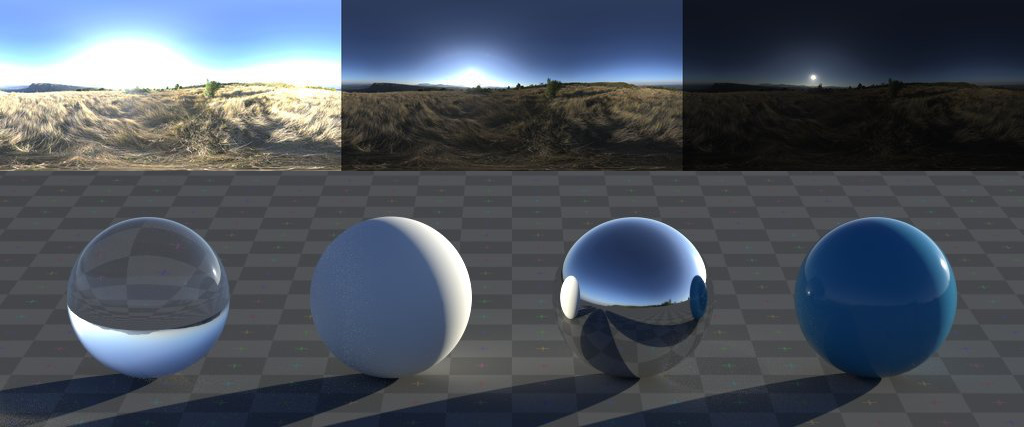
- Working with HDRI for Environment Lighting
- High Dynamic Range Imaging (HDRI) can bring your scenes to life with realistic environmental lighting. HDRI maps capture the light information from real-world scenes, providing your render with varied and natural lighting. Set up an HDRI in the World settings to enhance ambient lighting and reflections.
- Material Setup for Realism
- Materials define the appearance of objects in your render, including color, texture, and reflectivity. For realistic materials, use the Principled BSDF shader in Blender, which simplifies the creation of complex materials like metals, glass, and plastics. Adjust parameters such as roughness, metallic, and specular to match real-world materials.
- For textures, utilize Blender’s texture painting tools or import high-quality images. Pay attention to details like bump mapping and displacement for added realism.
- Experiment with subsurface scattering for materials like skin, wax, or leaves to simulate light passing through objects.
- Adjusting the Render Settings for Quality
- Adjust render settings to balance quality and rendering time. Increase samples for less noise, use denoising for cleaner images, and consider the render engine’s capabilities (Cycles for photorealism, Eevee for speed).
- Previewing and Testing
- Regularly preview your work using the rendered viewport shading. This allows you to quickly adjust lighting and materials without waiting for a full render. Use Blender’s compositor for post-production adjustments to brightness, contrast, and color grading to enhance realism.
In conclusion, achieving realistic renders in Blender involves a combination of proper lighting setup, detailed material creation, and fine-tuning render settings. By following these steps and continuously experimenting, you can create stunning, lifelike visuals that bring your digital creations to life.
Rendering Animations in Blender
Rendering animations in Blender transforms your motion projects into stunning visuals. This process requires understanding both the technical and creative aspects of Blender\"s rendering capabilities. Follow these steps to efficiently render animations.
- Setting Up Your Scene
- Before rendering, ensure your animation is complete. This includes modeling, texturing, rigging, and animating your objects. Proper scene setup is crucial for a successful render.
- Choosing the Right Render Engine
- Select a render engine that fits your project needs. Cycles offers ray-traced rendering for photorealistic results, while Eevee is faster and more suitable for real-time rendering. Consider your project\"s complexity and rendering time when deciding.
- Configuring Render Settings
- In the Render Properties panel, adjust settings for your animation. Key settings include resolution, frame rate, and the start/end frames of your animation. For high-quality renders, increase the sample rate in Cycles or adjust the shadow and reflection settings in Eevee.
- Optimizing for Speed and Quality
- Rendering animations can be time-consuming. To speed up the process without sacrificing quality, consider simplifying your scene, using fewer samples with denoising, or rendering in lower resolution and upscaling later.
- Rendering Your Animation
- Go to the Output Properties panel, choose your output format (e.g., AVI, MPEG, or individual frames as PNGs), and specify the output path. Click on Render > Render Animation or press Ctrl+F12 to start rendering. Blender will render each frame of your animation, which can take a significant amount of time for complex projects.
- Post-Production and Editing
- After rendering, you may want to edit your animation or apply post-production effects. Use Blender’s Video Sequence Editor for basic editing or external software for more complex post-production work.
Rendering animations in Blender is a detailed process that requires patience and practice. By carefully preparing your scene, selecting the appropriate render engine, and optimizing your settings, you can create beautiful animations that showcase your creative vision.
Common Rendering Issues and How to Solve Them
Rendering in Blender can sometimes present challenges that affect the final output. This section covers some common rendering issues and provides solutions to help you achieve the best results.
- Issue: Noise in Renders
- Noise is often caused by insufficient sampling rates. To solve this, increase the number of samples in your render settings. For faster rendering with less noise, consider using denoising features available in Blender, such as the Denoise node in the compositor or enabling AI denoising in the render properties.
- Issue: Long Render Times
- Long render times can be a bottleneck, especially for complex scenes. To optimize, lower the samples for test renders and use more efficient lighting methods like baking lights for scenes not requiring dynamic lighting. Additionally, simplifying your scene by reducing polygon counts or using adaptive subdivision can significantly decrease render times.
- Issue: Fireflies
- Fireflies are bright spots that appear in renders due to various factors like small, bright light sources or highly reflective materials. To mitigate this, increase the clamp indirect setting in your render settings, adjust the threshold in the denoising settings, or use light portals in scenes with environmental lighting.
- Issue: Materials Not Rendering Correctly
- If materials or textures are not appearing as expected, ensure that all textures are correctly linked and UV maps are properly applied. For materials that look different in render than in the viewport, check that all shader nodes are supported by the render engine you are using.
- Issue: Missing Objects in Render
- Objects missing from renders may be accidentally set to be invisible in renders. Check the Outliner to ensure that the camera icon next to your object is enabled. Also, verify that the object’s layers or collections are included in the render layers.
- Issue: Render Crashes
- Render crashes can be caused by insufficient memory. To prevent this, try reducing the resolution of textures, optimizing scene complexity, or rendering in smaller segments if you’re working on an animation. External render farms can also be a solution for very complex scenes or animations.
Encountering issues during rendering is a common part of the 3D creation process. By understanding these problems and knowing how to address them, you can significantly improve your workflow and the quality of your renders in Blender.
Utilizing Blender’s Compositing Features for Post-Production
Blender\"s compositing features are powerful tools for enhancing your renders in post-production. This section will guide you through the steps to leverage these features effectively, allowing you to add the final touches to your projects for a professional finish.
- Understanding the Node-Based Compositor
- Blender\"s compositor uses a node-based system, enabling you to apply and combine various effects non-destructively. Familiarize yourself with the node editor and how to connect different nodes to create complex compositing effects.
- Adding Effects
- Utilize nodes to add effects such as blurs, color correction, and glare to your renders. For instance, the Glare node can be used to add a realistic glow to bright areas, enhancing the sense of lighting in your scene.
- Using Masks and Layers
- Masks and layers can isolate and apply effects to specific parts of your scene. This is particularly useful for compositing different elements together or adjusting the focus and depth of your render.
- Color Grading
- Color grading is essential for setting the mood and improving the visual appeal of your renders. Use the RGB Curves node to adjust the colors and contrast of your image effectively.
- Integrating Live Footage with Rendered Scenes
- Blender’s compositing features allow you to seamlessly integrate 3D renders with live footage. Use the Keying node to remove green screens and the Tracker to match the movement of the 3D camera with the footage.
- Adding Post-Processing Effects
- For the final touches, add post-processing effects like vignettes, lens distortion, and film grain to achieve a cinematic quality. These effects can make your renders feel more dynamic and realistic.
- Rendering Your Composite
- Once you are satisfied with your composite, it\"s time to render it out. Ensure that your composite nodes are connected to the Composite node and that you\"ve selected the correct output settings for your project.
By mastering Blender\"s compositing features, you can elevate the quality of your renders, adding depth, realism, and artistic flair. Practice and experimentation are key to discovering the full potential of these powerful post-production tools.
_HOOK_
READ MORE:
Conclusion: Best Practices and Tips for Efficient Rendering
Rendering in Blender can be optimized through a series of best practices and tips, ensuring both high-quality results and efficient use of time and resources. This conclusion highlights key strategies to enhance your rendering workflow.
- Optimize Your Scene
- Before rendering, simplify your scene by removing any unnecessary geometry, optimizing modifiers, and using lower subdivision levels where possible. This reduces render times without significantly affecting the final quality.
- Manage Render Samples
- Adjust the render samples according to the complexity of your scene. Use fewer samples for scenes with less detail and increase samples for detailed scenes to reduce noise. Utilize denoising tools to improve render times without compromising on quality.
- Use Appropriate Lighting
- Efficient lighting can drastically improve render times. Use environment lighting for natural scenes and consider baking lighting for static objects in architectural or product visualization to speed up render times.
- Optimize Textures and Materials
- High-resolution textures can significantly increase render times. Use optimized, appropriately scaled textures and consider using procedural textures where feasible. Also, simplify materials without affecting the visual quality of the render.
- Select the Right Render Engine
- Choose between Cycles and Eevee based on your project needs. Eevee is faster and more suitable for real-time rendering and animations, while Cycles offers more photorealistic results at the cost of longer render times.
- Utilize Render Layers and Passes
- Rendering in layers and passes allows for more control in post-production and can save time by not having to re-render the entire scene for minor adjustments. This technique is especially useful for complex scenes and animations.
- Keep Your Software Updated
- Stay updated with the latest version of Blender. New versions often include optimizations and new features that can improve rendering performance and quality.
- Use Hardware Efficiently
- Ensure your hardware is utilized efficiently. For CPU rendering, use all available cores. For GPU rendering, adjust tile sizes for optimal performance (smaller tiles for CPU, larger tiles for GPU).
By following these best practices and tips, you can significantly enhance your rendering efficiency in Blender. Always experiment with settings to find the best balance between render quality and time, and keep learning new techniques to improve your workflow.
Unlock the full potential of Blender rendering with our comprehensive guide. From basic techniques to advanced strategies, elevate your skills and bring your creative visions to life with stunning realism and efficiency.