Topic 3d printing blender: Explore the transformative power of 3D printing with Blender, where creativity meets technology to turn your digital designs into tangible realities, opening a world of possibilities for hobbyists and professionals alike.
Table of Content
- How to prepare models created in Blender for 3D printing?
- Getting Started with Blender for 3D Printing
- Designing Models for 3D Printing
- Learning Resources
- Conclusion
- Designing Models for 3D Printing
- Learning Resources
- YOUTUBE: Learn Blender for 3D Printing - Complete Quick and Easy Guide
- Conclusion
- Learning Resources
- Conclusion
- Conclusion
- Introduction to 3D Printing with Blender
- Understanding Blender\"s Interface and Tools for 3D Printing
- Step-by-Step Guide: From Design to 3D Print Using Blender
- Optimizing Your Models for 3D Printing with Blender\"s Toolbox
- Common Challenges and Solutions in 3D Printing with Blender
- Advanced Techniques for Professional 3D Printing Projects
- Exploring the 3D Printing Community\"s Preferred Blender Plugins and Add-ons
- Case Studies: Successful 3D Printing Projects Using Blender
- Future Trends in 3D Printing and Blender\"s Role
- Resources for Learning More about 3D Printing with Blender
How to prepare models created in Blender for 3D printing?
To prepare models created in Blender for 3D printing, follow these steps:
- Check the model\'s scale: Ensure the model is in the correct size and scale for 3D printing. You can use the measuring tools in Blender to verify dimensions.
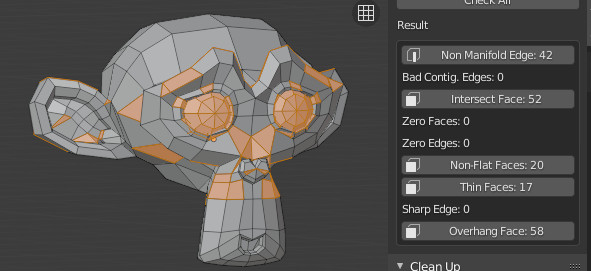
- Check and repair mesh issues: Use the \"3D Print Toolbox\" addon in Blender to check for any potential issues like non-manifold geometry or intersecting faces. Repair these issues before proceeding.
- Create a watertight model: Make sure the model is a solid, watertight mesh with no holes or gaps. Use the \"Solidify\" modifier in Blender to add thickness to thin surfaces.
- Set up the print bed: Orient the model in a way that optimizes printing, minimizes support material, and ensures stability during printing. Use the \"3D Print Toolbox\" addon to help with this step.
- Export the model: Once the model is ready, export it in a compatible file format for 3D printing, such as STL or OBJ. Go to File > Export > Stl in Blender to save the model in STL format.
- Review the exported file: Open the exported file in a 3D printing slicing software like Cura or PrusaSlicer to check for any final issues and prepare the model for printing.
- Adjust settings: Set the printing parameters like layer height, infill density, and supports based on the specific requirements of your 3D printer and the model complexity.
- Send to the 3D printer: Finally, transfer the prepared model file to your 3D printer either via USB or SD card and initiate the printing process.
READ MORE:
Getting Started with Blender for 3D Printing
Blender\"s journey in supporting 3D printing began in 2002, and with version 2.67, it introduced the 3D Printing Toolbox and real-time Mesh Analysis features, making 3D printing more accessible and powerful.
Key Features for 3D Printing
- 3D Printing Toolbox: Offers essential tools for preparing models for printing.
- Mesh Analysis: Provides real-time feedback on the printability of your designs.
- Polygonal Modeling: Utilizes polygons for creating three-dimensional shapes, essential for 3D design.
Designing Models for 3D Printing
Blender allows users to design everything from basic shapes to complex sculptures, optimizing them for 3D printing by scaling, applying modifiers, and exporting in compatible formats.
Steps to Prepare a Model for 3D Printing
- Design your model in Blender using its robust modeling tools.
- Optimize the model\"s structure using the 3D Printing Toolbox.
- Check for and correct any mesh errors to ensure printability.
- Export your model in a 3D printing-compatible file format.

Learning Resources
Blender offers extensive tutorials and guides for 3D printing, ranging from basic introductions to advanced modeling techniques. These resources are designed to help users of all levels achieve their 3D printing goals.
Online Courses and Tutorials
- Beginner guides to get familiar with Blender\"s interface and tools.
- Advanced tutorials for complex model design and optimization.
- Specialized courses on using Blender for 3D printing, available on platforms like Udemy.

Conclusion
With its powerful features, extensive learning resources, and a supportive community, Blender serves as an excellent tool for anyone interested in 3D printing. Whether you\"re a beginner or a seasoned professional, Blender has something to offer for everyone in the realm of 3D printing.

_HOOK_
Designing Models for 3D Printing
Blender allows users to design everything from basic shapes to complex sculptures, optimizing them for 3D printing by scaling, applying modifiers, and exporting in compatible formats.
Steps to Prepare a Model for 3D Printing
- Design your model in Blender using its robust modeling tools.
- Optimize the model\"s structure using the 3D Printing Toolbox.
- Check for and correct any mesh errors to ensure printability.
- Export your model in a 3D printing-compatible file format.
Learning Resources
Blender offers extensive tutorials and guides for 3D printing, ranging from basic introductions to advanced modeling techniques. These resources are designed to help users of all levels achieve their 3D printing goals.
Online Courses and Tutorials
- Beginner guides to get familiar with Blender\"s interface and tools.
- Advanced tutorials for complex model design and optimization.
- Specialized courses on using Blender for 3D printing, available on platforms like Udemy.
Learn Blender for 3D Printing - Complete Quick and Easy Guide
Tutorial: Discover step-by-step guidance in this engaging tutorial video, designed to help you master new skills effortlessly. Uncover useful tips and tricks to enhance your knowledge and become an expert in no time.
How to Use Blender for 3D Printing - The Basics Tutorial
UPDATED VERSION OF THIS VIDEO: https://youtu.be/9EF2VryBAq4 A detailed guide of the basics of bringing a file into and out ...
Conclusion
With its powerful features, extensive learning resources, and a supportive community, Blender serves as an excellent tool for anyone interested in 3D printing. Whether you\"re a beginner or a seasoned professional, Blender has something to offer for everyone in the realm of 3D printing.
Learning Resources
Blender offers extensive tutorials and guides for 3D printing, ranging from basic introductions to advanced modeling techniques. These resources are designed to help users of all levels achieve their 3D printing goals.
Online Courses and Tutorials
- Beginner guides to get familiar with Blender\"s interface and tools.
- Advanced tutorials for complex model design and optimization.
- Specialized courses on using Blender for 3D printing, available on platforms like Udemy.
Conclusion
With its powerful features, extensive learning resources, and a supportive community, Blender serves as an excellent tool for anyone interested in 3D printing. Whether you\"re a beginner or a seasoned professional, Blender has something to offer for everyone in the realm of 3D printing.
_HOOK_
Conclusion
With its powerful features, extensive learning resources, and a supportive community, Blender serves as an excellent tool for anyone interested in 3D printing. Whether you\"re a beginner or a seasoned professional, Blender has something to offer for everyone in the realm of 3D printing.

Introduction to 3D Printing with Blender
Blender is a powerful, free, and open-source 3D modeling software that revolutionizes the process of preparing models for 3D printing. Since its inception in 2002, Blender has supported 3D printing modeling and file formats, becoming an indispensable tool for both beginners and professionals. The introduction of version 2.67 marked a significant milestone with the addition of the 3D Printing Toolbox and real-time Mesh Analysis features, further simplifying and enhancing the 3D printing workflow.
- Blender\"s 3D Printing Toolbox offers a suite of tools specifically designed to prepare models for 3D printing, ensuring they are free from common issues that could affect print quality.
- Real-time Mesh Analysis allows users to identify and rectify potential problems before printing, significantly reducing wasted time and materials.
- Polygonal modeling, a core feature of Blender, uses polygons to create three-dimensional shapes. This approach is essential for designing detailed models that are both intricate and print-ready.
Learning to navigate Blender\"s interface and utilizing its comprehensive toolset can unlock endless possibilities for 3D printing enthusiasts. From creating basic shapes to complex sculptures, Blender streamlines the process of bringing digital creations to the physical world. Its ability to scale, apply modifiers, and export models in print-compatible formats makes it a go-to choice for anyone looking to explore the potential of 3D printing.
Understanding Blender\"s Interface and Tools for 3D Printing
Blender\"s interface and specialized tools are designed to facilitate the 3D printing process, making it accessible for users of all skill levels. The software\"s comprehensive features allow for the creation, editing, and preparation of models for 3D printing.
- User Interface: Blender\"s user-friendly interface includes a 3D viewport for model visualization, a timeline for animation control, and panels for tools and settings, ensuring a smooth workflow from design to print.
- 3D Printing Toolbox: This add-on provides essential tools for analyzing and preparing models for printing, including checks for thickness, overhangs, and non-manifold edges.
- Mesh Analysis: A feature that allows for real-time analysis of the model, highlighting potential issues that could affect the print quality.
- Units and Measurements: Blender supports customizable units and measurements, enabling precise scaling and sizing of models to fit specific 3D printing requirements.
To maximize the potential of Blender for 3D printing, users should familiarize themselves with the software\"s navigation, including zooming, panning, and rotating views, to efficiently work on models. Additionally, understanding how to use modifiers and the sculpting tools can greatly enhance the detail and readiness of models for printing.
- Begin by setting up your workspace to optimize access to frequently used tools.
- Enable the 3D Printing Toolbox through the Add-ons section in User Preferences.
- Utilize the Mesh Analysis feature to inspect your model for any issues that need correction.
- Adjust the unit scale in the Scene settings to match the physical dimensions required for your print.
Blender\"s vast array of tools and features, combined with a supportive community and extensive learning resources, makes it an ideal software for 3D printing projects ranging from simple models to intricate designs.
Step-by-Step Guide: From Design to 3D Print Using Blender
- Starting a New Project: Open Blender and create a new project. Familiarize yourself with the user interface, including the 3D viewport, toolbars, and panels.
- Modeling Your Design: Use Blender’s modeling tools to create your design. This can range from simple shapes to complex models. Utilize modifiers to refine your shapes and add details.
- Checking Model Readiness: Activate the 3D Printing Toolbox add-on via Preferences to access tools that analyze your model for print readiness, such as checking for non-manifold edges or ensuring wall thickness.
- Correcting Issues: Use the information from the 3D Printing Toolbox to make necessary adjustments to your model. This may involve fixing non-manifold edges, adjusting wall thickness, or ensuring the model is watertight.
- Preparing for Export: Once your model is ready and free of issues, it\"s time to prepare it for printing. This involves setting the correct dimensions and orientation for your print.
- Exporting Your Model: Export your model in a format compatible with your 3D printer, typically STL or OBJ. Ensure the export settings match the requirements of your 3D printing software.
- Slicing Your Model: Open your model in a slicing software to convert the 3D model into a series of layers and generate the G-code necessary for 3D printing.
- Printing Your Model: Load the G-code into your 3D printer and begin the printing process. Monitor the print for any issues that may arise during this stage.
- Post-Processing: After printing, you may need to remove support structures, sand rough edges, or apply other finishing touches to achieve the desired quality.
This guide outlines the basic steps required to take your 3D design from Blender to a physical 3D print, emphasizing the importance of model preparation and troubleshooting to ensure successful printing outcomes.
Optimizing Your Models for 3D Printing with Blender\"s Toolbox
Blender\"s 3D Printing Toolbox is an essential add-on for anyone looking to prepare their models for 3D printing. This powerful tool helps identify and fix common issues that can affect the printability of your designs. Here\"s how to optimize your models using Blender\"s Toolbox:
- Enable the 3D Printing Toolbox: Go to Edit > Preferences > Add-ons, and search for the 3D Printing Toolbox. Enable it to add the toolbox to your Blender workspace.
- Analyze Your Model: Use the toolbox to check for errors such as non-manifold edges, overhangs, and wall thickness. This step is crucial for ensuring that your model is structurally sound and ready for printing.
- Fix Common Issues: The toolbox provides direct solutions for common problems, including making the model manifold, checking for intersecting faces, and ensuring the model has a sufficient wall thickness.
- Scale and Orientation: Adjust the scale of your model to match the physical dimensions you desire. Ensure the model is correctly oriented to minimize the need for supports.
- Export for Printing: Once your model passes all checks, export it in a 3D printing-friendly format such as STL or OBJ. The toolbox can automatically apply the necessary settings for optimal printing.
By following these steps, you can significantly enhance the quality and printability of your models. The 3D Printing Toolbox in Blender not only streamlines the preparation process but also educates users on the intricacies of 3D model optimization for printing.
_HOOK_
Common Challenges and Solutions in 3D Printing with Blender
3D printing with Blender presents a unique set of challenges, from model preparation to the final print. Understanding these challenges and knowing how to address them can significantly improve your 3D printing experience. Here are some common issues and their solutions:
- Non-Manifold Edges: These are edges that do not belong to exactly two faces, leading to printing errors. Using Blender\"s \"Select Non-Manifold\" tool can help identify and correct these issues.
- Overhangs Without Support: Overhangs exceeding a 45-degree angle often require support structures to print correctly. Blender\"s modeling tools can be used to design custom supports or modify the model to reduce overhangs.
- Inadequate Wall Thickness: Thin walls can lead to breaks or holes in the final print. The 3D Printing Toolbox in Blender allows you to check for and correct wall thickness issues.
- Scaling Issues: Incorrectly scaled models can result in prints that are too small or too large. Blender\"s measurement and scaling tools enable precise control over model dimensions.
- Warping: Warping occurs when parts of the model lift off the print bed. Ensuring proper bed adhesion and using a heated bed can mitigate warping. Blender can be used to add brims or rafts to improve adhesion.
By leveraging Blender\"s comprehensive toolset and addressing these common challenges, you can enhance the quality of your 3D prints and enjoy a more successful 3D printing experience.
Advanced Techniques for Professional 3D Printing Projects
Mastering advanced techniques in Blender can elevate your 3D printing projects to a professional level. Here are some sophisticated methods to enhance your workflow and output quality:
- Boolean Operations for Complex Models: Utilize Boolean modifiers to combine or subtract mesh objects, allowing for intricate designs and parts assembly.
- Non-Destructive Modelling with Modifiers: Apply modifiers like Mirror, Array, and Solidify to create complex, symmetrical, or detailed models without permanently altering the base mesh.
- Retopology for Optimized Printing: Use retopology techniques to create a mesh with a clean, efficient topology, which is especially important for large prints or models requiring high detail.
- Advanced Sculpting Techniques: Leverage Blender’s sculpting tools for detailed model work, enhancing textures and features to bring your prints to life.
- UV Unwrapping for Texture Application: For models requiring textures, master UV unwrapping to accurately apply images or patterns onto your 3D model.
- Custom Support Structures: Design custom supports within Blender for complex prints, giving you control over support placement and reducing post-processing work.
- Material and Slicer Settings: Understand how different material properties and slicer settings impact your print, and adjust your model accordingly in Blender.
Implementing these advanced techniques requires patience and practice but leads to improved efficiency, reduced material waste, and stunningly detailed prints. Blender’s vast toolkit supports a creative and iterative design process, allowing professionals to push the boundaries of 3D printing.
Exploring the 3D Printing Community\"s Preferred Blender Plugins and Add-ons
The Blender community actively utilizes various plugins and add-ons to enhance 3D printing workflows. These tools significantly improve efficiency, model quality, and the overall printing process. Here are some of the top-recommended Blender plugins and add-ons for 3D printing:
- 3D Printing Toolbox: An essential tool for preparing models for printing, offering features like checks for thickness, overhangs, and non-manifold edges.
- MeshLint: A diagnostic tool that identifies common mesh problems that could affect the printability of your design.
- MeasureIt: Allows users to add dimension annotations directly onto their 3D models, facilitating accurate scaling for printing.
- Archimesh: Ideal for architectural models, this add-on helps in creating detailed structures that are print-ready.
- PuzzleUrPrint: Specially designed for 3D printing, this addon enables the dissection of objects and addition of connectors for easy assembly post-print.
Integrating these plugins and add-ons into your Blender workflow can streamline the process from model creation to the final print, ensuring high-quality results and a more efficient design process. Whether you\"re a hobbyist or a professional, these tools are invaluable for anyone looking to optimize their 3D printing projects.
Case Studies: Successful 3D Printing Projects Using Blender
Blender has been instrumental in various successful 3D printing projects across different industries. Here are some notable case studies highlighting the versatility and capability of Blender in transforming ideas into tangible products:
- Automotive Industry Innovations: Companies like Volkswagen Autoeuropa have utilized Blender for creating precise tools, jigs, and fixtures for their assembly lines. This approach has significantly reduced costs and improved production efficiency.
- Architectural Models: Architects and designers leverage Blender to create detailed models of buildings and structures. These models are then 3D printed to assist in the visualization and planning of architectural projects.
- Medical Prosthetics and Implants: The medical industry has seen remarkable applications of Blender in designing custom prosthetics and implants, tailored to fit individual patients for improved comfort and functionality.
- Educational Tools and Models: Educational institutions have employed Blender to design and 3D print models that enhance learning experiences in sciences, engineering, and art.
- Custom Gaming Figurines: The gaming community has embraced Blender for creating detailed figurines and replicas from their favorite video games, showcasing the software’s precision and adaptability to intricate designs.
These case studies demonstrate Blender\"s vast potential in 3D printing, offering solutions from prototyping to final product creation across various sectors. By embracing Blender, professionals and hobbyists alike can push the boundaries of digital fabrication.
Future Trends in 3D Printing and Blender\"s Role
As 3D printing technology continues to evolve, its integration with Blender is set to play a pivotal role in shaping the future of digital fabrication. Here are key trends and how Blender supports these advancements:
- Increase in Material Diversity: The expansion of materials used in 3D printing, from metals to bio-materials, will require Blender\"s versatility in modeling for different material properties and constraints.
- Enhanced Print Precision: As 3D printing technology advances towards finer resolutions, Blender\"s detailed modeling capabilities become even more crucial for creating designs that leverage this increased precision.
- Integration with Augmented Reality (AR) and Virtual Reality (VR): Blender\"s support for AR and VR content creation will enable designers to visualize and modify their 3D models in immersive environments before printing.
- Automated Design Optimization: Future Blender plugins and tools may offer automated design optimizations for 3D printing, including structural integrity analysis and material usage optimization.
- Customization and Personalization: As demand for personalized products grows, Blender\"s flexibility in creating custom designs will become even more valuable, allowing for easy adjustments and bespoke creations.
- Sustainable and Eco-Friendly Printing: With a growing focus on sustainability, Blender\"s role in designing for eco-friendly materials and minimizing waste through efficient model design will be emphasized.
Blender\"s continuous development, driven by a robust community and open-source innovation, positions it as a key player in adapting to and shaping the future trends of 3D printing. Its ability to merge creativity with technological advancements makes it an essential tool for the next generation of 3D printing professionals and hobbyists alike.
_HOOK_
READ MORE:
Resources for Learning More about 3D Printing with Blender
To dive deeper into 3D printing with Blender and enhance your skills, numerous resources are available ranging from online courses to community forums. Here are some essential resources to get started:
- Blender Studio: Offers training specifically for 3D printing, including the use of the 3D Printing Toolbox and Mesh Analysis.
- Udemy Courses: Various comprehensive courses like \"3D Printing from Zero to Hero in Blender\" provide in-depth learning from basic to advanced techniques.
- All3DP Blender Tutorials: A great starting point for beginners, offering step-by-step guides on designing and preparing models for 3D printing.
- Blender.org Tutorials: The official Blender website provides tutorials covering the basics to more advanced 3D modeling techniques suitable for 3D printing.
- YouTube: A vast resource of free tutorials and guides that cater to all levels, from basic introductions to complex modeling tips for 3D printing.
Engaging with the Blender community through forums and social media groups can also provide valuable insights, feedback, and support as you explore the world of 3D printing with Blender.
Embrace the future of digital fabrication by mastering 3D printing with Blender, where endless creativity meets precision. Unlock your potential and transform your visions into reality with this powerful tool.