Topic blender texture paint erase: Discover how to master Blender"s texture paint erase tool and elevate your 3D creations. This guide offers essential techniques and tips to enhance your texturing skills effectively and efficiently.
Table of Content
- Texture Paint Erase Tool
- Applying Transparency to Textures
- Additional Tips and Techniques
- Applying Transparency to Textures
- Additional Tips and Techniques
- Additional Tips and Techniques
- Introduction to Blender Texture Paint Erase
- What is the shortcut in Blender\'s texture paint mode to erase instead of painting?
- Key Features of the Erase Tool in Blender
- YOUTUBE: How to Use Texture Paint in Blender
- Step-by-Step Guide to Using the Erase Tool
- Advanced Techniques for Texture Erasing and Correction
- Common Challenges and Solutions in Texture Erasing
- Best Practices for Efficient Texture Painting and Erasing
- Additional Resources and Tutorials for Blender Texture Painting
Texture Paint Erase Tool
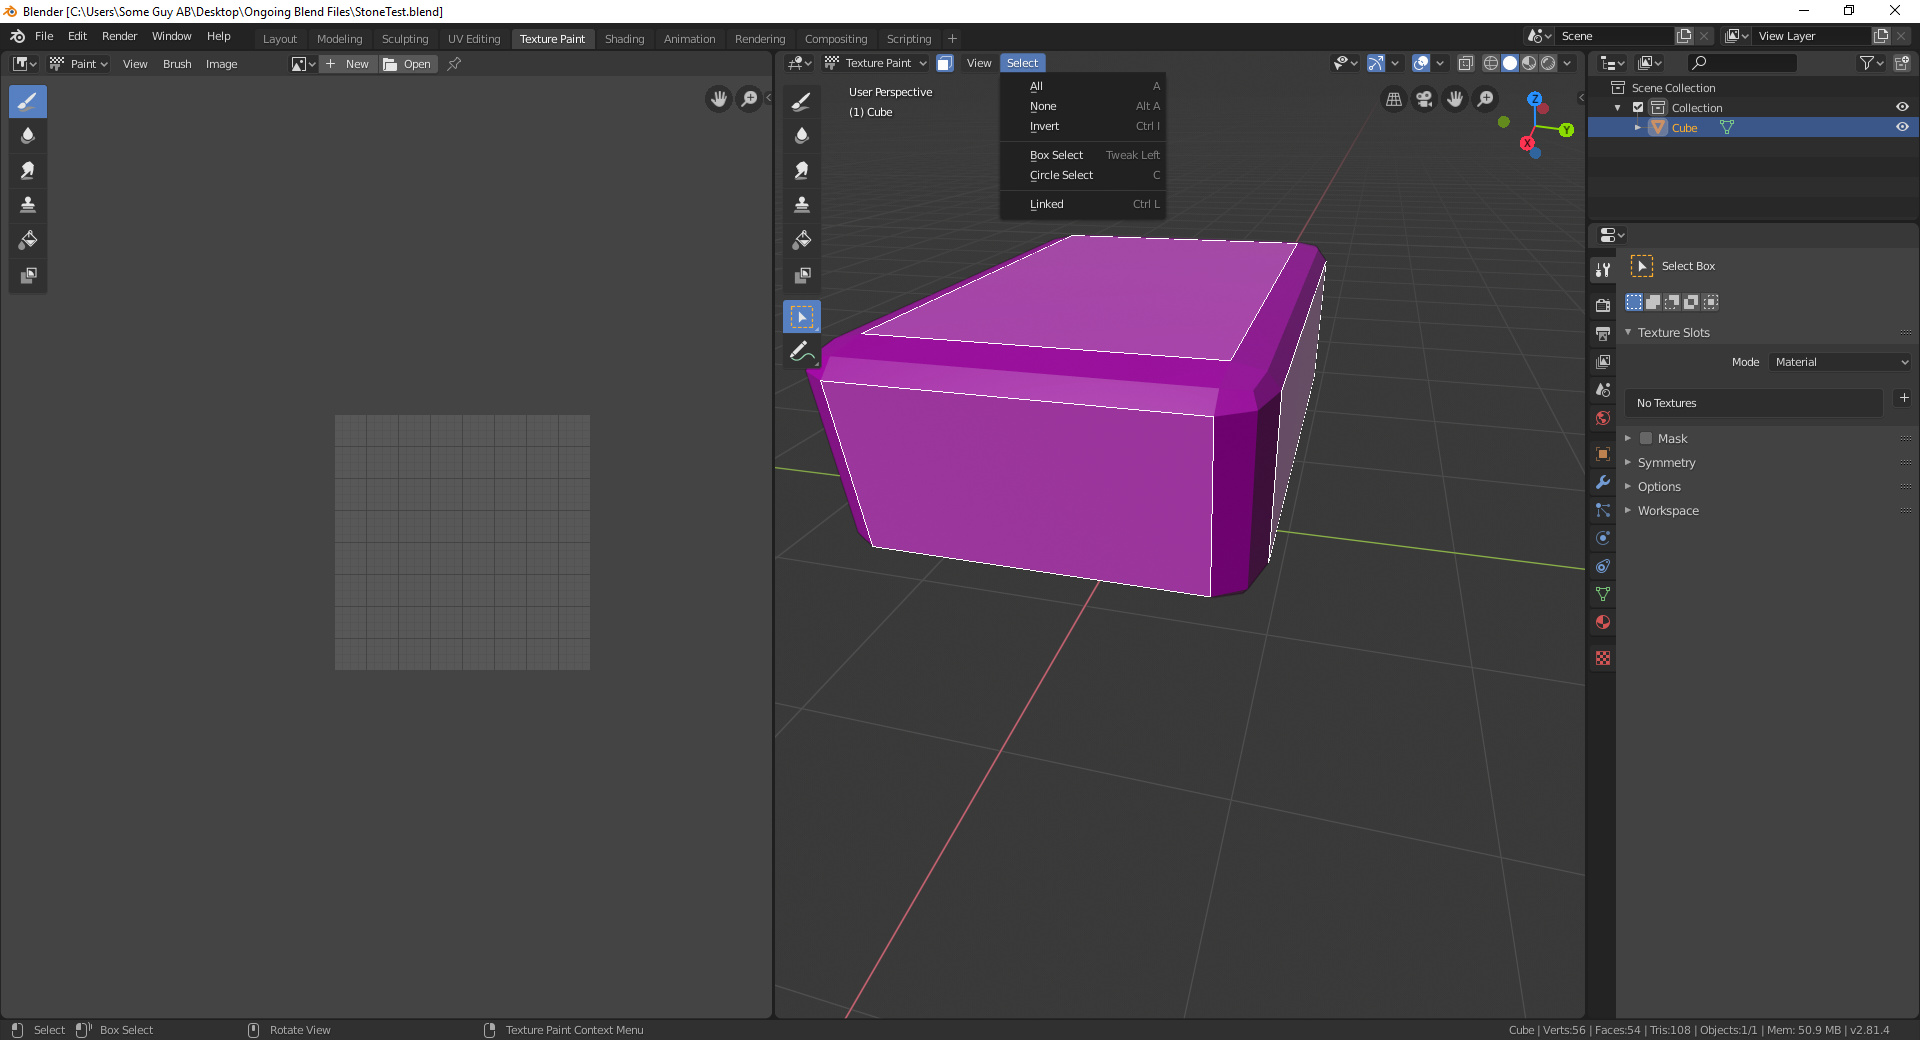
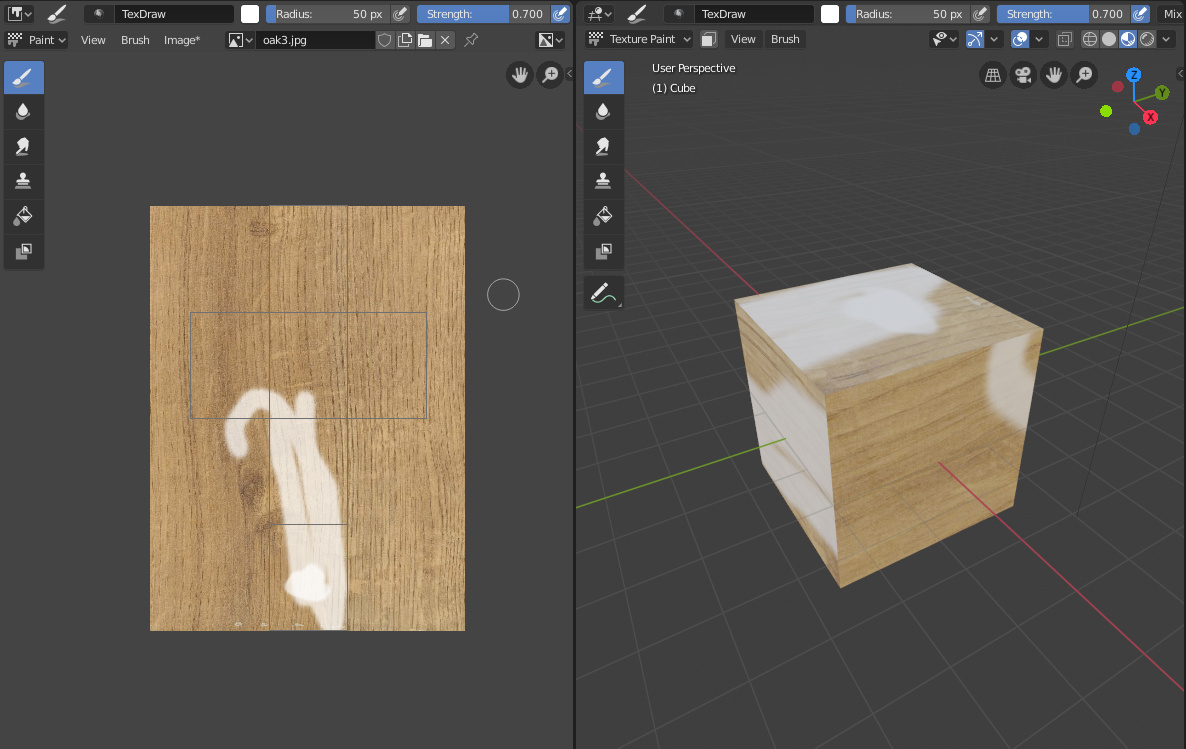
To utilize the Texture Paint Erase tool, select it from the Toolbox in the Texture Paint mode. You can erase textures by clicking and dragging on the model\"s surface. For quicker access, use the hotkey Shift+E. This tool is essential for cleaning up textures and removing unwanted paint strokes.

READ MORE:
Applying Transparency to Textures
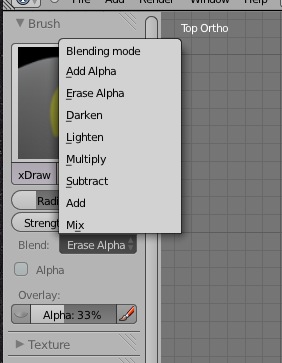
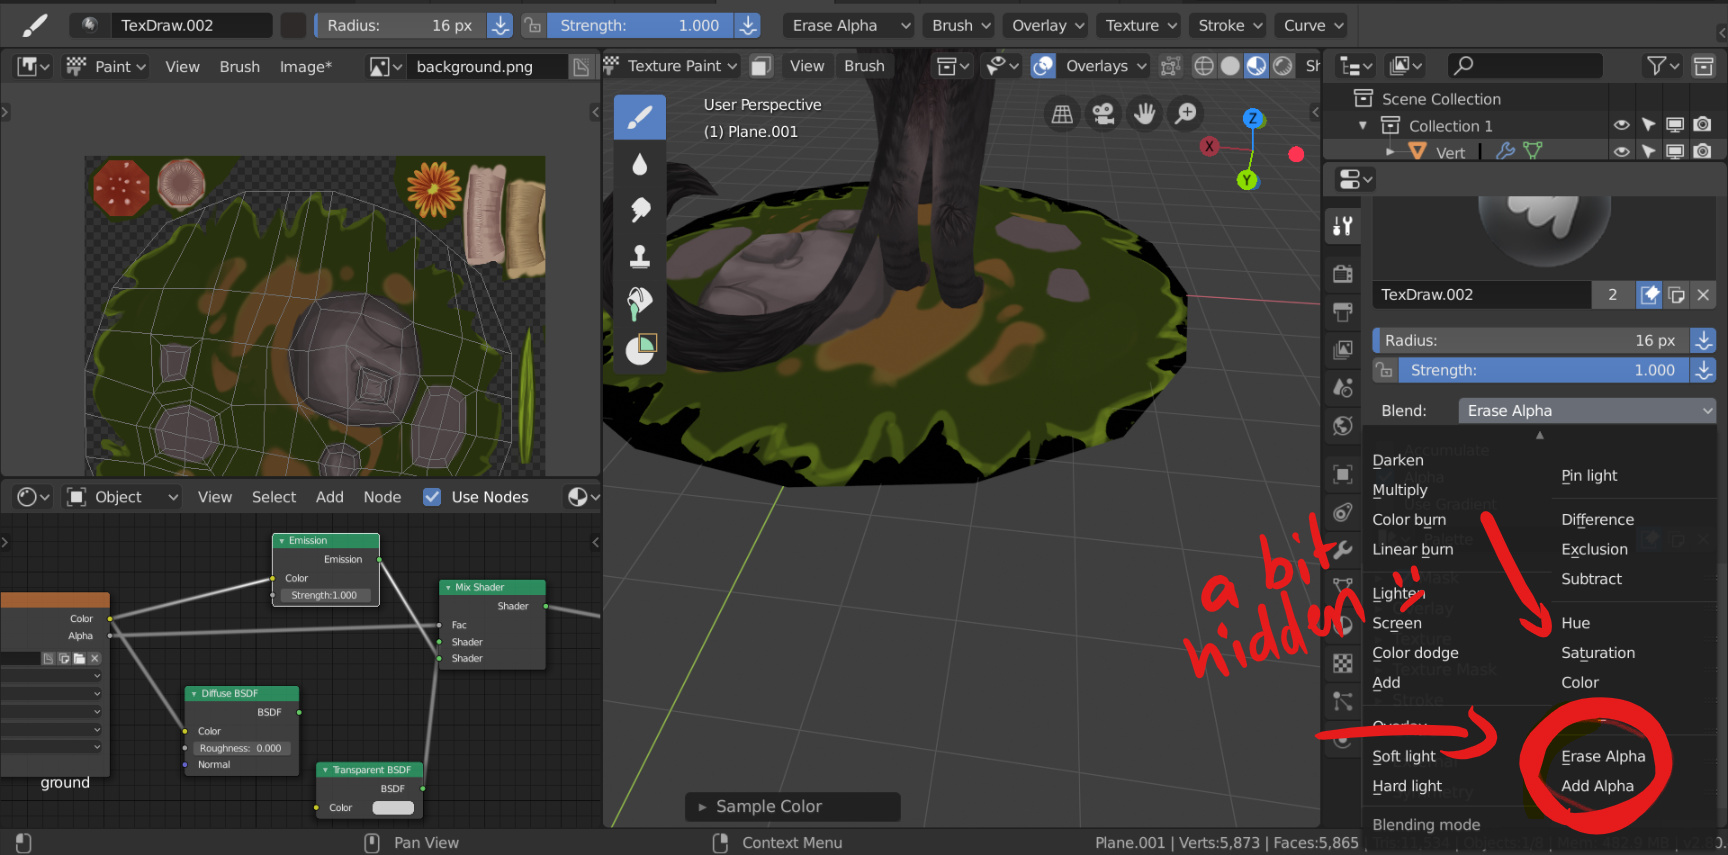
To add transparency to your textures, navigate to the image editor or the 3D viewport in texture paint mode. In the header bar, find the \"Mix\" option which represents the Brush Blender Mode. Switch this to the \"erase alpha\" option to start introducing transparency into your UV map, allowing for more nuanced texture effects.
Additional Tips and Techniques
- Explore various brush settings to adjust the intensity and flow of the erase function.
- Use layers to manage different aspects of your texture painting, making it easier to erase without affecting underlying work.
- Experiment with the \"Stencil\" mode for precise control over where to erase or apply textures.
Mastering these techniques will give you greater flexibility and creativity in your texture painting projects, allowing for more detailed and customized textural effects on your 3D models.

Applying Transparency to Textures
To add transparency to your textures, navigate to the image editor or the 3D viewport in texture paint mode. In the header bar, find the \"Mix\" option which represents the Brush Blender Mode. Switch this to the \"erase alpha\" option to start introducing transparency into your UV map, allowing for more nuanced texture effects.
Additional Tips and Techniques
- Explore various brush settings to adjust the intensity and flow of the erase function.
- Use layers to manage different aspects of your texture painting, making it easier to erase without affecting underlying work.
- Experiment with the \"Stencil\" mode for precise control over where to erase or apply textures.
Mastering these techniques will give you greater flexibility and creativity in your texture painting projects, allowing for more detailed and customized textural effects on your 3D models.

_HOOK_
Additional Tips and Techniques
- Explore various brush settings to adjust the intensity and flow of the erase function.
- Use layers to manage different aspects of your texture painting, making it easier to erase without affecting underlying work.
- Experiment with the \"Stencil\" mode for precise control over where to erase or apply textures.
Mastering these techniques will give you greater flexibility and creativity in your texture painting projects, allowing for more detailed and customized textural effects on your 3D models.

Introduction to Blender Texture Paint Erase
Blender\"s Texture Paint Erase function is a powerful tool within the software\"s texture painting mode, allowing artists and designers to refine their creations with precision. This feature is essential for removing unwanted texture details or correcting errors, enabling users to achieve the desired look and feel for their 3D models.
Utilizing the erase function, you can work directly on your model\"s surface in real-time, offering a highly interactive and intuitive approach to texturing. Whether you\"re working on detailed character models, complex architectural designs, or simple objects, understanding how to effectively use this tool can significantly impact the quality of your final output.
- Accessing the Erase Tool: Learn how to navigate Blender\"s interface to find and use the erase tool within the Texture Paint mode.
- Adjustable Settings: Explore the various settings and options available for the erase tool, including strength, size, and blend modes, to achieve different effects.
- Practical Applications: Discover the practical uses of the erase tool, from making minor adjustments to performing major texture overhauls.
- Tips and Tricks: Gain insight into professional tips and tricks to enhance your texture painting workflow and achieve more precise results with the erase tool.
Mastering the Texture Paint Erase function in Blender not only enhances your ability to correct mistakes but also empowers you to experiment with textures creatively. By integrating this tool into your texturing process, you can push the boundaries of your artistic expression and bring your 3D models to life with unparalleled detail and realism.
What is the shortcut in Blender\'s texture paint mode to erase instead of painting?
In Blender\'s texture paint mode, the shortcut to erase instead of painting is by holding down the Ctrl key while painting. This will allow you to erase the texture instead of adding to it.
Here is a step-by-step guide to using the shortcut:
- Open Blender and select the object you want to texture paint.
- Go to the Texture Paint workspace.
- Select the brush you want to use for erasing.
- Hold down the Ctrl key on your keyboard.
- Click and drag your mouse over the areas you want to erase on the texture.
- Release the Ctrl key when you are done erasing.
By following these steps and using the Ctrl key as a shortcut, you can easily switch to erasing mode while texture painting in Blender.
Key Features of the Erase Tool in Blender
The Erase Tool in Blender\"s Texture Paint mode is a versatile and indispensable feature for any artist looking to refine their 3D models with precision and creativity. Here are some of the key features that make the Erase Tool a critical component of the texture painting toolkit:
- Variable Opacity: Adjust the opacity of the eraser to softly blend textures or completely remove them, offering flexibility in your texturing process.
- Brush Size Customization: Easily adjust the size of the eraser brush to target specific areas or cover larger sections, enhancing control and efficiency.
- Soft Edge Options: Utilize soft edges to create seamless transitions between textures, perfect for subtle corrections or blending.
- Pressure Sensitivity: For those using a graphics tablet, the eraser supports pressure sensitivity, allowing the strength of the erase effect to be dynamically controlled by the pressure applied on the tablet.
- Undo Functionality: Quickly revert any changes made with the Erase Tool, ensuring that you can experiment and adjust textures without permanent consequences.
- Custom Brushes: Beyond the default eraser, Blender allows the creation and use of custom brushes for erasing, offering unique effects and textures.
- Texture Masking: Protect certain areas of your texture from being erased by using masking tools, providing precision in texture editing.
These features collectively make the Erase Tool in Blender a powerful ally in texture painting, enabling artists to achieve professional-grade results with ease. Whether correcting mistakes or creatively modifying textures, the Erase Tool provides the flexibility and control needed to bring your artistic vision to life.

How to Use Texture Paint in Blender
Tutorial: Explore our engaging and informative tutorial video that will guide you through step-by-step instructions on mastering a new skill. Get ready to learn, create, and unleash your creativity! Masking: Dive into the world of masking with our visually captivating video presentation. Discover the magic of blending, hiding, and revealing elements to enhance your digital artistry. Watch now and upgrade your editing game!
Isolate Areas When Texture Painting in Blender 3.0
Grant\'s Character Course: ...
Step-by-Step Guide to Using the Erase Tool
Using the Erase Tool in Blender\"s Texture Paint mode allows you to effectively remove unwanted textures or refine your artwork with precision. Follow this step-by-step guide to master the use of the Erase Tool and enhance your texturing skills:
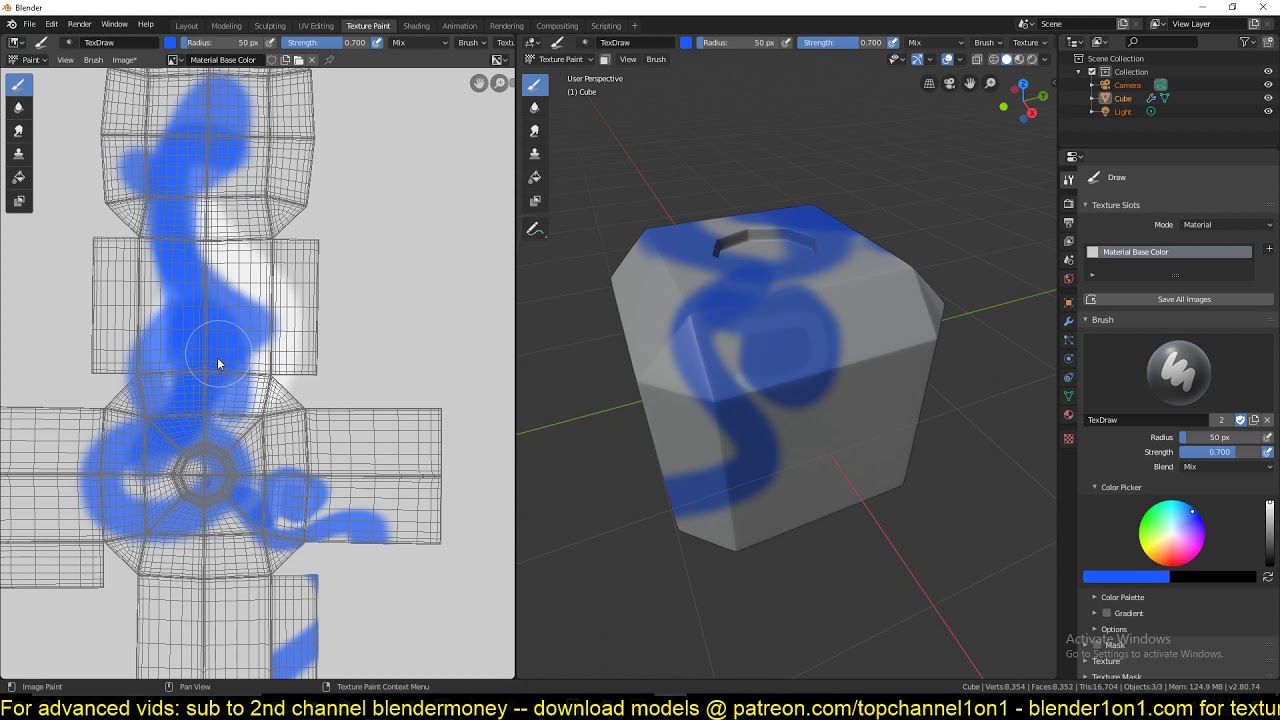
- Open Texture Paint Mode: Start by selecting your object and switching to Texture Paint mode from the mode menu in the 3D Viewport.
- Select the Erase Tool: In the toolshelf on the left side of the 3D Viewport, find and select the Erase Tool from the available painting tools.
- Adjust Brush Settings: Before beginning to erase, adjust the eraser\"s size, strength, and blend mode in the Tool Settings to suit the specific needs of your project.
- Begin Erasing: Click and drag over the area of the texture you wish to erase. Use steady, controlled motions for the best results.
- Utilize Layer Masks: For complex textures, consider using layer masks to non-destructively erase textures, allowing for easier adjustments and revisions.
- Experiment with Soft and Hard Edges: Depending on the effect you\"re aiming for, toggle between soft and hard edges to blend or sharply define the erased areas.
- Pressure Sensitivity: If using a graphics tablet, take advantage of pressure sensitivity to dynamically control the erasure intensity for more nuanced results.
- Save Your Work: Regularly save your project to avoid losing any progress. Blender\"s undo feature is helpful, but it\"s always safe to have a saved version of your work.
By following these steps, you\"ll be able to utilize the Erase Tool effectively, ensuring that your textures look exactly as you intend. Remember, practice is key to mastering any tool in Blender, so don\"t hesitate to experiment with different settings and techniques to find what works best for your artistic vision.

_HOOK_
Advanced Techniques for Texture Erasing and Correction
For artists seeking to elevate their texture painting skills in Blender, mastering advanced erasing and correction techniques is crucial. These methods offer greater control and flexibility, allowing for the creation of more complex and detailed textures. Here are some advanced strategies to enhance your texture erasing and correction processes:
- Stenciling for Precision: Use stencils to erase textures with high precision. This method allows you to apply or remove texture only where needed, perfect for detailed work and intricate designs.
- Layer Blending Modes: Experiment with different layer blending modes when erasing textures. Blending modes can significantly affect the outcome of your erasures, adding depth and dimension to your work.
- Clone Tool for Corrections: The Clone Tool can be invaluable for correcting mistakes in texture painting. By cloning parts of the texture from one area to another, you can seamlessly fix errors or inconsistencies.
- Using Masks for Non-Destructive Editing: Employ masks to erase textures non-destructively. This approach allows you to make changes without permanently altering the underlying texture, offering flexibility in experimentation and adjustments.
- Gradient Erase for Smooth Transitions: Utilize gradient erasing to create smooth transitions between textures. This technique is particularly useful for blending or fading textures together harmoniously.
- Texture Baking for Complex Edits: For advanced texture corrections, consider baking your textures. This process can help in consolidating your edits, making the texture easier to manage and modify.
By incorporating these advanced techniques into your workflow, you can significantly improve the quality and complexity of your texture work in Blender. Remember, the key to mastering these methods is practice and experimentation, so don\"t hesitate to try different approaches to find what best suits your artistic vision.
Common Challenges and Solutions in Texture Erasing
Texture erasing in Blender can sometimes present challenges, especially for those new to the tool or working on complex projects. Recognizing these challenges and knowing how to address them can significantly streamline your workflow. Here are some common issues encountered with texture erasing, along with practical solutions:
- Accidental Over-Erasing: It\"s easy to accidentally erase more texture than intended. To mitigate this, use a lower strength setting for your eraser or utilize the undo function (Ctrl + Z) to revert unwanted changes immediately.
- Difficulty in Erasing Hard-to-Reach Areas: For textures in tight or complex areas, zoom in for a closer view and use a smaller brush size. This provides better control and precision in your erasing efforts.
- Uneven Texture Blending: When textures do not blend smoothly after erasing, consider using a soft edge brush or adjusting the brush\"s opacity. These adjustments can help create a more seamless transition between textures.
- Maintaining Texture Quality: High-quality textures can sometimes degrade when edited. To preserve quality, work with higher resolution textures and save your work in a lossless format whenever possible.
- Layer Confusion: Managing multiple texture layers can become confusing, leading to accidental erasures on the wrong layer. Always double-check which layer is active before beginning to erase and consider naming layers for clarity.
- Undo History Limit: Blender has a limit on the number of undo steps, which can be problematic in extensive editing sessions. Regularly save your work in different stages to prevent loss of progress.
Overcoming these challenges requires patience, practice, and a thorough understanding of Blender\"s Texture Paint mode. By applying these solutions, you can enhance your texture erasing skills and achieve better results in your 3D projects.
Best Practices for Efficient Texture Painting and Erasing
To achieve professional and high-quality results in texture painting and erasing within Blender, incorporating a set of best practices into your workflow is essential. These tips will help you work more efficiently, allowing for greater creativity and precision in your texturing projects:
- Plan Your Layers: Organize your texture painting project into layers. This makes it easier to manage different elements of your texture and facilitates non-destructive editing.
- Use a Graphics Tablet: For more nuanced control over your painting and erasing, a graphics tablet is highly recommended. The pressure sensitivity allows for more dynamic and expressive strokes.
- Customize Your Brushes: Don\"t rely solely on default brushes. Customize your brushes to suit the specific needs of your project, whether for painting or erasing.
- Keep Your Textures Organized: Maintain an organized file structure for your textures. This helps in quickly locating and applying the right textures, as well as managing revisions and edits.
- Experiment with Blending Modes: Use blending modes creatively to achieve unique effects in your texture work. Understanding how different modes interact can add depth and complexity to your textures.
- Practice Non-Destructive Editing: Make use of layer masks and other non-destructive techniques. This approach allows you to make changes without permanently altering your original textures.
- Regularly Save Your Work: Ensure you regularly save your project and create backups. This prevents data loss and allows you to explore different creative directions without worry.
- Stay Updated with Blender\"s Features: Blender is constantly evolving. Stay updated with the latest features and tools that can enhance your texture painting and erasing techniques.
By following these best practices, you can enhance your efficiency and creativity in Blender\"s Texture Paint mode. Remember, the key to mastering texture painting and erasing is practice, experimentation, and a deep understanding of your tools.
READ MORE:
Additional Resources and Tutorials for Blender Texture Painting
Enhancing your skills in Blender\"s Texture Paint mode can be achieved by exploring a variety of resources and tutorials tailored to all skill levels. Below is a curated list of resources that offer comprehensive guidance and tips for mastering texture painting and erasing techniques in Blender:
- Official Blender Tutorials: The Blender Foundation provides a series of official tutorials that cover the basics to advanced techniques in texture painting.
- Online Courses and Workshops: Platforms like Udemy, Coursera, and Skillshare feature courses on Blender, including focused modules on texture painting and sculpting.
- YouTube Tutorials: YouTube is a goldmine for Blender tutorials, with many experienced artists sharing their workflows, tips, and tricks for texture painting and erasing.
- Blender Artist Forums: The Blender Artist community forums are a great place to ask questions, share your work, and receive feedback from other Blender users.
- Books and eBooks: Several comprehensive guides and books have been written on Blender, offering in-depth tutorials and projects to practice texture painting.
- BlenderNation: BlenderNation regularly posts articles, tutorials, and news updates, providing valuable insights into the latest tools and techniques in Blender.
By leveraging these resources, you can significantly improve your texture painting abilities in Blender. Whether you\"re a beginner looking to understand the basics or an experienced artist aiming to refine your skills, there\"s a wealth of knowledge available to support your journey.
Embracing the power of Blender\"s texture paint erase tool can transform your 3D projects, unleashing new levels of creativity and precision. Dive into these techniques and practices to bring your artistic visions to life with unmatched detail and realism.