Topic blender texture paint tutorial: Discover the secrets of texture painting in Blender with our detailed tutorial, designed to guide beginners and pros alike through the intricate process of bringing 3D models to life with stunning, realistic textures.
Table of Content
- Getting Started with Texture Painting
- Basic Texture Painting Techniques
- Advanced Texture Painting Strategies
- Tips for Successful Texture Painting
- Basic Texture Painting Techniques
- Advanced Texture Painting Strategies
- Tips for Successful Texture Painting
- What is the process for texture painting in Blender according to the tutorials available online?
- Advanced Texture Painting Strategies
- YOUTUBE: Quick Start Guide for Texture Painting in Blender
- Tips for Successful Texture Painting
- Tips for Successful Texture Painting
- Introduction to Texture Painting in Blender
- Setting Up Your Project for Texture Painting
- Basic Texture Painting Techniques and Tools
- Advanced Texture Painting Strategies for Realistic Effects
- Working with UV Maps and Texture Slots
- Creating Seamless Textures for Your Models
- Utilizing Brushes and Stencils for Detailed Painting
- Incorporating Layers and Masks in Texture Painting
- Exporting and Applying Textures to 3D Models
- Common Challenges and Solutions in Texture Painting
- Additional Resources and Tutorials for Further Learning
Getting Started with Texture Painting
- Introduction to texture painting in Blender
- Setting up your workspace for texture painting
- Understanding Blender\"s texture painting tools
- Creating and managing texture slots

READ MORE:
Basic Texture Painting Techniques
- UV unwrapping your model for texture painting
- Applying base colors and initial textures
- Using brushes and stencils for detailed painting
- Layering textures for depth and complexity
Advanced Texture Painting Strategies
- Using masks and layers for intricate designs
- Mixing shaders to achieve unique texture effects
- Painting with images and stencil brushes for realism
- Creating seamless textures for continuous patterns
Texture Painting Projects and Ideas
Explore project-based tutorials to practice your texture painting skills, including creating stylized characters, realistic environments, and dynamic props. Each project offers step-by-step instructions to guide you through the texture painting process.

Tips for Successful Texture Painting
- Optimizing your workflow for efficiency
- Choosing the right brushes and tools for specific effects
- Understanding the impact of lighting on textures
- Exporting and applying textures for rendering
By following this tutorial, you\"ll be equipped with the knowledge and skills to create stunning textures for your 3D models in Blender. Dive into the world of texture painting and unleash your creativity today!
Basic Texture Painting Techniques
- UV unwrapping your model for texture painting
- Applying base colors and initial textures
- Using brushes and stencils for detailed painting
- Layering textures for depth and complexity
_HOOK_
Advanced Texture Painting Strategies
- Using masks and layers for intricate designs
- Mixing shaders to achieve unique texture effects
- Painting with images and stencil brushes for realism
- Creating seamless textures for continuous patterns
Texture Painting Projects and Ideas
Explore project-based tutorials to practice your texture painting skills, including creating stylized characters, realistic environments, and dynamic props. Each project offers step-by-step instructions to guide you through the texture painting process.
Tips for Successful Texture Painting
- Optimizing your workflow for efficiency
- Choosing the right brushes and tools for specific effects
- Understanding the impact of lighting on textures
- Exporting and applying textures for rendering
By following this tutorial, you\"ll be equipped with the knowledge and skills to create stunning textures for your 3D models in Blender. Dive into the world of texture painting and unleash your creativity today!

What is the process for texture painting in Blender according to the tutorials available online?
Based on the tutorials available online, the process for texture painting in Blender can be broken down into the following steps:
- Select the object you want to texture paint in Blender.
- Go to the \"Texture Paint\" workspace within Blender.
- Create a new texture slot for the object if one doesn\'t already exist.
- Choose the brush you want to use for painting from the toolbar.
- Adjust the brush settings such as size, strength, and texture if needed.
- Select the color you want to paint with.
- Start painting directly on the object\'s surface in the 3D viewport.
- You can switch between different brush modes like \"Add\", \"Subtract\", \"Smear\", etc., for different effects.
- Utilize tools such as masks, stencils, and layers to enhance your texture painting.
- Preview your painted textures in the viewport to see how they look on the object.
- Once satisfied, you can save the painted textures to use in your renders.
Advanced Texture Painting Strategies
- Using masks and layers for intricate designs
- Mixing shaders to achieve unique texture effects
- Painting with images and stencil brushes for realism
- Creating seamless textures for continuous patterns
Texture Painting Projects and Ideas
Explore project-based tutorials to practice your texture painting skills, including creating stylized characters, realistic environments, and dynamic props. Each project offers step-by-step instructions to guide you through the texture painting process.
Quick Start Guide for Texture Painting in Blender
Dive into the world of texture painting and elevate your artistic skills to the next level! Learn how to add depth and realism to your digital artwork with our step-by-step guide. Watch our video tutorial now and unleash your creativity.
Quick Start Guide for Texture Painting in Blender
Dive into the world of texture painting and elevate your artistic skills to the next level! Learn how to add depth and realism to your digital artwork with our step-by-step guide. Watch our video tutorial now and unleash your creativity.
Tips for Successful Texture Painting
- Optimizing your workflow for efficiency
- Choosing the right brushes and tools for specific effects
- Understanding the impact of lighting on textures
- Exporting and applying textures for rendering
By following this tutorial, you\"ll be equipped with the knowledge and skills to create stunning textures for your 3D models in Blender. Dive into the world of texture painting and unleash your creativity today!

_HOOK_
Tips for Successful Texture Painting
- Optimizing your workflow for efficiency
- Choosing the right brushes and tools for specific effects
- Understanding the impact of lighting on textures
- Exporting and applying textures for rendering
By following this tutorial, you\"ll be equipped with the knowledge and skills to create stunning textures for your 3D models in Blender. Dive into the world of texture painting and unleash your creativity today!
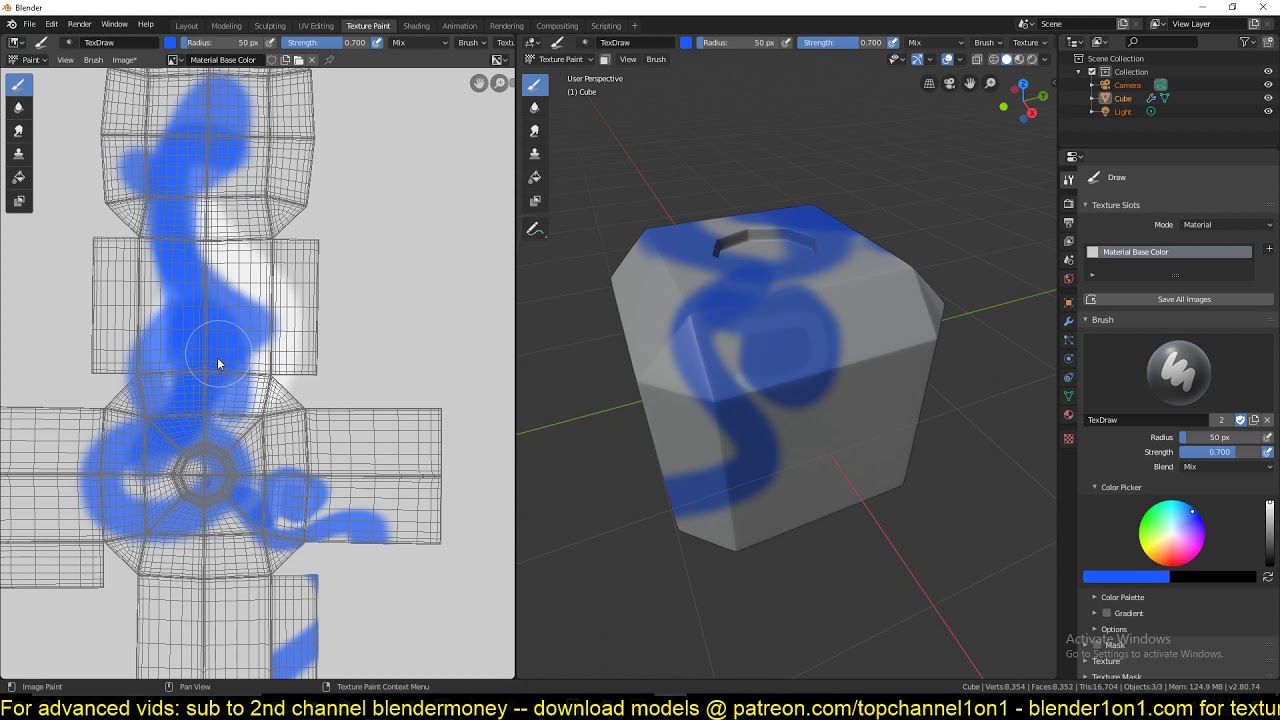
Introduction to Texture Painting in Blender
Texture painting in Blender is a powerful technique that allows artists to add color, details, and life to their 3D models. This process involves directly painting on the surface of the model, enabling the creation of complex and detailed textures. Whether you are aiming for a realistic look or a stylized appearance, texture painting can help you achieve your desired outcome.
- Understanding the Basics: Learn the fundamental concepts of texture painting, including how to navigate Blender\"s interface and the purpose of texture painting.
- Setting Up Your Workspace: Configure Blender for texture painting by setting up your workspace, choosing the right tools, and preparing your model for painting.
- Creating and Managing Texture Slots: Discover how to create texture slots in Blender, which will hold your painted textures and allow for multiple layers of painting.
- Painting Techniques: Explore various painting techniques, from basic brush strokes to advanced methods like stencil and projection painting, to add depth and detail to your models.
- Utilizing Brushes and Textures: Learn how to use Blender\"s brush system and import custom textures to enhance your texture painting workflow.
- Layer Management and Blending: Understand how to effectively manage layers, blend colors, and use masks to achieve professional-looking textures.
- Finalizing and Exporting Textures: Once your painting is complete, find out how to finalize and export your textures for use in other projects or game engines.
By the end of this section, you will have a solid foundation in texture painting within Blender, equipped with the knowledge to start bringing your 3D creations to life with vibrant textures.
Setting Up Your Project for Texture Painting
Before diving into the creative process of texture painting in Blender, it\"s essential to properly set up your project. This preparation ensures that your workflow is efficient and your results are optimal. Follow these steps to start your texture painting journey on the right foot.
- Choose Your Model: Start with a 3D model that you wish to paint. If you\"re a beginner, consider using a simple object to practice your skills.
- UV Unwrapping: Ensure your model is UV unwrapped. UV unwrapping is the process of projecting a 3D model\"s surface onto a 2D plane to allow for accurate texture mapping.
- Create a New Texture: In the Shader Editor, create a new texture that will serve as the canvas for your painting. This texture will be applied to your model.
- Configure Brushes and Colors: Blender offers a variety of brushes and color options for texture painting. Familiarize yourself with these tools and select the ones that best suit your project\"s needs.
- Set the Viewport Shading: Adjust the viewport shading to texture paint mode. This will allow you to see the texture directly on your model as you paint.
With these steps, your project is well-prepared for texture painting. This setup process lays the foundation for a smooth and creative painting experience, allowing you to focus on bringing your artistic vision to life.
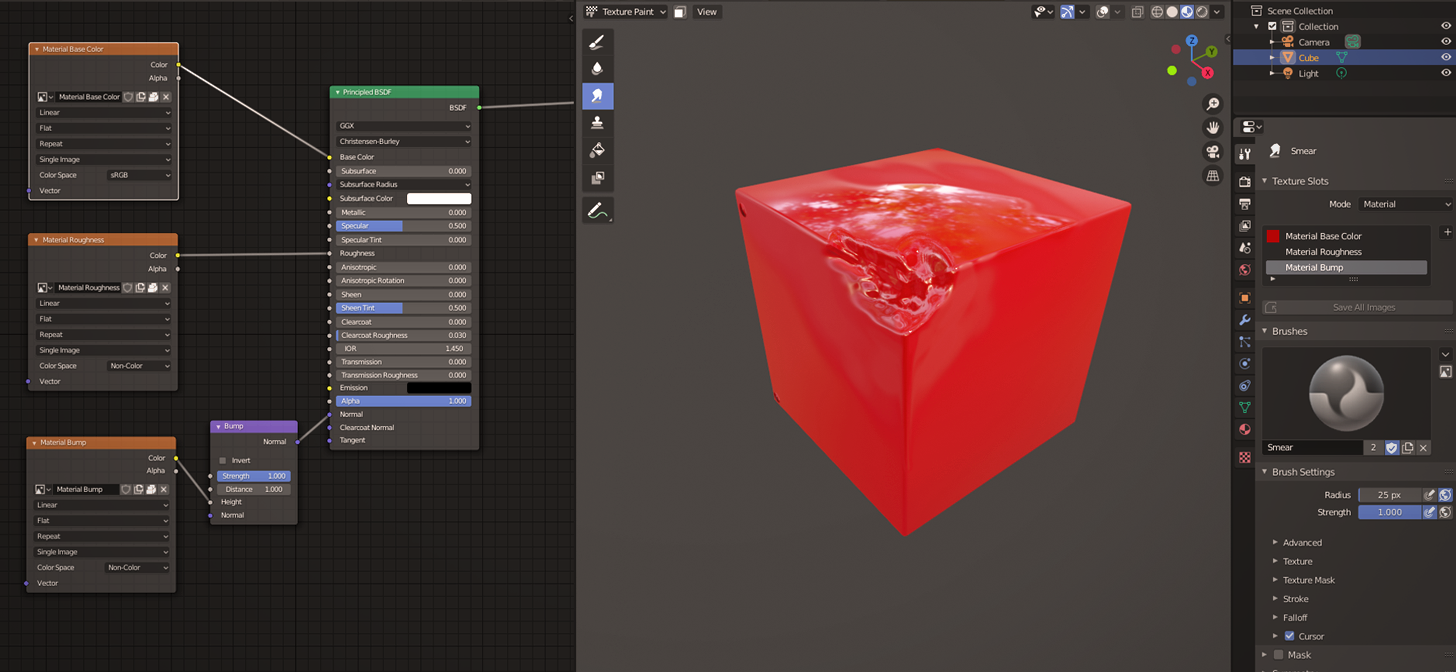
Basic Texture Painting Techniques and Tools
Texture painting in Blender is a versatile and powerful feature that allows artists to directly apply colors and patterns onto their 3D models. This section covers basic techniques and tools to get you started with texture painting in Blender.
- Brushes: Blender offers a variety of brushes for different effects, such as softening, smearing, and cloning. Experiment with brush settings to achieve the desired texture.
- Colors and Swatches: Select colors from the palette or create your own swatches. Use the color picker tool for precise color matching.
- Layers: Work with layers to separate different elements of your texture. This allows for non-destructive editing and easier adjustments.
- Stencils: Use stencils to apply detailed patterns and textures. You can create stencils from images and use them as guides for painting.
- Projection Painting: This technique projects an image onto your 3D model, allowing for quick and detailed texturing.
- Texture Masks: Masks control where paint is applied on the texture, enabling you to protect certain areas from being painted over.
Start by selecting your object and switching to Texture Paint mode. From there, you can choose your brush and start painting directly onto your model. Adjust the brush size, strength, and color to suit your needs. Remember, practice and experimentation are key to mastering texture painting in Blender.
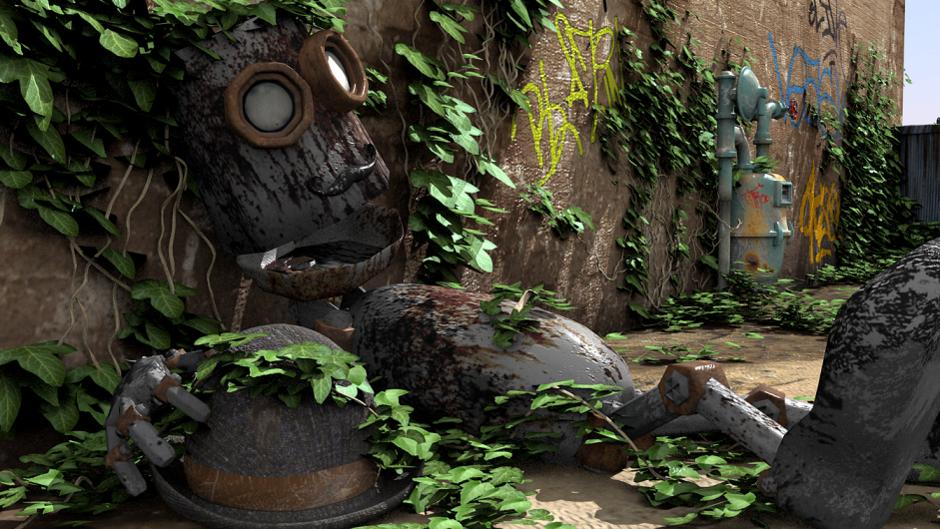
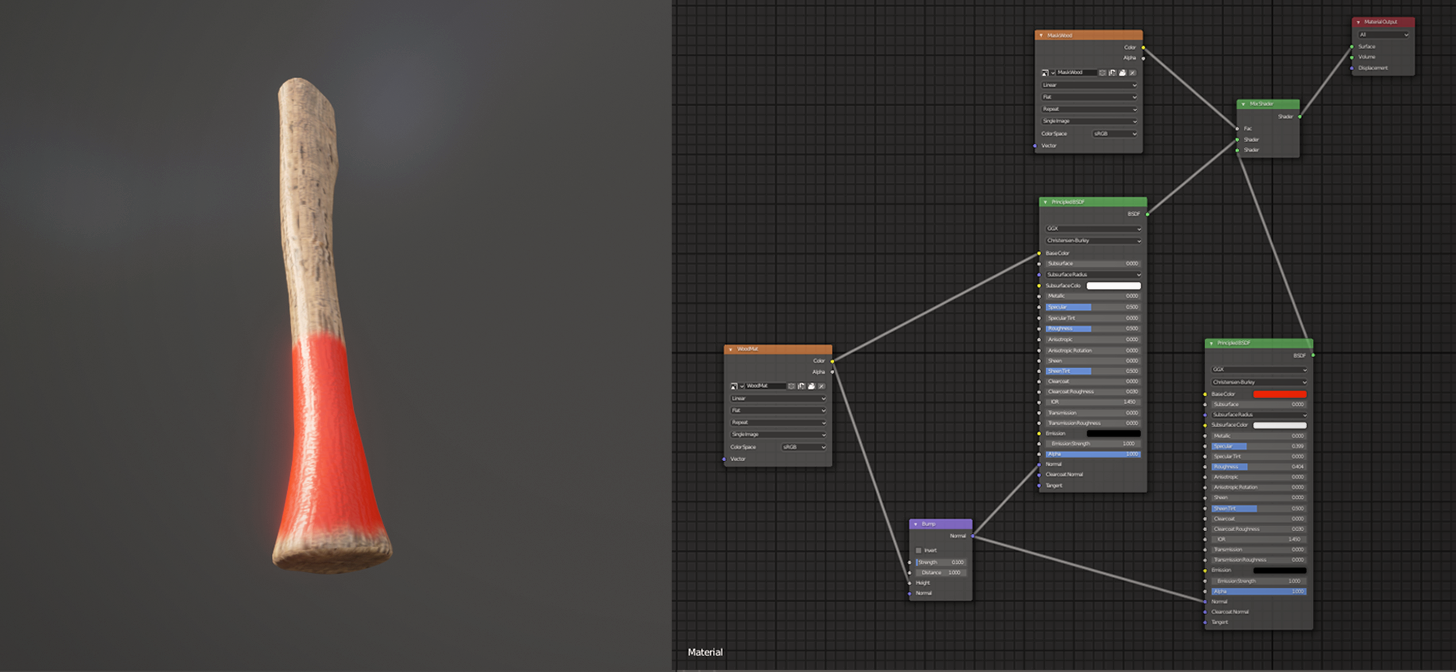
Advanced Texture Painting Strategies for Realistic Effects
To achieve realistic effects in texture painting with Blender, it\"s essential to delve into advanced techniques that enhance the visual depth and realism of your models. These strategies involve a combination of Blender\"s sophisticated tools and artistic nuances that mimic real-world textures.
- Layering Textures: Build up layers of textures to add complexity and depth. Start with base colors and add layers for details like scratches, dirt, or wear and tear for realism.
- Using High-Resolution Images: Employ high-resolution images as stencils or brushes to add real-world texture details. This method is particularly effective for creating natural surfaces like skin, fabric, or stone.
- Bump and Normal Maps: Utilize bump and normal maps to simulate texture depth without adding geometric complexity to your model. This technique is key for adding surface details like bumps, grooves, or other textures.
- Specular and Roughness Maps: Adjust specular and roughness maps to control the reflectivity and surface roughness of your textures. These adjustments can significantly affect the realism of materials like metals, glass, or wet surfaces.
- Blending Modes and Opacity: Experiment with different blending modes and opacity levels for your texture layers. This approach allows for subtle transitions and can help blend your painted textures with the base materials.
- Environmental Effects: Incorporate environmental effects such as weathering or aging to add realism. Techniques like vertex painting can be used to add grime or rust at specific areas of your model.
By mastering these advanced techniques, you can push the boundaries of digital texture painting in Blender and create stunning, lifelike textures that bring your 3D models to life.
_HOOK_
Working with UV Maps and Texture Slots
Understanding UV maps and texture slots is crucial for effective texture painting in Blender. This section guides you through the process of managing UV maps and utilizing texture slots to organize and apply textures to your 3D models efficiently.
- Understanding UV Maps: UV maps are essentially a 2D representation of your 3D model\"s surface. They allow you to accurately apply textures to the model\"s surface. The first step is to unwrap your model, which generates the UV map.
- Creating and Managing UV Maps: In Blender, you can create multiple UV maps for a single object. This is useful for applying different textures to different parts of your model. Access the UV mapping options in the Mesh Data tab.
- Adding Texture Slots: Texture slots in Blender allow you to manage multiple textures on a single object. Each slot can hold a different texture, such as diffuse, bump, or specular maps.
- Assigning Textures to Slots: Once you\"ve created your texture slots, you can start assigning your painted textures to them. This step is crucial for layering textures and creating complex materials.
- Adjusting Texture Mapping: After assigning textures to slots, you may need to adjust the mapping settings to ensure the texture aligns correctly on your model. Use the UV/Image Editor to tweak the UV map as needed.
By mastering UV maps and texture slots, you can significantly enhance the quality and realism of your texture painting projects in Blender. These tools provide the flexibility to create detailed and complex textures that bring your 3D models to life.
Creating Seamless Textures for Your Models
Creating seamless textures in Blender is essential for ensuring your models look realistic and cohesive when viewed from any angle. This process involves careful planning and technique to ensure the textures wrap around the 3D model smoothly, without visible seams or interruptions.
- Start with High-Quality Images: Choose high-resolution images that are inherently seamless or have repeatable patterns. This choice is crucial for creating textures that blend well.
- Editing Images for Seamlessness: Use image editing software to modify your texture images, ensuring they are seamless. Pay attention to the edges of the image, making them match up perfectly when tiled.
- UV Mapping for Seamless Textures: Properly unwrap your model\"s UV map to align with the texture\"s pattern. This step is critical for avoiding visible seams where the texture edges meet.
- Testing and Adjusting in Blender: Apply your texture to the model in Blender and inspect it from various angles. Look for any visible seams and adjust the UV map as needed to correct them.
- Utilize Blender\"s Texture Painting Tools: Use Blender\"s texture painting tools to manually adjust and blend any seams or discrepancies on the texture. This can help to further integrate the texture onto the model.
By following these steps, you can create seamless textures that enhance the realism of your 3D models, making them more visually appealing and cohesive. Remember, practice and attention to detail are key in mastering seamless texture creation in Blender.
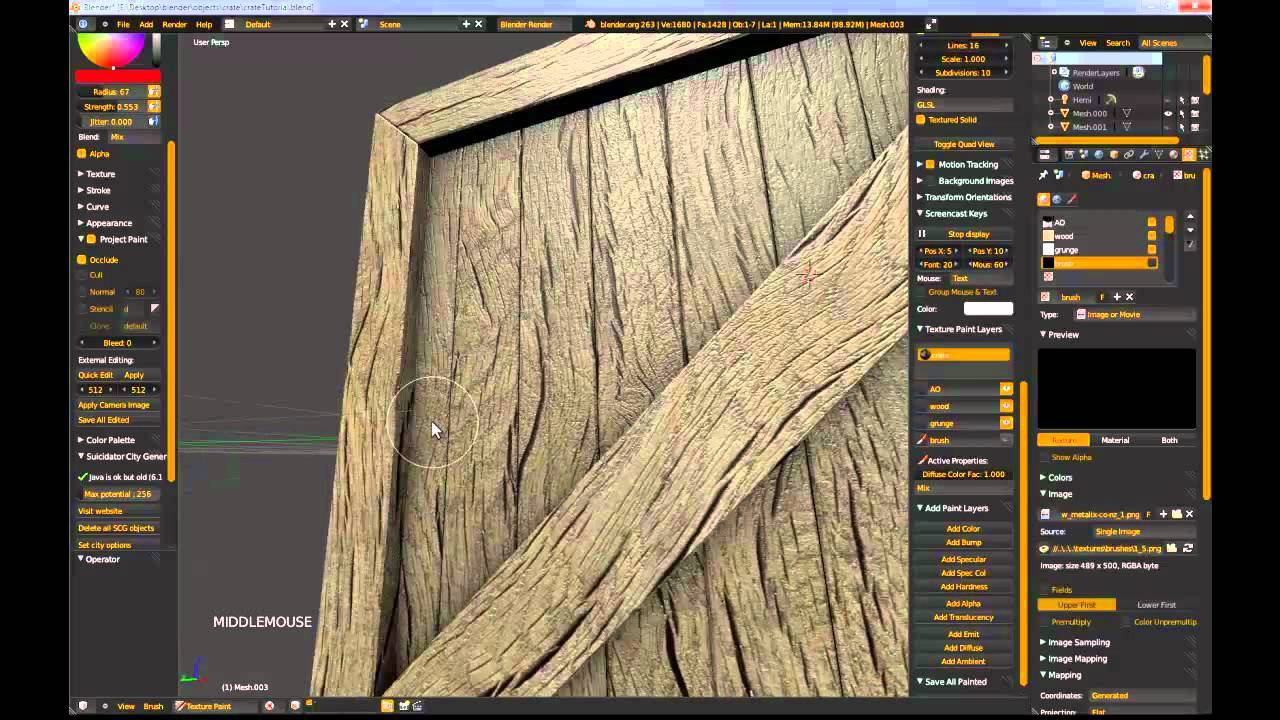
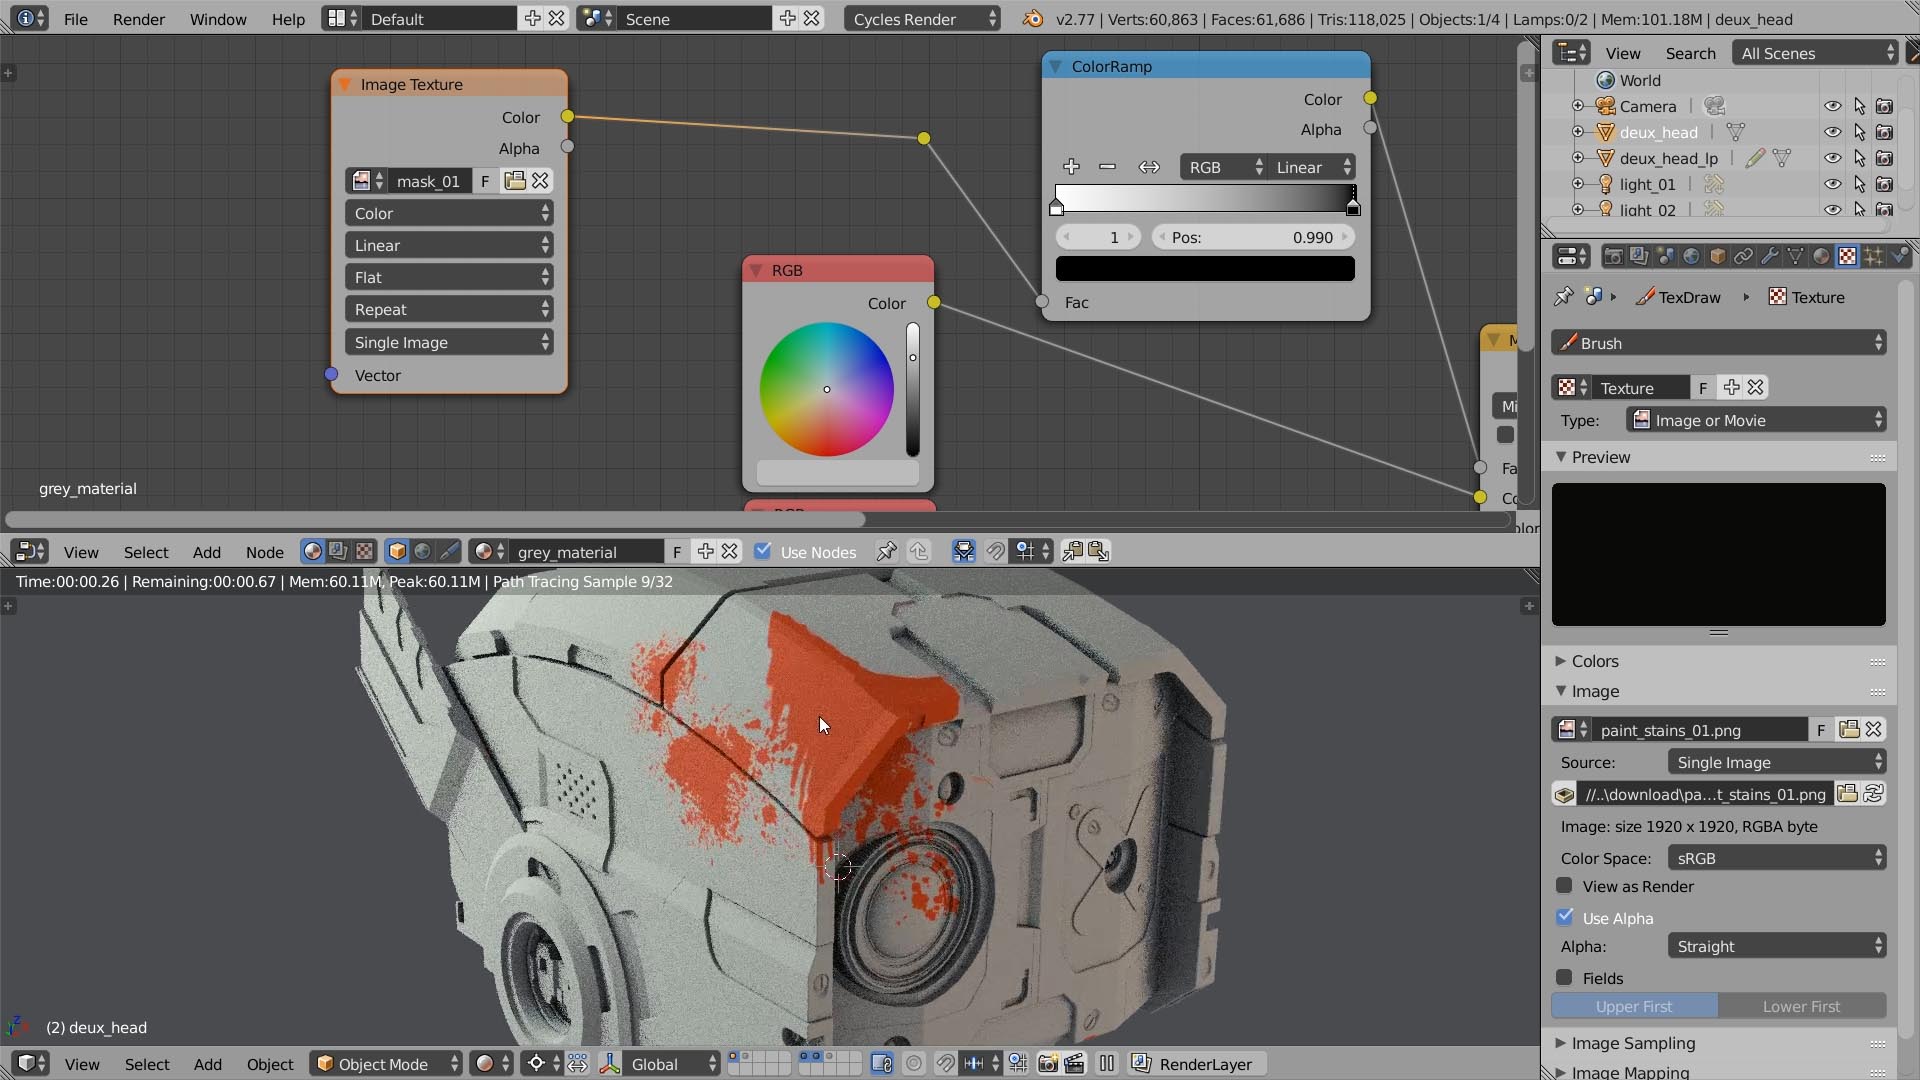
Utilizing Brushes and Stencils for Detailed Painting
Blender\"s texture painting capabilities are significantly enhanced by the use of various brushes and stencils, allowing for intricate details and precision in your work. This section explores how to leverage these tools for detailed texture painting.
- Exploring Brush Types: Blender offers a wide range of brush types, each suited for different aspects of texture painting. Familiarize yourself with brushes such as the Draw, Soften, Smear, Clone, Fill, and Mask brushes to apply diverse effects and textures.
- Customizing Brushes: Customize your brushes by adjusting their size, shape, strength, and texture to achieve the desired effect. Blender allows for fine-tuning of brush parameters, enabling artists to create unique and detailed textures.
- Using Stencils: Stencils act as masks that control where paint can be applied on the model. By using image files as stencils, you can project complex patterns and details onto your model with precision. This technique is perfect for adding logos, tattoos, or intricate designs.
- Creating Your Own Stencils: Design your own stencils in an image editing software and import them into Blender. This allows for fully customized and unique textures that stand out.
- Techniques for Detailed Painting: Use a combination of different brushes and stencils to build up texture layers, add fine details, and enhance the overall realism of your model. Experiment with layering stencils and varying brush strokes for complex textures.
Mastering the use of brushes and stencils in Blender opens up a world of creative possibilities, enabling you to add unparalleled detail and depth to your texture painting projects.
Incorporating Layers and Masks in Texture Painting
Layers and masks are fundamental in creating complex and detailed textures in Blender, allowing for non-destructive editing and greater control over the painting process. This section provides a step-by-step approach to effectively use layers and masks in your texture painting workflow.
- Understanding Layers: Blender\"s texture paint mode supports layering, similar to layers in photo editing software. You can paint on separate layers to manage different aspects of your texture independently.
- Creating and Managing Layers: Start by adding a new layer for each texture element you want to paint. This can include base colors, details, and effects. Use the layer management tools to rearrange, merge, or adjust the opacity of layers.
- Utilizing Masks: Masks allow you to control where paint is applied on a layer. By using masks, you can protect certain areas of your texture or create intricate designs without affecting the underlying layers.
- Painting with Masks: Create a mask for a layer and use the brush tools to paint within the masked area. This technique is especially useful for adding details or textures to specific parts of your model.
- Blending Modes: Experiment with different blending modes for layers to achieve various effects. Blending modes can help in creating realistic textures by simulating how materials interact with light.
Incorporating layers and masks into your texture painting process in Blender enhances your ability to create rich, detailed, and complex textures. By mastering these techniques, you can push the boundaries of your creativity and produce professional-quality textures for your 3D models.
Exporting and Applying Textures to 3D Models
Once you\"ve created your masterpiece texture in Blender, the next steps involve exporting your texture and applying it to your 3D model for rendering or game development. This section will guide you through the process to ensure your textured models look as intended in any environment.
- Finalizing Your Texture: Ensure all layers are correctly blended and that your texture looks exactly as you want on your 3D model. It\"s crucial to review your work in different lighting conditions within Blender to catch any inconsistencies.
- Exporting Textures: Go to the UV/Image Editor, select your texture, and use the Image menu to export it. Choose a format that preserves quality, such as PNG or TIFF, for best results.
- Applying Textures in Other Software: When importing your model into other software or game engines, you\"ll need to reapply the texture. Ensure you import both the model and the texture file, then assign the texture to the model using the software\"s materials or shading system.
- Adjusting for Scale and Orientation: Textures may appear differently depending on the software\"s default settings. You might need to adjust the scale, orientation, or tiling of your texture to fit your model correctly.
- Testing in Final Environment: Always test how your model and its texture appear in the final rendering environment. Lighting and other scene elements can significantly affect the appearance of textures, so adjustments may be necessary.
By following these steps, you can ensure that your textures are correctly exported from Blender and applied to your 3D models, maintaining the integrity of your artistic vision across different platforms and software.
_HOOK_
Common Challenges and Solutions in Texture Painting
Texture painting in Blender, while rewarding, can present various challenges, especially to those new to the process. This section addresses common issues artists may encounter and provides practical solutions to overcome them.
- Seam Visibility: Seams can be highly visible when textures wrap around a model. To mitigate this, ensure your UV maps are correctly unwrapped and use Blender\"s clone brush to paint over seams, blending them into the surrounding texture.
- Uneven Texture Resolution: Textures may appear blurry or pixelated if the resolution is too low. Always work with high-resolution images and adjust the UV map scale to maintain texture clarity.
- Difficulties with Complex Shapes: Painting textures on complex models can be challenging. Use projection painting to simplify the process, allowing you to paint a texture on a 2D image that Blender will then wrap around the 3D model.
- Color Matching Issues: Achieving consistent colors across different parts of a texture can be difficult. Utilize Blender\"s color picker tool to ensure consistency and blend modes to smoothly integrate different colors and shades.
- Overlapping Textures: When multiple textures overlap, it can lead to visual clutter. Organize your work by using separate texture layers and masks to isolate and manage different texture elements effectively.
By understanding and addressing these common challenges, you can enhance your texture painting skills in Blender, leading to more polished and professional results.
READ MORE:
Additional Resources and Tutorials for Further Learning
To deepen your understanding of texture painting in Blender and expand your skill set, consider exploring these additional resources and tutorials. They offer a range of perspectives and techniques to suit artists at all levels of experience.
- Blender Official Documentation: The Blender Manual provides comprehensive guides on all aspects of Blender, including texture painting.
- YouTube Tutorials: Channels like Blender Guru, CG Geek, and Grant Abbitt offer in-depth tutorials on texture painting and other Blender techniques.
- BlenderNation: A hub for Blender news and tutorials, including step-by-step guides on texture painting and creative uses of Blender\"s painting tools.
- Online Courses: Platforms like Udemy and Coursera feature courses tailored to Blender, covering everything from basics to advanced texture painting strategies.
- Blender Artists Community: Engage with the Blender community for feedback, tips, and shared learning experiences on texture painting and more.
By utilizing these resources, you can continue to grow as a Blender artist, enhancing your texture painting skills and creating ever more impressive 3D art.
Embrace the world of texture painting in Blender and unlock your creative potential. With practice, patience, and passion, you\"ll transform ordinary models into extraordinary works of art. Start your journey today and see where it takes you!