Topic blender eevee render: Discover the capabilities of Blender Eevee Render, a game-changer in real-time visualization, offering stunning visuals with remarkable speed and efficiency for artists and designers alike.
Table of Content
- What are the render settings for EEVEE in Blender?
- Understanding Eevee Rendering
- Introduction to Eevee Renderer in Blender
- Key Features of Eevee Rendering
- Advanced Eevee Rendering Techniques
- YOUTUBE: Render Cinematic Shot with EEVEE in Blender Tutorial
- Subsurface Scattering with Eevee
- Screen Space Reflections and Refractions
- Ambient Occlusion in Eevee
- Bloom Effects and Depth of Field
- Optimizing Eevee Render Settings for Performance
- Creating Realistic Materials and Textures
- Lighting Techniques in Eevee
- Using Emissive Objects for Dynamic Lighting
- Best Practices for Eevee Rendering
- Common Challenges and Solutions
- Comparing Eevee with Cycles Renderer
- Future Developments and Updates in Eevee
- Resources and Tutorials for Mastering Eevee
What are the render settings for EEVEE in Blender?
To achieve high-quality renders using EEVEE in Blender, you can adjust various render settings to enhance the output. Here are some key render settings for EEVEE:
- Render Engine: Make sure EEVEE is selected as the render engine in the Render Properties tab.
- Sampling: Adjust the number of samples to control the quality of the render. Higher samples will result in a cleaner image but may increase render time.
- Shadows: Enable Soft Shadows for a more realistic lighting effect.
- Reflections: Adjust the Reflection settings to control how objects reflect in the scene.
- Subsurface Scattering: Enable this option for materials that require subsurface light scattering effects.
- Bloom: Enhance the bloom effect to add a glow to bright areas in the scene.
- Ambient Occlusion: Enable Ambient Occlusion to improve the shading and realism of the scene.
- Depth of Field: Adjust the Depth of Field settings to control the focus distance and depth blur in the scene.
By configuring these render settings in Blender\'s EEVEE engine, you can create stunning and realistic renders for your 3D projects.
READ MORE:
Understanding Eevee Rendering
Eevee is Blender\"s real-time render engine, known for its speed and ability to produce high-quality visuals. It incorporates features like subsurface scattering, ambient occlusion, bloom, depth of field, and screen space reflections, making it a powerful tool for artists and designers.
Key Features
- Subsurface Scattering: Simulates light passing through thin, translucent materials, enhancing the realism of objects like skin, leaves, and wax.
- Screen Space Reflections: Provides dynamic reflections based on the viewport\"s view, with adjustable settings for precision and performance.
- Ambient Occlusion: Adds depth and realism by simulating soft shadows where objects meet, with customizable distance and intensity.
- Bloom: Creates a glowing effect around bright areas, adding vibrancy to scenes.
- Depth of Field: Mimics camera focus effects, bringing attention to specific parts of the scene.
Advanced Techniques
- Indirect Lighting: Enhances scene realism by calculating irradiance, with options for baked lighting to simulate light bounce.
- Emissive Objects: Allows objects to act as light sources, contributing to the scene\"s overall lighting.
- Refractive Materials: Simulates glass and other transparent materials with adjustable indices of refraction.
- Performance Optimization: Tips on using Eevee efficiently, focusing on balancing quality with rendering speed.
Best Practices
To achieve the best results with Eevee, experiment with different settings to find the right balance for your project. Consider using high-quality normals for detailed meshes, optimizing shadow settings for clarity and performance, and utilizing light thresholds to manage scene lighting effectively.
For more detailed information on each feature and technique, refer to the comprehensive guides and tutorials available online, tailored to both beginners and experienced users.

Introduction to Eevee Renderer in Blender
Eevee, Blender\"s real-time render engine, is designed to provide artists with the capability to render out scenes with remarkable speed and visual fidelity. It employs advanced rendering techniques to simulate complex physical phenomena like light reflection, refraction, and subsurface scattering.
- Subsurface scattering enhances the realism of translucent materials by simulating the diffusion of light within them, crucial for rendering skin, wax, and other semi-transparent objects.
- Screen space reflections offer dynamic reflections based on the viewer\"s perspective, adding depth and realism to scenes.
- Ambient occlusion contributes to the depth and weight of the scene by adding soft shadows where objects meet, enhancing the overall sense of realism.
- Bloom effects create a glowing appearance around bright areas, adding a cinematic quality to the render.
- Depth of field effects mimic camera focus, allowing for more artistic control over what parts of the scene appear sharp or blurred.
Each feature within Eevee is designed to be highly customizable, allowing artists to balance between render quality and performance based on the project\"s needs. For example, subsurface scattering settings are automatically detected and applied based on the materials used in the scene, streamlining the workflow. Similarly, screen space reflections can be fine-tuned with settings such as trace precision and thickness to achieve the desired effect.
Ambient occlusion settings, including distance and blend factor, enable precise control over the soft shadow effects, while bloom\"s threshold and radius settings allow for detailed adjustments to the glow effects. The depth of field settings, including max size, offer control over the camera\"s focus effect, adding another layer of realism to the render.
Optimizing Eevee\"s settings for performance involves adjusting sample counts, resolution, and other parameters to ensure a smooth workflow without sacrificing visual quality. Advanced techniques such as baking indirect lighting and using emissive materials for dynamic lighting further enhance the scene\"s realism. Understanding and leveraging these settings and techniques allows artists to fully utilize Eevee\"s capabilities, producing stunning visuals in real-time.
Key Features of Eevee Rendering
Eevee, Blender\"s real-time render engine, offers a suite of powerful features designed to produce high-quality visuals with efficiency. Below are some of its key attributes:
- Ambient Occlusion: Adds depth to scenes by simulating the way light bounces off objects, enhancing realism.
- Bloom: Creates a realistic glow around bright areas, simulating the way light interacts with the camera lens.
- Depth of Field: Mimics the camera\"s focus techniques, allowing for cinematic depth effects in renders.
- Subsurface Scattering: Simulates light passing through translucent materials like skin, wax, or leaves, adding to the realism of such materials.
- Screen Space Reflections: Reflects objects on surfaces in real-time, enhancing the dynamic feel of scenes.
- Motion Blur: Simulates the blur effect on moving objects, lending motion a more natural appearance.
- Performance Optimization: Includes settings for optimizing render speeds without significantly compromising quality.
- Shadows: Offers detailed control over shadow resolution and softness, enhancing the depth and realism of scenes.
- Filmic Lighting Support: Integrates advanced color management for cinematic quality lighting and shading.
- Advanced Materials and Uber Shaders: Supports complex material effects including real-time volumetric materials and is compatible with Blender’s Principled Shader for easy material setup.
- Indirect Lighting: While optimized for speed, Eevee can simulate indirect lighting effects for enhanced scene realism.
- Reflection and Irradiance Probes: To achieve high-quality reflections and global illumination effects, Eevee utilizes probes that capture and simulate the light and reflection information of a scene.
Eevee\"s integration into Blender\"s workflow allows artists to produce stunning visuals quickly, making it an invaluable tool for both real-time previews and final renders. Its compatibility with game engine workflows also enables the creation of assets that can be directly used in game development, streamlining the production process.

Advanced Eevee Rendering Techniques
Mastering Eevee in Blender involves understanding and applying a range of advanced rendering techniques. These techniques leverage Eevee\"s real-time capabilities to create stunning visual effects and realistic scenes. Here are some advanced methods to enhance your Eevee renders:
- Indirect Lighting: Utilize the Indirect Lighting options to simulate global illumination effects. Adding an Irradiance Volume and baking the lighting can significantly increase the realism of your scenes by incorporating bounced light effects.
- Emissive Objects: To simulate objects emitting light, you must first calculate the irradiance. This enables the light from emissive materials to properly illuminate the surrounding area, enhancing the atmosphere of your scene.
- Refractive Materials: Creating realistic glass or transparent materials in Eevee requires adjusting the Transmission value of the Principled BSDF material and using refraction settings to simulate light passing through objects.
- Sub-Surface Scattering (SSS): Achieve realistic effects for materials like skin, wax, or leaves by tweaking the SSS settings. Adjusting samples, jitter threshold, and subsurface color can produce lifelike results for objects that should transmit light.
- Screen Space Reflections: Enhance the realism of reflective surfaces by fine-tuning the Screen Space Reflections settings. This includes managing reflections visibility, precision, and quality to ensure they accurately mirror their environment.
- Advanced Lighting Techniques: Explore beyond basic lighting setups by incorporating advanced techniques such as HDRI lighting, atmospheric effects, and custom light configurations to elevate the mood and depth of your scenes.
- Render Settings Optimization: For the best balance between quality and performance, adjust Eevee\"s render settings like sample rate, shadow quality, and viewport effects. This optimizes your rendering workflow while maintaining high visual fidelity.
- Utilizing Geometry Nodes for Environmental Detail: Use Blender\"s Geometry Nodes to add complexity and detail to environments without heavily taxing the system, enabling the creation of rich, dynamic scenes that are efficiently rendered in Eevee.
By mastering these advanced techniques, you can push the boundaries of what\"s possible with Eevee, achieving results that rival more traditional, time-consuming rendering engines. Eevee\"s flexibility and speed offer a unique blend of efficiency and quality, making it an excellent choice for both rapid previews and final productions.
_HOOK_
Render Cinematic Shot with EEVEE in Blender Tutorial
Cinematic: Immerse yourself in the breathtaking world of cinematic storytelling, where each frame is a work of art. Witness the magic of stunning visuals and captivating narratives come to life on screen. Tutorial: Let this step-by-step tutorial be your guide to mastering a new skill or technique. Learn from expert instructors in an easy-to-follow format that will empower you to create and achieve with confidence.
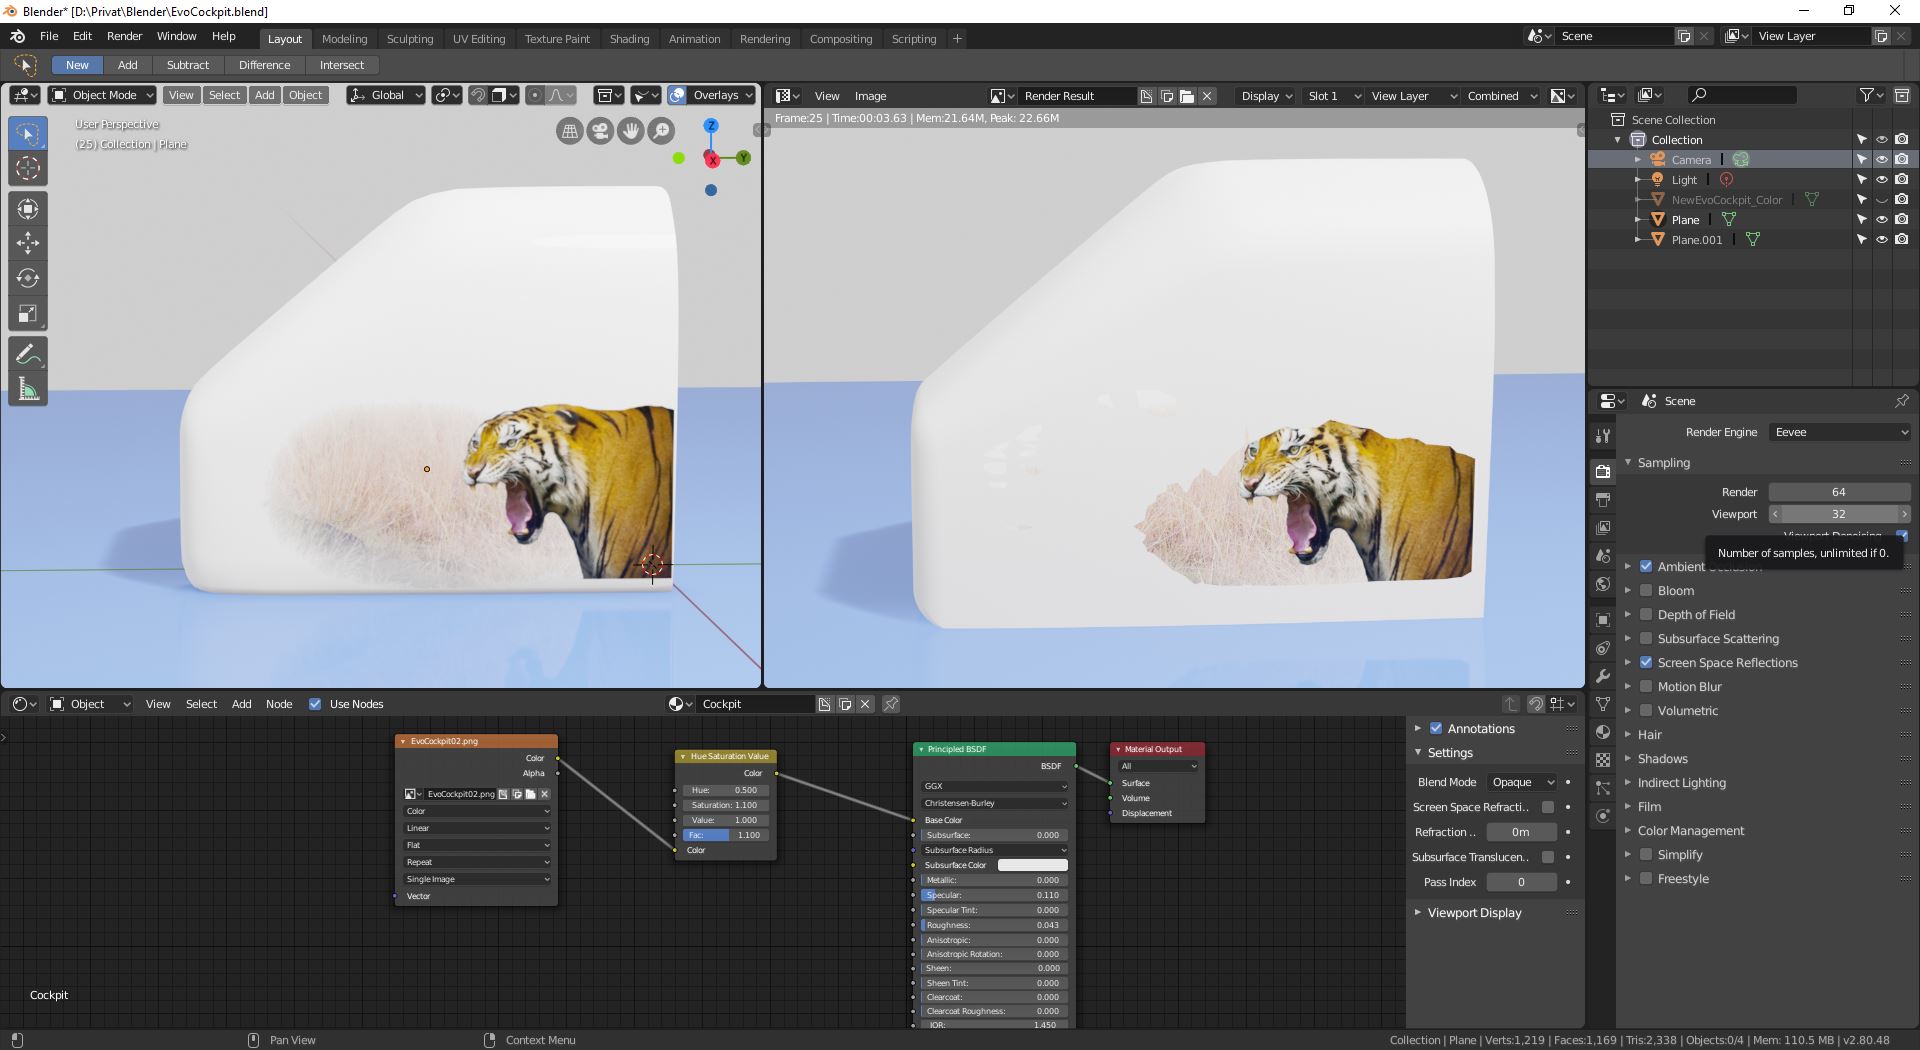
Subsurface Scattering with Eevee
Subsurface Scattering (SSS) is a crucial technique in Blender\"s Eevee for simulating the light that penetrates materials like skin, wax, or leaves, creating a natural and lifelike appearance. Here\"s how to effectively use SSS in Eevee:
- Understanding SSS: SSS simulates the way light bounces within thin or semi-transparent materials, allowing some of the light to scatter through the surface. This is commonly observed in nature, such as when sunlight shines through human ears or leaves.
- Activating SSS: Eevee automatically detects and enables SSS when it identifies a shader in the scene that requires it. This dynamic feature simplifies the process, making SSS more accessible within your projects.
- Configuring SSS Settings: Adjust the SSS settings within the Render Properties. You can fine-tune the effect by altering the number of samples and the jitter threshold. These settings help balance between achieving a realistic effect and maintaining optimal performance.
- Sample Count: Determines the number of samples used for the SSS effect. Adjusting this can affect the visual quality and performance. A lower sample count might be faster but less accurate, while a higher count improves quality at the cost of performance.
- Jitter Threshold: Controls the randomness of the SSS pattern. Modifying this value helps in avoiding repetitive or unnatural patterns in the rendered material.
- Shader Adjustments: Further refine SSS by making adjustments in the Shader Editor. This includes setting the base and subsurface colors differently to enhance the SSS effect and adjusting the subsurface radius for different color depths.
- Practical Uses: SSS is not only crucial for human skin but also for materials like candle wax, plastics, and beverages. Correctly used, it can significantly enhance the realism of various materials in your scene.
By mastering these steps, you can effectively incorporate SSS into your Eevee renders, adding depth and realism to your scenes. Experiment with different settings to find the right balance for your project.
Screen Space Reflections and Refractions
Blender\"s Eevee renderer incorporates advanced techniques for simulating reflections and refractions in real-time, enhancing the realism of scenes without the computational overhead typically associated with such effects. Here\"s a guide to utilizing Screen Space Reflections and Refractions in Eevee:
- Screen Space Reflections (SSR): This feature simulates reflections on surfaces based on what\"s visible in the viewport. It enhances the realism of reflective materials by incorporating the surrounding environment into their appearance. The effect relies on the depth buffer and the previous frame\"s color data to create accurate reflections, surpassing the capabilities of reflection probes. However, it\"s worth noting that SSR in Eevee may not include effects like subsurface scattering, volumetrics, or other screen space reflections/refractions within the reflected color.
- Configuring SSR: The quality and performance of SSR can be adjusted in Eevee\"s render settings. Options such as trace precision, which increases the accuracy of reflections at the cost of potential noise and performance, and half resolution trace, which reduces memory usage and improves performance by casting rays at a lower resolution, are available. Adjusting these settings allows for a balance between visual quality and rendering speed.
- Screen Space Refractions: Similar to reflections, screen space refractions simulate the bending of light as it passes through transparent materials. This feature must be enabled both globally in Eevee\"s render settings and on a per-material basis. It introduces a slight performance cost but significantly enhances the realism of materials like glass or water by accurately simulating how they distort light.
- Advanced Shading Techniques with SSRT: For those seeking even more realism, the Screen Space Ray Tracing (SSRT) shader provides an advanced solution. It simulates light bouncing using screen space data, offering more realistic reflections and lighting. The SSRT shader and addon need to be manually installed and applied to objects within Blender. By adjusting shader settings and experimenting with different lighting setups, users can achieve highly realistic lighting and reflections in real-time.
By mastering these techniques, artists and designers can create visually stunning scenes in Blender with Eevee, benefiting from its real-time rendering capabilities while maintaining a high level of visual quality.
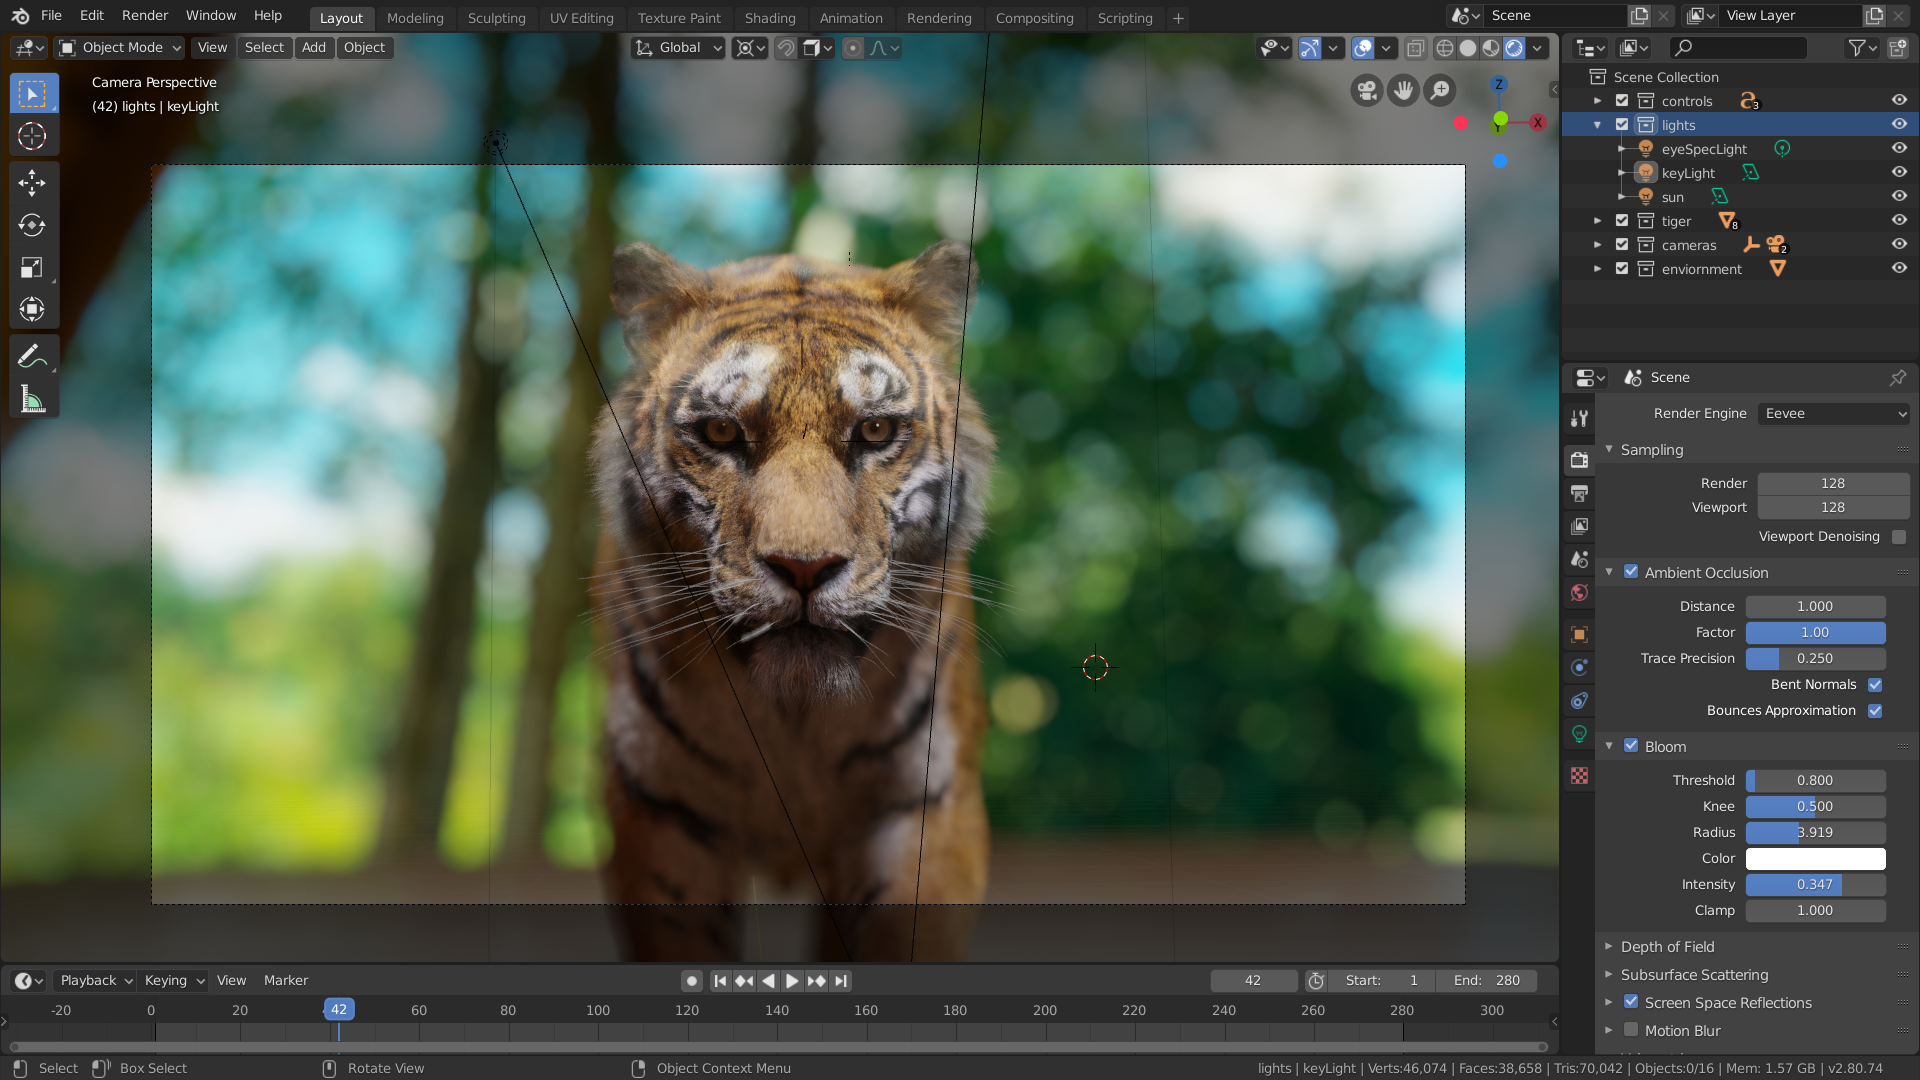
Ambient Occlusion in Eevee
Ambient Occlusion (AO) in Blender\"s Eevee is a powerful tool that enhances the depth and realism of your scenes by adding soft shadowing to corners, crevices, and areas where objects meet. Understanding and applying AO effectively can significantly improve the visual quality of your renders. Here\"s how to use AO in Eevee:
- Enable Ambient Occlusion: AO can be found in the Render Properties panel under Eevee\"s settings. By enabling AO, you introduce additional depth to your scene, making it appear more realistic.
- Adjusting AO Settings: Eevee offers several parameters to fine-tune the AO effect:
- Distance: Controls how far the AO effect reaches. A higher value increases the area affected by AO, adding shadowing to more distant objects and features.
- Factor: Determines the intensity of the AO effect. Increasing this value enhances the strength of the shadows produced by AO.
- Trace Precision: Adjusts the accuracy of the AO calculation. Higher precision can improve the quality of the AO effect but may impact performance.
- Bent Normals: When enabled, this option uses bent normals for more accurate AO calculations, potentially enhancing the realism of the effect without a significant performance cost.
- Bounce Approximation: Takes into account the amount of light hitting an object to adjust the AO effect, thereby increasing the realism of how shadows are cast in well-lit vs. less-lit areas.
- Applying AO in Your Scene: Once AO is enabled and configured, it works automatically to add soft shadows to your scene. This effect is particularly useful in interior scenes or models with intricate details, where it helps to accentuate the depth and form of the objects.
- Performance Considerations: While AO adds visual quality, it\"s important to balance its settings with the overall performance, especially in complex scenes. Adjust the settings to find a suitable compromise between visual fidelity and render times.
Ambient Occlusion in Eevee is a versatile feature that, when used effectively, can greatly enhance the visual appeal of your renders. Experiment with its settings to best suit your project\"s needs and achieve a more dynamic and realistic look.

Bloom Effects and Depth of Field
Blender\"s Eevee rendering engine offers advanced features to enhance the realism and visual appeal of your renders through Bloom Effects and Depth of Field (DOF). These features are instrumental in creating photorealistic scenes by adding glow and focus effects respectively.
- Bloom Effects: Bloom adds a soft glow around bright areas in your scene, simulating the way light behaves in a real-world camera. You can adjust the intensity, threshold, radius, and color of the bloom effect to achieve the desired outcome. The bloom effect is particularly effective for creating atmospheric or magical scenes, adding a layer of depth and realism.
- Depth of Field: DOF is a camera effect that blurs objects that are too close or too far away from the focus point, highlighting the main subject by making it the sharpest part of the image. In Eevee, DOF settings can be found in the camera\"s object data properties, allowing you to control the focus distance, aperture (f-stop), and the maximum size of the blur effect. This feature is essential for cinematic compositions and guiding the viewer\"s attention within the scene.
Implementing these features in Eevee is straightforward and highly customizable, offering real-time feedback in the viewport. This allows for immediate visualization of changes, significantly speeding up the workflow for texturing, animating, and finalizing scenes. Whether you are creating detailed close-ups, atmospheric landscapes, or dynamic animations, blending bloom effects and depth of field will elevate the quality of your renders in Eevee.

Optimizing Eevee Render Settings for Performance
Optimizing Blender\"s Eevee render settings can significantly enhance your workflow efficiency without compromising on quality. Here are several key strategies to boost Eevee\"s performance:
- Update Blender Regularly: Ensure Blender is always up-to-date to benefit from the latest performance optimizations and features.
- Adjust Sampling Settings: Reduce the number of samples in both render and viewport settings to speed up render times. Experiment with the balance between quality and performance to find the optimal setting for your project.
- Optimize Resolution: Consider rendering at a lower resolution if high-resolution outputs are not necessary, as this can significantly reduce render times.
- Use Denoising: Leverage Eevee\"s denoising feature to clean up noise in the final render, allowing you to lower the sample count without noticeably reducing image quality.
- Manage Poly Counts: Be mindful of poly-heavy modifiers like subdivisions. Use Blender\"s simplify options to reduce the complexity of your scenes, which can have a substantial impact on render speeds.
- Simplify Scenes: Minimize the use of resource-intensive features such as high-resolution textures, complex shaders, and excessive particle systems. This approach not only speeds up rendering but also makes for a more efficient and manageable project.
- Optimize Lighting and Shadows: Fine-tune shadow and lighting settings for efficiency. Utilize Eevee\"s soft shadows and adjust the cascade and cube size settings to balance between visual fidelity and performance.
- Utilize Screen Space Reflections Sparingly: While screen space reflections enhance realism, they can also increase render times. Adjust settings like trace precision and half resolution trace to optimize performance without significantly degrading quality.
By implementing these strategies, you can significantly reduce Eevee render times while maintaining a high standard of visual quality. Remember, optimizing for performance often involves finding the right balance that suits your specific project\"s needs.
_HOOK_
Creating Realistic Materials and Textures
Creating realistic materials and textures in Blender\"s Eevee renderer involves understanding and applying a blend of techniques and settings to achieve photorealism. Here\"s a comprehensive guide to developing materials that bring your 3D scenes to life.
- Understanding Blender Nodes: Begin by familiarizing yourself with Blender\"s node system, which allows for the creation of complex materials through a network of interconnected nodes. Focus on the Principled BSDF shader for a wide variety of materials, and use nodes like Mix Shader, Hue Saturation Value, and Brightness Contrast for color adjustments. Texture nodes like Image Texture and Noise Texture are essential for adding detail.
- Shader Nodes: Utilize the Principled BSDF and Mix Shader nodes to create and mix different materials. The Principled BSDF acts as an all-encompassing shader, capable of simulating a variety of materials with minimal setup.
- Texture and Converter Nodes: Incorporate texture nodes for detailed surfaces and converter nodes like Separate RGB and Color Ramp to adjust and manipulate these textures effectively.
- PBR Workflows: Adopt Physically Based Rendering (PBR) workflows, focusing on the metallic workflow supported by Blender. This approach relies on diffuse/albedo, roughness, normal, and metalness maps to define the physical properties of materials.
- Global Illumination and Indirect Lighting: While Eevee cannot simulate global illumination as accurately as Cycles due to its rasterization method, using light probes and understanding the limitations can help approximate the effect. Baking indirect lighting with light probes is crucial for static scenes.
- Transparency and Volumetrics: Manage transparency and volumetric effects carefully. Eevee supports these features differently than Cycles, with specific considerations for alpha blend modes and the number of volumetric layers.
- Material and Displacement: Be mindful of Eevee\"s limitations with procedural noise and displacement. Utilize bump mapping and stay within the texture limit per material to ensure optimal performance.
These steps offer a pathway to creating rich, realistic materials in Eevee. Experimentation and understanding the strengths and limitations of Eevee compared to Cycles will enable you to choose the right tool for your project\"s needs.
Lighting Techniques in Eevee
Lighting in Blender\"s Eevee renderer involves a combination of techniques designed to enhance realism and visual appeal in real-time rendering environments. Understanding these techniques can greatly improve the quality of your scenes:
- Indirect Lighting: For global illumination effects, use Irradiance Volumes to simulate bounced light in your scene. Place the Irradiance Volume strategically and adjust settings like Distance and Falloff to control the irradiance effect. Baking the indirect lighting solidifies these effects into your scene, enhancing realism with subtle color bounces.
- Emissive Objects: To create light sources from objects, you must first calculate irradiance. Without irradiance, emissive materials won\"t illuminate surrounding areas. Screen Space Reflections can reflect emissive objects even without irradiance calculations.
- Refractive Materials: For materials like glass, adjust the Transmission value in the Principled BSDF material. Unlike Cycles, Eevee requires additional steps to simulate refraction accurately due to its rasterization-based rendering.
- Sub-Surface Scattering (SSS): This effect, which simulates light passing through translucent materials, can be achieved by adjusting settings in the Render Properties and Shader Editor. Eevee\"s approach to SSS provides a balance between visual quality and rendering speed.
These advanced lighting techniques, combined with Eevee\"s real-time rendering capabilities, allow for the creation of visually stunning scenes with a high level of detail and realism. Experimenting with different settings and understanding the underlying principles of each technique will enable you to leverage Eevee\"s full potential for your projects.
Using Emissive Objects for Dynamic Lighting
Utilizing emissive objects for dynamic lighting in Blender\"s Eevee renderer can significantly enhance the realism and mood of your scenes. Emissive materials emit light by themselves, making them perfect for creating sources of light such as screens, signs, or any object that should appear as if it is self-illuminated.
Here\"s a step-by-step guide to effectively using emissive objects in your Eevee projects:
- Creating an Emissive Material: Start by selecting your object and going to the Material Properties panel. Add a new material and under the Emission section, increase the Emission strength. This will make your object emit light. You can also change the color to fit the desired light source.
- Adjusting Emission Strength: The emission strength controls how much light is emitted from the object. Adjusting this value can help you achieve the right balance for your scene\"s lighting. High values can simulate bright light sources like neon signs, while lower values are suitable for subtle effects.
- Using Light Probes: For dynamic lighting to affect other objects in the scene, you might need to use light probes. Light probes capture the lighting information from emissive materials and help to illuminate surrounding objects correctly.
- Combining with Other Light Sources: Emissive objects work best when used in conjunction with traditional light sources in Eevee. This combination allows for a more complex and layered lighting setup, enhancing the depth and realism of the scene.
- Optimizing for Performance: While emissive materials add greatly to a scene\"s atmosphere, they can also impact performance. Use them judiciously, especially in complex scenes or when aiming for real-time rendering.
Remember, the key to effective use of emissive objects in Eevee is experimentation. Try different emission strengths, colors, and combinations with other lighting techniques to see what works best for your specific project.
Dynamic lighting with emissive objects can transform your scenes, adding a new layer of realism and visual interest. By following these steps, you can leverage the power of Eevee to create stunning, lifelike renders that captivate your audience.
Best Practices for Eevee Rendering
Eevee, Blender\"s real-time rendering engine, offers a blend of speed and quality, making it an attractive choice for various projects. To maximize the potential of Eevee, here are some best practices gathered from comprehensive resources:
- Utilize Temporal Anti-Aliasing (TAA): Eevee employs TAA to remove artifacts and smooth out the image. Adjust the sample settings under Render Properties to control the quality in both the viewport and final renders.
- Optimize Ambient Occlusion: For added realism, fine-tune the ambient occlusion settings to enhance shadow depth where objects meet or are close to each other. Modify distance, factor, and trace precision for optimal shadow detailing.
- Employ Bloom for Glow Effects: Use the bloom effect to add a glowing haze around bright areas. Adjust settings like threshold, knee, radius, color, and intensity to achieve the desired glow effect.
- Manage Depth of Field (DOF): Eevee\"s DOF effects are primarily managed through the camera settings. Adjust the max size for the DOF effect to enhance performance while maintaining visual quality.
- Subsurface Scattering: Achieve realistic rendering of materials like skin or wax by fine-tuning subsurface scattering settings. Adjust samples and jitter threshold for a seamless result without compromising speed.
- Screen Space Reflections: To add reflections, use screen space reflections effectively. Consider the limitations of reflections based on viewport visibility and use reflection probes for comprehensive reflection coverage.
- Implement High Quality Normals: For dense meshes, enable high quality normals to minimize artifacts and ensure a smoother appearance.
- Adjust Shadow Settings: Eevee\"s shadow settings, such as cube size and cascade size, can significantly impact the sharpness and quality of shadows. Experiment with these to find the right balance between quality and performance.
- Enhance Performance: To optimize rendering times without sacrificing too much quality, experiment with settings like high quality normals and consider the complexity of your scene\"s lighting and materials.
By adhering to these best practices, you can leverage Eevee\"s capabilities to produce stunning visuals efficiently. Remember, each project may require a different approach, so experimentation and adjustment are key to achieving the best results.
Common Challenges and Solutions
Blender\"s Eevee renderer, while powerful, can present various challenges during the rendering process. This section addresses common issues and provides step-by-step solutions to ensure a smooth rendering experience.
- Memory Overload: High memory usage can lead to Blender crashes, especially when scenes are too large. To mitigate this, consider reducing texture resolution, minimizing geometry, and optimizing particle systems. Using a lower resolution HDRI or a sky texture can also help manage memory demands effectively.
- Graphics Driver Issues: Rendering with a GPU can sometimes lead to driver-related issues. It is recommended to use the Studio Driver for Nvidia GPUs and Radeon Pro software for AMD GPUs, as they tend to offer more stability and are less prone to crashing.
- Software Bugs: Encountering a bug in Blender can affect rendering. Utilizing the latest long-term support (LTS) release or trying the latest beta release can help bypass these issues.
- Black Frames in Final Render: Incorrectly connected compositing nodes can result in black frames. Ensuring that your render layers are properly connected to the composite node in the compositor workspace and verifying that Compositing and Sequencer options are enabled in the output properties can resolve this issue.
- Missing Objects: Objects missing in the final render can be due to disabled rendering for specific objects or collections. Checking the camera icon in the Outliner for each object or collection can help identify and rectify this issue.
- Clipping Issues: Objects disappearing due to being too far or too close can be fixed by adjusting the camera\"s clipping settings to ensure all intended objects are within the renderable distance.
Addressing these challenges requires a combination of optimizing scene complexity, ensuring software and hardware compatibility, and making precise adjustments to settings. By applying these solutions, users can enhance their rendering workflow in Blender\"s Eevee and achieve the desired outcomes with fewer obstacles.
_HOOK_
Comparing Eevee with Cycles Renderer
Blender offers two distinct rendering engines, Eevee and Cycles, each with its own set of strengths and weaknesses, catering to different needs and project requirements.
- Eevee: Known as an online renderer, Eevee is designed for speed, offering real-time rendering capabilities that are similar to modern game engines. This makes it ideal for quick previews, animations, and scenes where time is of the essence. However, its reliance on rasterization and screen space for calculations introduces limitations, particularly in lighting accuracy, shadow resolution, and transparent materials handling.
- Cycles: As an offline renderer, Cycles focuses on delivering the highest levels of quality through path tracing. This approach allows for more accurate lighting, reflections, and shadows, even though it results in longer rendering times compared to Eevee. Cycles excel in producing photorealistic images and animations, with its main limitation being its performance, as detailed scenes can take significantly longer to render.
When comparing the two, it\"s clear that the choice between Eevee and Cycles depends on the specific needs of your project:
- Reflections and Transparency: Eevee can create visually appealing effects quickly but struggles with objects not directly visible to the camera and complex transparency. Cycles, with its path tracing, naturally handles reflections and transparency with higher fidelity, accurately simulating light behavior through and around transparent materials.
- Shadows: Eevee uses shadow maps to estimate shadows, which can result in pixelation and less accurate shadow casting. Cycles, by calculating light bounces, offers more natural and detailed shadows.
- Ambient Occlusion and Global Illumination: Eevee offers a simplified version of these effects, prioritizing speed over accuracy. Cycles, through its comprehensive light calculation, achieves more realistic ambient occlusion and global illumination effects.
- Material and Texture Limitations: Eevee has a hard limit on the number of textures per material, which can affect the complexity of materials you can create. Cycles, with its more robust computation, does not have such limitations, allowing for more detailed and complex material creations.
Ultimately, Eevee is best suited for projects where speed and interactivity are crucial, such as during the early stages of design or when working on animations that do not require photorealistic quality. Cycles, on the other hand, is the go-to choice for final renders where realism and detail are paramount, despite the longer rendering times.
Future Developments and Updates in Eevee
The future of Eevee in Blender is looking bright with several exciting developments on the horizon. With the upcoming Blender 4.1 release, the Blender community is eagerly anticipating Eevee Next, a significant update to the real-time render engine.
- Eevee Next: This next iteration promises a leap in functionality and quality, focusing on enhancing the rendering capabilities to support a virtually unlimited number of lights in the scene, higher shadow resolutions, shader displacement, and a complete overhaul of the baking system.
- Screen Space Ray-tracing: Among the most anticipated features is the introduction of Screen Space Ray-tracing, aiming to elevate the visual quality of renders directly within Eevee. While this represents a significant step forward, it maintains the screen space limitations, emphasizing the ongoing journey towards achieving even greater realism.
- Enhanced Real-time Performance: The commitment to reducing the complexity of achieving bounce lighting and screen space refractions to a simple button click highlights Blender\"s focus on user efficiency and real-time performance enhancement.
- Continuous Development: Despite the advances, the understanding remains that Eevee has more potential to unlock. Comparisons with other real-time rendering systems underscore the importance of further investment and development to fully realize Eevee\"s capabilities.
With these updates, Eevee Next is poised to bridge the gap between the original Eevee and Cycles, offering Blender users an even more powerful tool for their real-time rendering needs. The exact details of all features and improvements are still unfolding, with the Blender community closely watching the ongoing development efforts.
For those eager to explore these new features, the latest builds of Blender, including experimental versions, offer a glimpse into the future of Eevee and its evolving landscape within the 3D rendering and animation industry.
READ MORE:
Resources and Tutorials for Mastering Eevee
Mastering Eevee in Blender can significantly enhance your 3D rendering skills. Below is a compilation of resources and tutorials designed to help you learn and master Eevee\"s capabilities.
- Official Blender Documentation: Begin with the official Blender documentation for Eevee, which provides comprehensive guides on every feature, setting, and option available in Eevee. It\"s a great starting point for understanding the basics and advanced features.
- Blender Guru: Blender Guru offers tutorials ranging from beginner to advanced levels, including a dedicated series on Eevee. These tutorials are practical for understanding real-world applications of Eevee\"s features.
- CG Cookie: CG Cookie provides a library of Eevee tutorials that cover various topics, including lighting, texturing, and rendering. Their courses are structured to help you progress from basic to more complex projects.
- YouTube Channels: YouTube is an excellent resource for free tutorials. Channels like Blender Diplom, Ducky 3D, and Ian Hubert offer project-based tutorials that are both entertaining and informative.
- Blender Artists Community: The Blender Artists forum is a vibrant community where you can ask questions, share your work, and find answers to specific Eevee-related challenges.
- BlenderNation: BlenderNation posts daily news, articles, tutorials, and videos from the Blender community, including Eevee tutorials and project showcases.
- Books and eBooks: For those who prefer written material, there are several books and eBooks available that cover Eevee in detail. Titles like \"Blender 3D By Example\" often include sections dedicated to Eevee.
- Online Courses: Platforms like Udemy, Coursera, and Skillshare offer comprehensive Blender courses, including those focused on Eevee, taught by industry professionals.
As you explore these resources, practice is key. Try to apply what you learn in projects to solidify your understanding and skills. Happy Blending!
Embark on your Blender Eevee journey and unlock the full potential of real-time rendering to bring your creative visions to life with efficiency and flair. Discover the future of digital artistry today.