Topic blender import models: "Discover the seamless integration of external 3D models into your Blender projects. This guide unveils efficient techniques to import models, enhancing your creations with versatility and precision. Dive in to elevate your Blender skills."
Table of Content
- FBX Format Import
- OBJ Format Import
- Adjusting Imported Models
- Tips for Successful Import
- OBJ Format Import
- How do I import models into Blender and ensure the textures show up correctly?
- Adjusting Imported Models
- YOUTUBE: Proper Way to Import Models With Textures in Blender
- Tips for Successful Import
- Adjusting Imported Models
- Tips for Successful Import
- Tips for Successful Import
- Introduction to Importing Models in Blender
- How to Enable and Use the FBX Addon for Import
- Step-by-Step Guide to Importing OBJ Files
- Adjusting Scale, Position, and Orientation of Imported Models
- Common Issues and Solutions When Importing Models
- Importing Textures and Materials with Your Models
- Advanced Import Options: Fine-Tuning Your Imports
- Using Blender’s Import/Export Addons for Efficiency
- Best Practices for a Seamless Model Import Workflow
- Community Tips and Tricks for Importing Models
- Conclusion: Enhancing Your Blender Projects with Imported Models
FBX Format Import
The FBX format, developed by Autodesk, is ideal for transferring complex data into Blender, including geometry, materials, textures, and animations. Ensure the FBX addon is enabled in Blender’s preferences under the Addons subsection. Use the import option under the File menu to bring FBX files into your project. Adjust import settings like scale and animation data through the file browser’s side panel for optimal results.
Operator Presets
Customize data import with operator presets in the file browser, allowing control over transform data, scale, and specific animation and armature data importation.

READ MORE:
OBJ Format Import
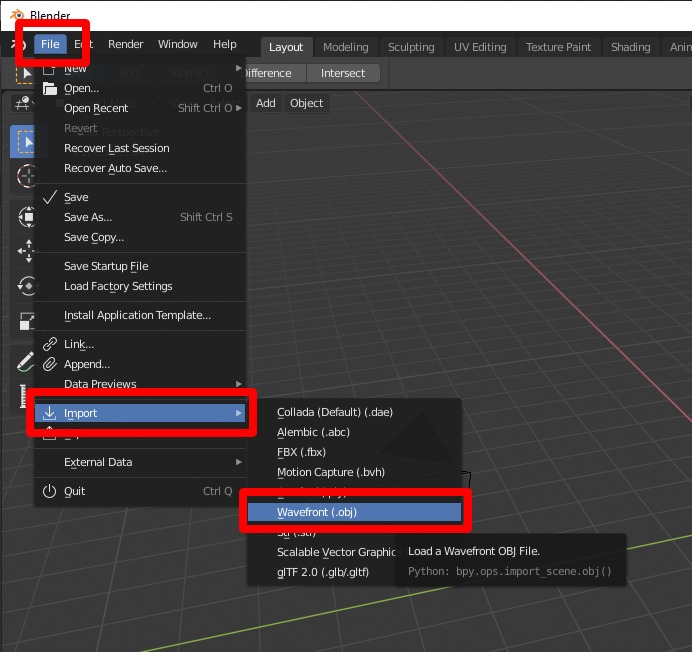
The OBJ format, focusing on geometry, is user-friendly for beginners, supporting vertex positioning, normals, and textures. Import OBJ files via the File menu, selecting the wavefront obj option. Similar to FBX, ensure the necessary addon is enabled by default or activate it through Blender’s preferences.
Adjusting Imported Models
Post-import, models may require adjustments in scale, position, or rotation. Utilize Blender’s tools like the Scale tool (S key), Grab tool (G key), and Rotate tool (R key) for modifications. For detailed adjustments, access the Object menu or use shortcuts for axis-specific transformations.

Tips for Successful Import
- Check for compatible file formats before importing.
- Ensure models are correctly scaled to match Blender’s unit system.
- Include textures or materials in the import process for visual consistency.
- Adjust Blender’s lighting and camera settings to highlight the imported model.
Blender supports a wide array of formats, including .fbx, .obj, .stl, and more, facilitating a versatile 3D modeling and animation workflow.
| FormatSupportNotes | FBXYesInclusive of complex data | OBJYesGeometry focused | STLYes3D printing |
For detailed steps and additional tips, refer to Blender’s documentation and community forums.

OBJ Format Import
The OBJ format, focusing on geometry, is user-friendly for beginners, supporting vertex positioning, normals, and textures. Import OBJ files via the File menu, selecting the wavefront obj option. Similar to FBX, ensure the necessary addon is enabled by default or activate it through Blender’s preferences.

_HOOK_
How do I import models into Blender and ensure the textures show up correctly?
To import models into Blender and ensure the textures show up correctly, you can follow these steps:
- Open Blender and go to the \"File\" menu.
- Select \"Import\" and then choose the file format of the model you want to import (e.g., .obj, .fbx, .dae).
- Navigate to the location of your model file on your computer and select it.
- Click \"Import\" to bring the model into Blender.
- After importing the model, go to the \"Materials\" tab in the Properties panel.
- Ensure that the material slots are correctly assigned to the model\'s geometry.
- If the textures are not showing up, make sure the file paths to the textures are correct.
- Click on the texture image node and check the file path to ensure it is pointing to the correct location.
- If needed, re-assign the textures by clicking on the \"Open\" button next to the file path.
- Repeat this process for all textures associated with the model to ensure they are correctly mapped.
- You can also adjust the mapping and UV settings for the textures in the \"Texture\" panel to fine-tune their appearance on the model.
Adjusting Imported Models
Post-import, models may require adjustments in scale, position, or rotation. Utilize Blender’s tools like the Scale tool (S key), Grab tool (G key), and Rotate tool (R key) for modifications. For detailed adjustments, access the Object menu or use shortcuts for axis-specific transformations.

Proper Way to Import Models With Textures in Blender
Textures: Step into a world of intricate beauty as we explore the mesmerizing world of textures. From smooth surfaces to rough details, each texture tells a unique story waiting to be discovered. Blender: Unleash your creativity with the powerful tool of Blender. Dive into a versatile world of 3D modeling, animation, and rendering as we navigate the endless possibilities in this dynamic software.
Tips for Successful Import
- Check for compatible file formats before importing.
- Ensure models are correctly scaled to match Blender’s unit system.
- Include textures or materials in the import process for visual consistency.
- Adjust Blender’s lighting and camera settings to highlight the imported model.
Blender supports a wide array of formats, including .fbx, .obj, .stl, and more, facilitating a versatile 3D modeling and animation workflow.
For detailed steps and additional tips, refer to Blender’s documentation and community forums.

Adjusting Imported Models
Post-import, models may require adjustments in scale, position, or rotation. Utilize Blender’s tools like the Scale tool (S key), Grab tool (G key), and Rotate tool (R key) for modifications. For detailed adjustments, access the Object menu or use shortcuts for axis-specific transformations.
Tips for Successful Import
- Check for compatible file formats before importing.
- Ensure models are correctly scaled to match Blender’s unit system.
- Include textures or materials in the import process for visual consistency.
- Adjust Blender’s lighting and camera settings to highlight the imported model.
Blender supports a wide array of formats, including .fbx, .obj, .stl, and more, facilitating a versatile 3D modeling and animation workflow.
| FormatSupportNotes | FBXYesInclusive of complex data | OBJYesGeometry focused | STLYes3D printing |
For detailed steps and additional tips, refer to Blender’s documentation and community forums.