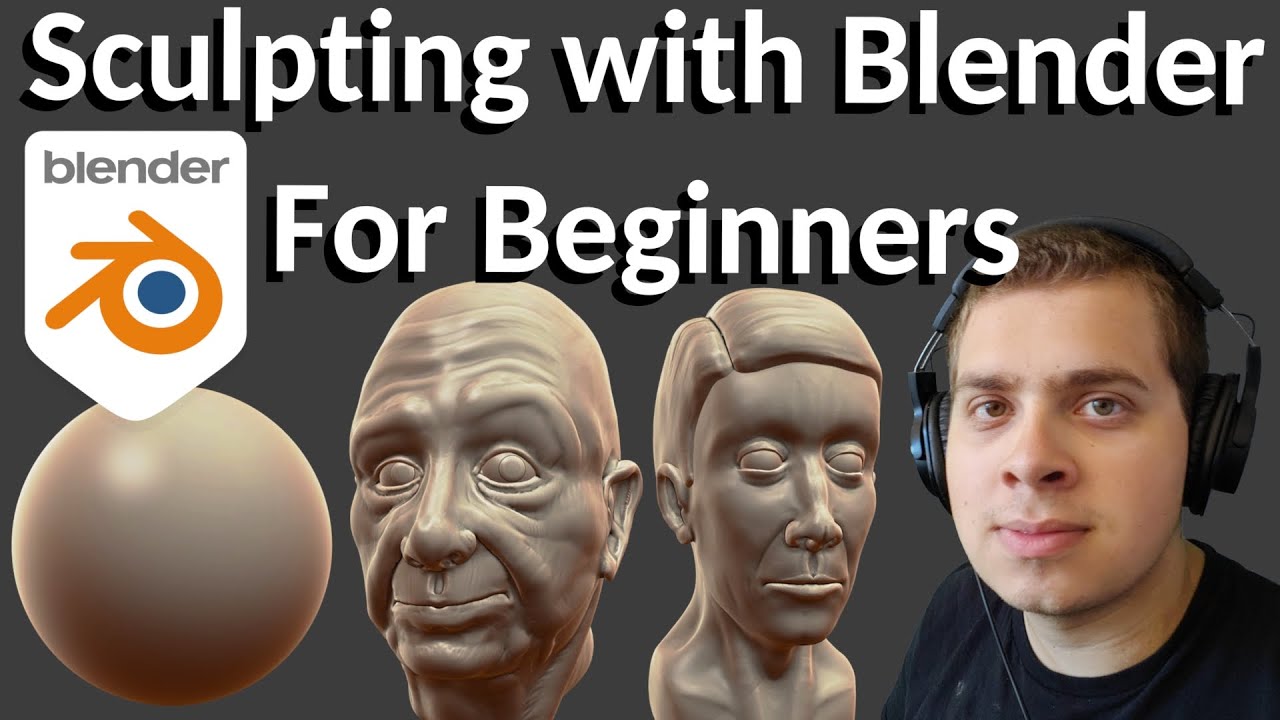
Topic sculpting tutorial blender: Dive into the world of 3D art with our sculpting tutorial for Blender, designed to transform beginners into skilled artists through easy-to-follow guides and expert tips.
Table of Content
- Getting Started with Blender Sculpting
- Advanced Techniques and Projects
- Brushes and Tools
- Additional Resources
- Advanced Techniques and Projects
- Brushes and Tools
- Additional Resources
- Brushes and Tools
- Additional Resources
- What is a recommended Blender tutorial for sculpting techniques?
- YOUTUBE: Blender Sculpting Tutorial for Beginners - Stylized Head Sculpt Tutorial
- Additional Resources
- Introduction to Blender Sculpting
- Essential Tools and Brushes for Beginners
- Step-by-Step Basic Sculpting Tutorials
- Advanced Sculpting Techniques and Tips
- Creating Detailed Characters and Creatures
- Utilizing Textures and Alphas in Sculpting
- Workflow Optimization and Best Practices
- Common Challenges and How to Overcome Them
- Resource Compilation for Further Learning
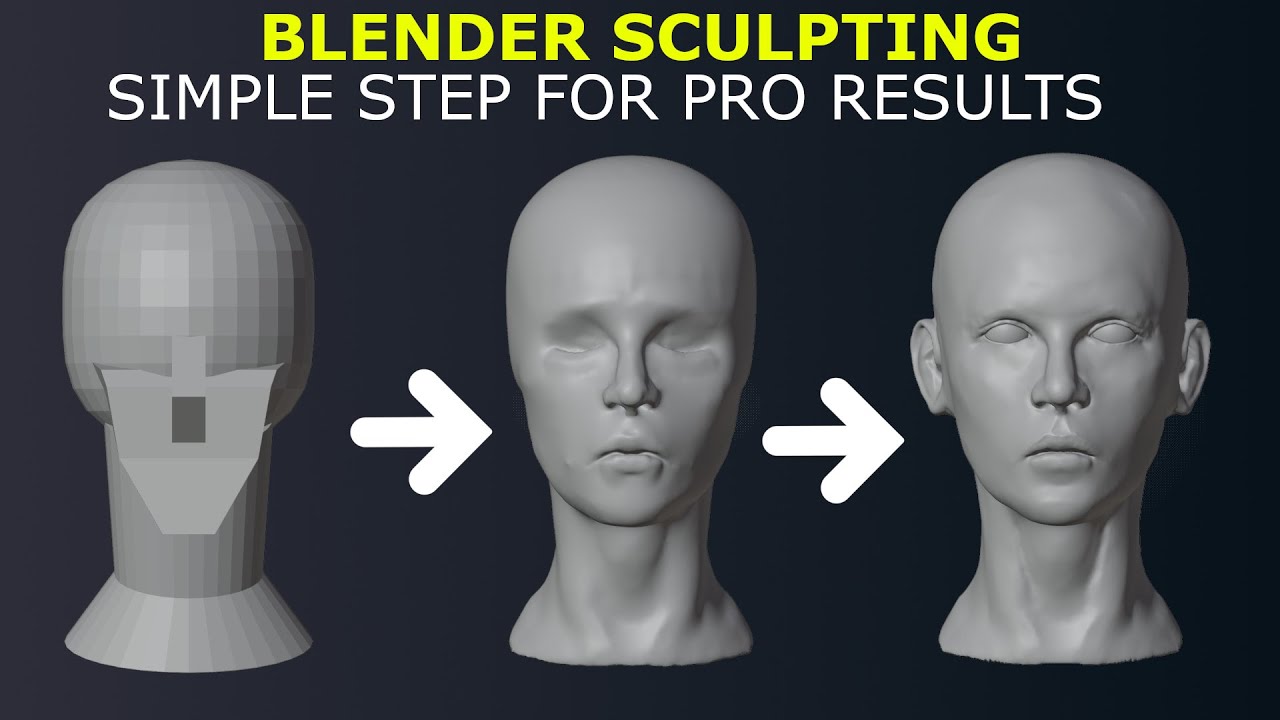
Getting Started with Blender Sculpting
- Introduction to basic sculpting tools and features for beginners.
- Step-by-step guide to sculpting a fantasy being, covering all essential techniques.
- Overview of Blender 2.8 sculpting fundamentals, including official video tutorials.
READ MORE:
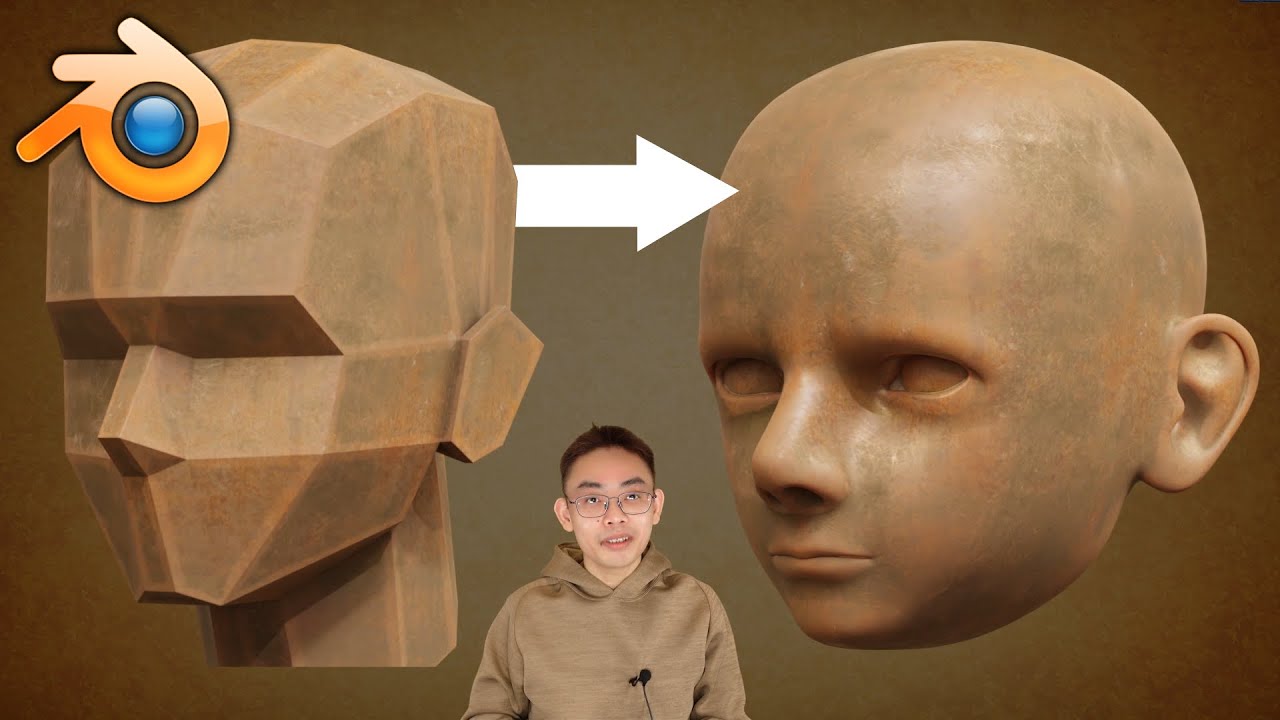
Advanced Techniques and Projects
- Detailed tutorials on creature creation workflow, including base mesh, sculpting, and auto-retopology.
- Speed sculpting tips and techniques for character and creature design.
- Comprehensive course on 3D sculpting from A-Z, compatible with Blender 4.0.
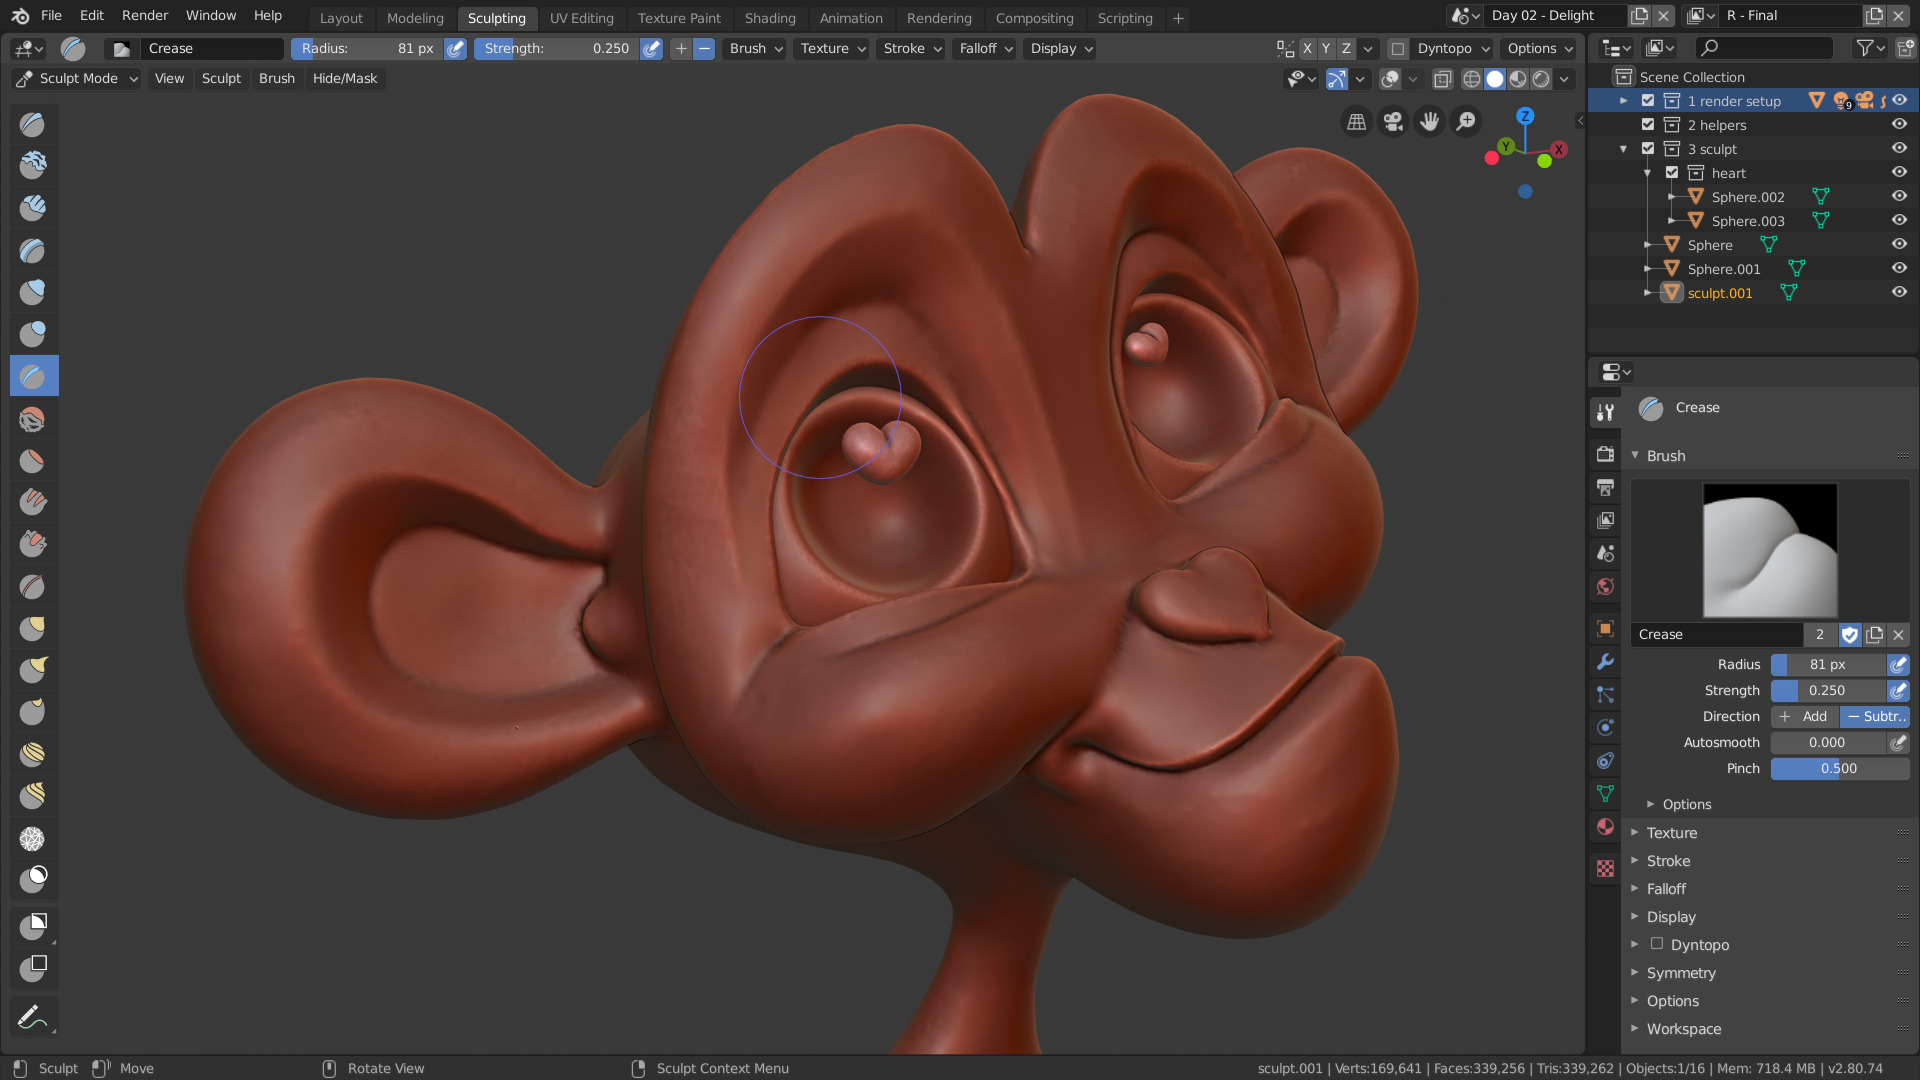
Brushes and Tools
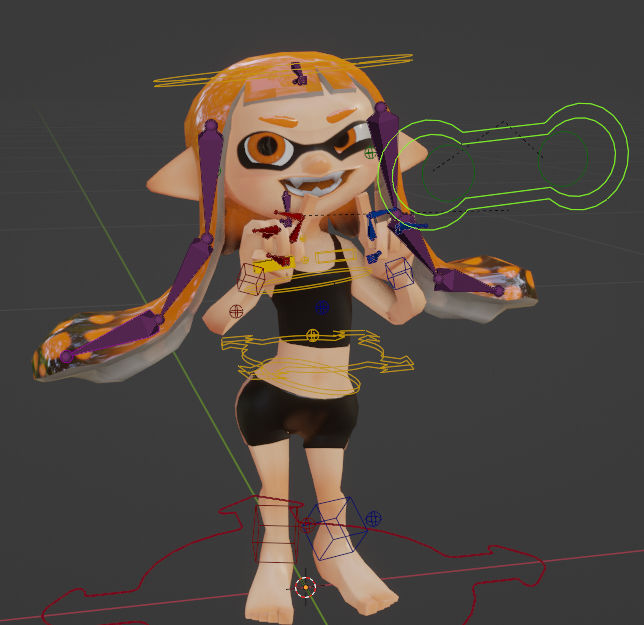
Explore Blender\"s built-in brushes such as Crease, Clay Strips, Pinch, and more. Learn how dynamic topology (dyntopo) enhances your sculpting process by adding and removing details on the fly.
Additional Resources
- Video tutorials for beginners on sculpting basics and setup.
- Guides to creating your own alphas and brushes for efficient workflow.
- Recommendations for the best Blender tutorials available in 2024, most of which are free.
Whether you are new to digital sculpting or looking to refine your skills, Blender offers a comprehensive set of tools and tutorials to bring your creations to life. Dive into the world of 3D sculpting and unleash your creativity with Blender.
Advanced Techniques and Projects
- Detailed tutorials on creature creation workflow, including base mesh, sculpting, and auto-retopology.
- Speed sculpting tips and techniques for character and creature design.
- Comprehensive course on 3D sculpting from A-Z, compatible with Blender 4.0.
_HOOK_
Brushes and Tools
Explore Blender\"s built-in brushes such as Crease, Clay Strips, Pinch, and more. Learn how dynamic topology (dyntopo) enhances your sculpting process by adding and removing details on the fly.

Additional Resources
- Video tutorials for beginners on sculpting basics and setup.
- Guides to creating your own alphas and brushes for efficient workflow.
- Recommendations for the best Blender tutorials available in 2024, most of which are free.
Whether you are new to digital sculpting or looking to refine your skills, Blender offers a comprehensive set of tools and tutorials to bring your creations to life. Dive into the world of 3D sculpting and unleash your creativity with Blender.

Brushes and Tools
Explore Blender\"s built-in brushes such as Crease, Clay Strips, Pinch, and more. Learn how dynamic topology (dyntopo) enhances your sculpting process by adding and removing details on the fly.
Additional Resources
- Video tutorials for beginners on sculpting basics and setup.
- Guides to creating your own alphas and brushes for efficient workflow.
- Recommendations for the best Blender tutorials available in 2024, most of which are free.
Whether you are new to digital sculpting or looking to refine your skills, Blender offers a comprehensive set of tools and tutorials to bring your creations to life. Dive into the world of 3D sculpting and unleash your creativity with Blender.

What is a recommended Blender tutorial for sculpting techniques?
For learning sculpting techniques in Blender, a recommended tutorial is the Blender Guru\'s donut tutorial. This tutorial covers a wide range of aspects including sculpting and is great for beginners. Additionally, Grant Abitt offers another tutorial that is highly regarded for its sculpting content. Here is a breakdown of steps you can follow:
- Begin by watching Blender Guru\'s donut tutorial to learn the basics of sculpting in Blender.
- Practice sculpting different shapes and forms using the tools and techniques demonstrated in the tutorial.
- Experiment with different brushes and settings to get a feel for how they affect your sculpted objects.
- Once you are comfortable with the basics, consider watching Grant Abitt\'s tutorial for further insights and tips on sculpting in Blender.
- Continue practicing and experimenting with sculpting to improve your skills and create more complex and detailed objects.
Remember that practice is key when it comes to mastering sculpting techniques in Blender. Don\'t be afraid to experiment and try new things to hone your skills.
_HOOK_
Blender Sculpting Tutorial for Beginners - Stylized Head Sculpt Tutorial
Stylized: \"Immerse yourself in the mesmerizing world of a stylized masterpiece! Brilliant colors, intricate details, and unique design elements await in this visually stunning video that will leave you in awe.\" Complete: \"Experience the satisfaction of a complete journey in this video that ties every loose end and fulfills every storyline. From start to finish, this captivating video offers a truly fulfilling viewing experience.\"
Additional Resources
- Video tutorials for beginners on sculpting basics and setup.
- Guides to creating your own alphas and brushes for efficient workflow.
- Recommendations for the best Blender tutorials available in 2024, most of which are free.
Whether you are new to digital sculpting or looking to refine your skills, Blender offers a comprehensive set of tools and tutorials to bring your creations to life. Dive into the world of 3D sculpting and unleash your creativity with Blender.

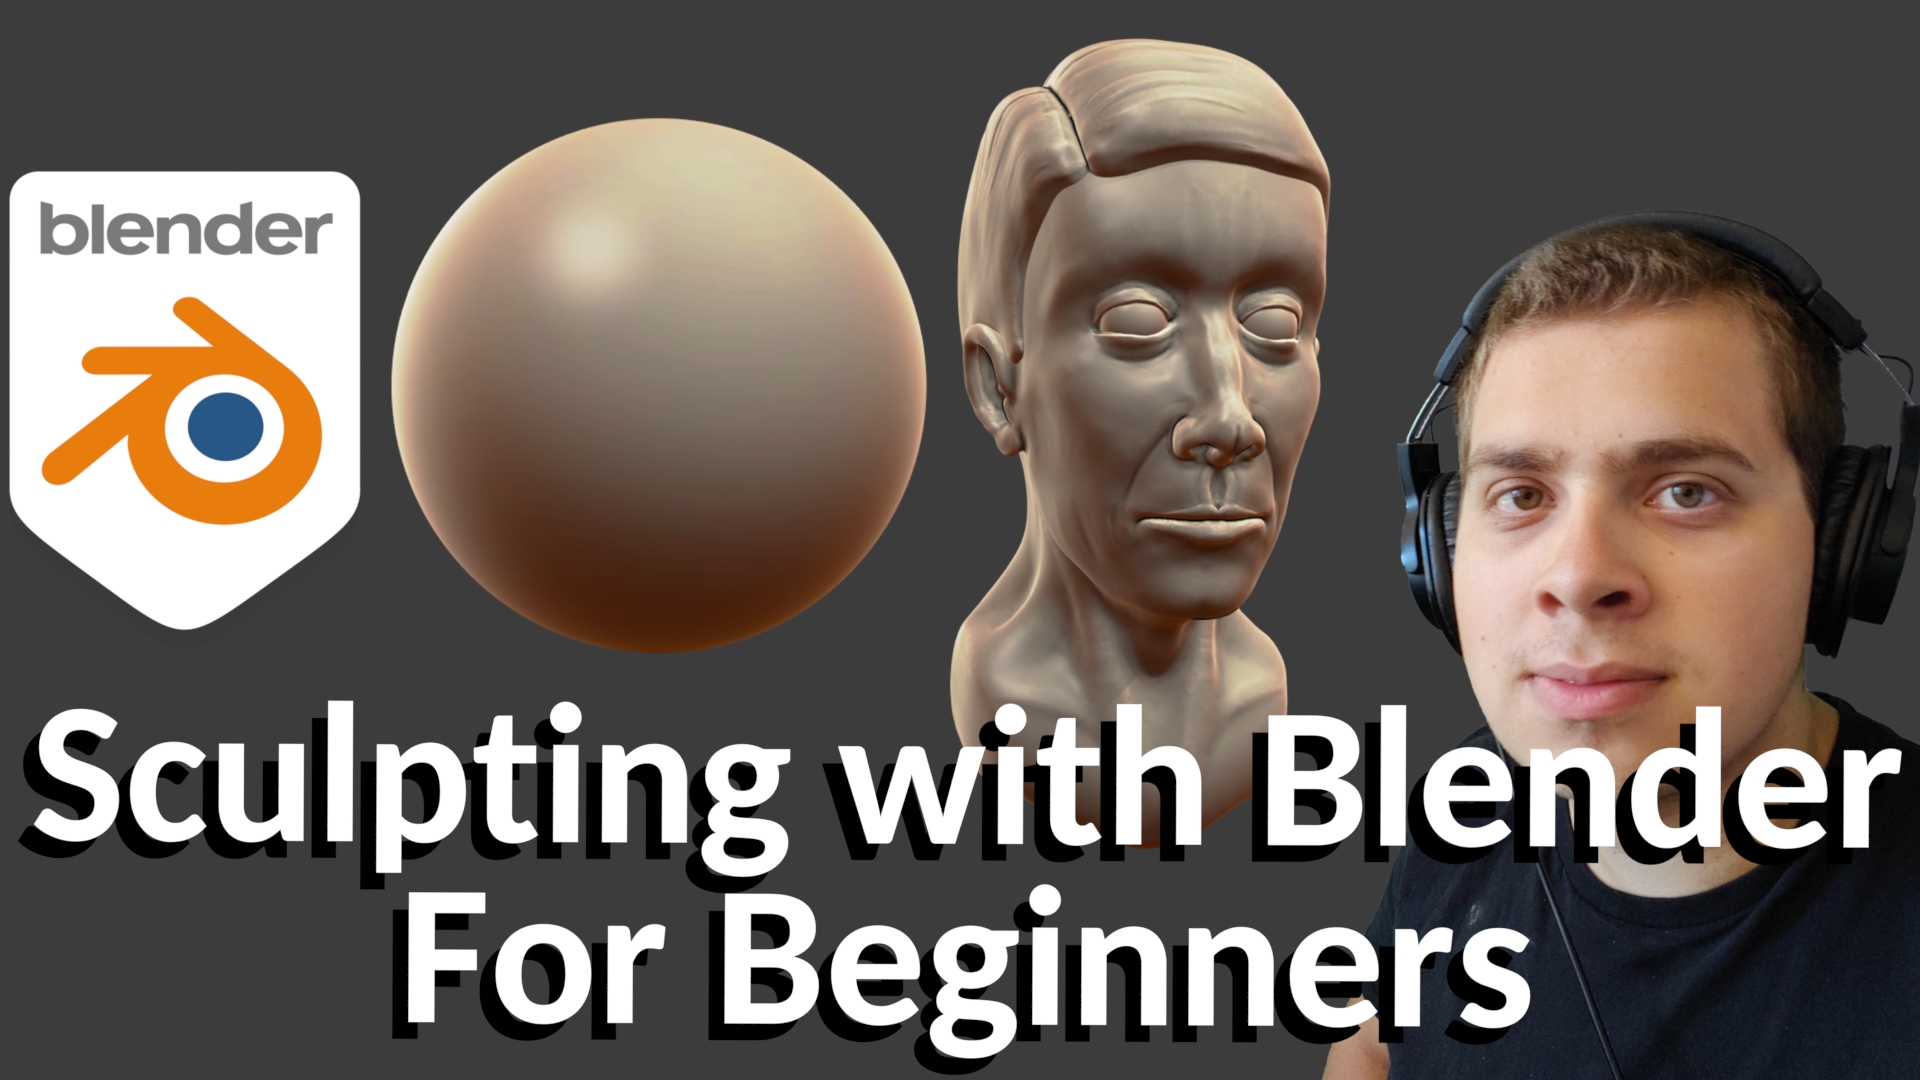
Sculpting in Blender: A Complete Beginner\'s Guide
blender3d #blender #sculpting If you are new to sculpting or Blender, this video is a great place to start. It will teach you everything ...
Introduction to Blender Sculpting
Blender sculpting allows artists to create detailed 3D models by simulating the process of sculpting clay in the digital realm. This powerful feature of Blender opens up a world of creativity and is accessible to beginners and professionals alike. Starting with Blender for sculpting involves understanding the interface, tools, and techniques that make digital sculpting possible.
- Getting Started: Begin with familiarizing yourself with the Blender interface and setting up your workspace for sculpting. This includes learning how to navigate the viewport, selecting and manipulating objects, and customizing your toolset.
- Understanding Sculpting Tools: Blender offers a variety of sculpting tools such as the Grab, Crease, Smooth, and Scrape brushes. Each tool has a specific purpose and understanding how to use them effectively is crucial for sculpting.
- Dynamic Topology (Dyntopo): Learn about Dyntopo, a dynamic tessellation sculpting method, which allows for the addition and removal of details without worrying about the underlying mesh structure. This is essential for creating complex shapes and details.
- Sculpting Workflow: A step-by-step guide to sculpting your first model in Blender. This covers everything from blocking out basic shapes to adding fine details and textures.
- Advanced Techniques: As you become more comfortable with the basics, explore advanced sculpting techniques such as sculpt layers, mask extraction, and the use of alphas for adding intricate details.
- Finishing Touches: Learn about the final steps in the sculpting process, including retopology, baking normal maps, and texturing to bring your sculpt to life.
This introduction aims to equip you with the knowledge and tools needed to begin your journey into the world of Blender sculpting. Whether you are creating characters, creatures, or any other artistic sculptures, Blender provides a robust platform for unleashing your creativity.
Essential Tools and Brushes for Beginners
Starting with sculpting in Blender introduces you to a world where digital creation meets artistic freedom. The seamless sculpting environment in Blender is tailored for sculpting organic subjects and provides an intuitive transition between conceptual design and final model production. For those beginning their journey into digital sculpting, understanding the essential tools and brushes Blender offers is crucial.
- Experience the dedicated sculpting workspace, designed to offer an immersive sculpting experience with tools and features tailored for sculpting efficiency and creativity.
- Explore the 20 different brush types available in Blender, including Crease, Clay Strips, Pinch, Grab, and Smooth. These brushes are the backbone of sculpting in Blender, each offering unique effects for modeling organic shapes and textures.
- Dynamic Topology (Dyntopo) is a revolutionary feature for beginners, allowing for the addition and removal of details on the fly without the need for a fixed mesh structure. This makes it easier to create complex models without pre-planning the mesh density.
- Masking is another powerful feature that allows you to isolate parts of your mesh for focused sculpting. This can be particularly useful when working on dense models or when needing to sculpt close to other geometry without affecting it.
These tools and features provide a strong foundation for beginners to start sculpting in Blender. By learning how to effectively use these brushes and utilizing the dynamic topology and masking features, you can begin to bring your 3D sculptures to life with precision and artistic flair.
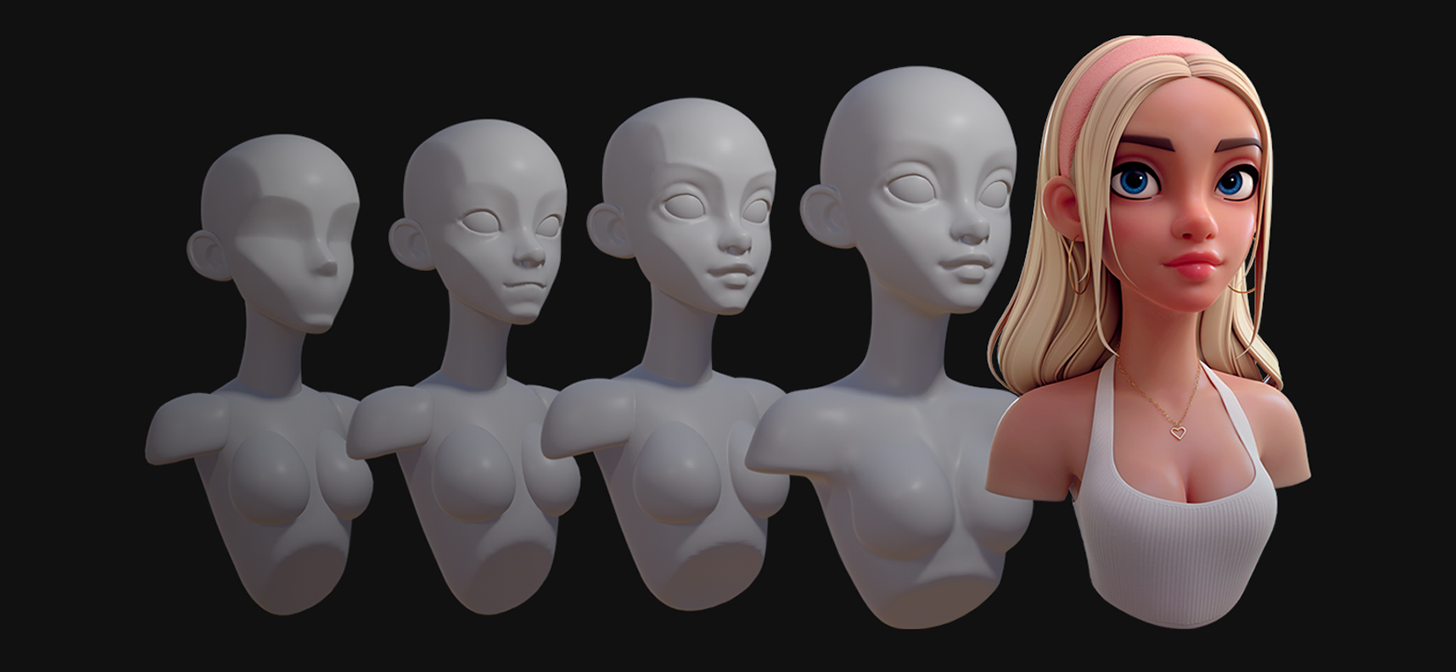
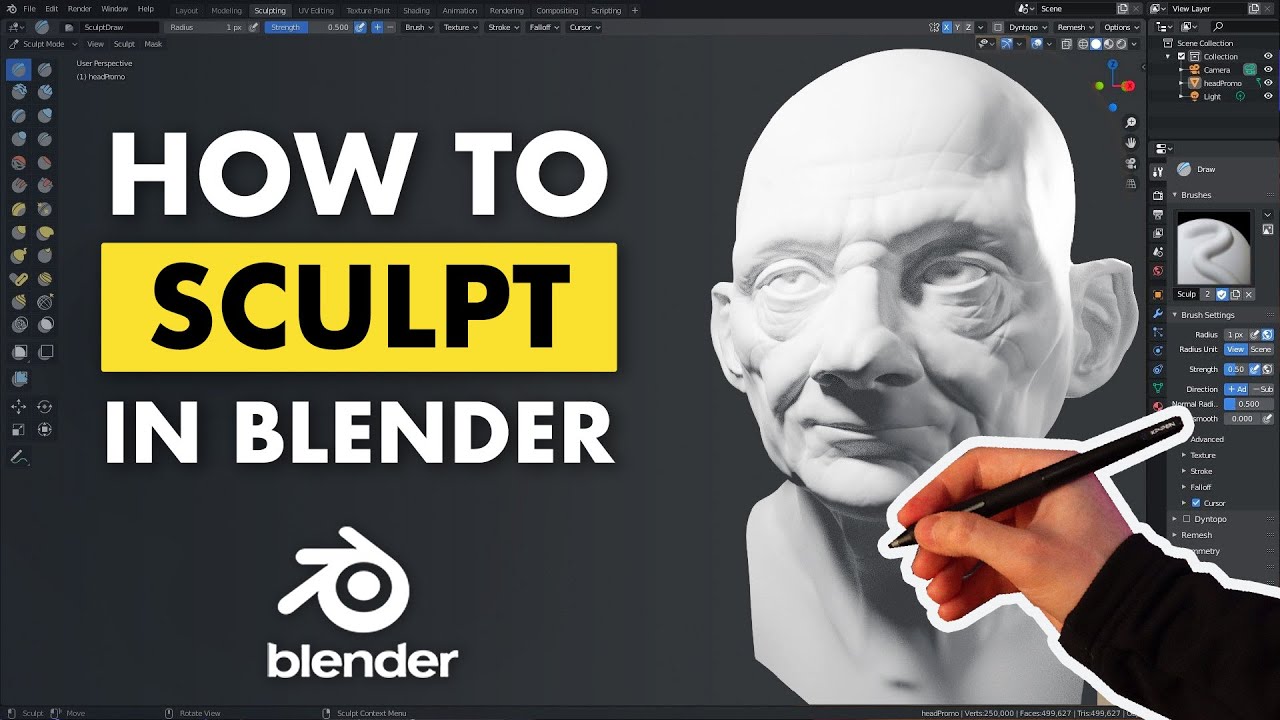
Step-by-Step Basic Sculpting Tutorials
Welcome to the exciting journey of learning to sculpt in Blender! This section provides a curated step-by-step guide for beginners eager to master the art of digital sculpting. By following these tutorials, you\"ll gain a solid understanding of Blender\"s sculpting tools, techniques, and workflows, enabling you to bring your creative visions to life.
Getting Started with Blender Sculpting
Begin your sculpting adventure by familiarizing yourself with Blender\"s sculpt mode. This initial step is crucial for understanding the software\"s interface and the various sculpting tools at your disposal. You\"ll learn how to navigate the sculpting environment, adjust your brush settings, and manipulate your digital clay with precision.
Essential Sculpting Tools and Brushes
Explore the core set of brushes and tools that are fundamental to sculpting in Blender. This includes brushes like the Crease, Clay Strips, Pinch, and Grab. Each brush has a specific purpose, from adding volume to creating fine details, and knowing when and how to use them is key to achieving your desired results.
Creating Your First Sculpt
With a solid grasp of the basics, you\"ll embark on creating your first sculpt. This tutorial will guide you through the process of shaping a simple object, teaching you to apply your knowledge of brushes and tools. You\"ll learn techniques for adding details, refining shapes, and experimenting with symmetry to create balanced and interesting forms.
Practical Exercise: Sculpting a 3D Shark
Put your skills to the test with a practical exercise designed to solidify your understanding of Blender\"s sculpting tools. Following step-by-step instructions, you\"ll sculpt a 3D shark, starting from a basic digital clay ball and transforming it into a detailed model. This exercise emphasizes the importance of practice and experimentation in mastering digital sculpting.
Advanced Tips and Techniques
As you become more comfortable with the basics, you\"ll be ready to explore advanced sculpting techniques. Learn about dynamic topology for adding complexity to your models, remeshing for optimizing geometry, and using matcaps for better visual feedback. These advanced tips will help you refine your sculpts and prepare them for further development or rendering.
Conclusion and Next Steps
By completing these tutorials, you\"ve taken a significant step towards becoming proficient in Blender sculpting. Remember, mastery comes with practice, so continue to experiment, explore new techniques, and challenge yourself with increasingly complex projects. Happy sculpting!
Advanced Sculpting Techniques and Tips
Mastering the art of sculpting in Blender requires understanding both the tools at your disposal and the creative techniques that can bring your work to life. Below are advanced techniques and tips to enhance your sculpting workflow and achieve more detailed, dynamic, and realistic models.
- Dynamic Topology (Dyntopo):
- Use Dynamic Topology to add more detail to your sculpt dynamically. It allows for localized mesh refinement without affecting the entire model, ideal for adding intricate textures and features.
- Masking and Inverted Sculpting:
- Mask areas of your model to protect them from being altered while you sculpt other parts. Use inverted sculpting to push inwards and create unique effects or detailed indentations.
- Custom Brushes:
- Create or download custom brushes that can produce effects or textures specific to your project. Experiment with brush settings to achieve varied sculpting effects, from realistic skin pores to scales on creatures.
- Multi-resolution Sculpting:
- Start sculpting at a lower resolution to block out basic shapes and forms. Gradually increase the resolution as you add finer details, allowing for more control and efficiency.
- Utilizing Sculpt Layers:
- Sculpt layers allow you to apply different details or modifications on separate layers that can be toggled on and off. This is especially useful for non-destructive sculpting and experimenting with variations.
- Advanced Remeshing:
- Use remeshing tools like QuadriFlow for a more uniform, quad-based mesh topology. This is crucial for animation-ready models or for achieving smoother, more organic shapes.
- Matcap and Lighting:
- Experiment with different matcap materials and lighting setups to better visualize the forms and details of your sculpt. This can also highlight areas that need further refinement.
- Texture and Alpha Brushes:
- Incorporate textures and alphas into your sculpting process to add complex surface details easily. This technique can drastically enhance realism and depth in your sculptures.
- Proportional Editing for Large Scale Changes:
- Use proportional editing for smooth transitions and modifications on a larger scale. This is ideal for adjusting the overall shape and proportions of your model without losing detail.
- Workflow Optimization:
- Develop a consistent workflow that includes regular saves, using layers for organization, and setting up hotkeys for frequently used tools and actions to speed up your sculpting process.
Remember, mastering these advanced techniques requires practice and patience. Experiment with different approaches to find what works best for your style and the specific requirements of your project.
_HOOK_
Creating Detailed Characters and Creatures
Creating detailed characters and creatures in Blender is an exciting journey that blends creativity with technical skill. This guide outlines a step-by-step approach to sculpting detailed and lifelike models, from conceptualization to the final touches.
- Concept and Reference Gathering:
- Begin with a solid concept. Collect references of anatomy, textures, and poses to guide your sculpting process. Understanding your character\"s or creature\"s story can also influence its design and details.
- Blocking Out Basic Shapes:
- Use basic shapes to block out your character\"s or creature\"s form. Focus on proportions and the overall silhouette at this stage. Blender\"s sculpting tools like the Blob and Snake Hook can be very effective here.
- Refining the Sculpt:
- Once the basic shape is established, start refining the sculpt. Add muscle structure, facial features, and other anatomical details. Use a combination of the Clay Strips, Crease, and Grab brushes to define these elements.
- Adding Fine Details:
- With the character\"s form and features in place, begin adding fine details such as wrinkles, scars, and skin texture. Custom brushes and alphas can be invaluable for creating realistic skin textures and scales.
- Dynamic Topology for Localized Detailing:
- Enable Dynamic Topology (Dyntopo) for areas that require intricate detail. This feature allows you to add geometry only where needed, keeping the overall mesh manageable.
- Posing Your Character:
- Use Blender\"s rigging and armature tools to pose your character or creature. Posing can bring your model to life and add a dynamic element to its appearance.
- Textures and Materials:
- Apply textures and materials to your sculpt. This can include everything from base color maps to complex subsurface scattering for skin. Blender\"s shader editor allows for detailed material creation.
- Hair and Fur:
- For characters or creatures with hair or fur, use Blender\"s particle system or hair object to create realistic hair, fur, feathers, or other fibrous elements.
- Lighting and Rendering:
- Set up lighting to highlight the details of your character or creature. Experiment with different lighting setups to find one that best suits the mood and theme of your model. Finally, render your model to see the culmination of your work.
- Review and Refinement:
- Review your sculpt in different lighting and from various angles. Make any necessary refinements to ensure your character or creature meets your vision.
Creating detailed characters and creatures in Blender is a process of continuous learning and experimentation. Each project offers a new opportunity to refine your skills and push the boundaries of your creativity.
Utilizing Textures and Alphas in Sculpting
Textures and alphas play a crucial role in adding complexity and detail to your sculptures in Blender. This guide will walk you through the process of applying these elements to your work, significantly enhancing the realism and depth of your sculpts.
- Understanding Textures and Alphas:
- Textures are images used to add surface detail to a model, while alphas are grayscale images that affect the depth of your sculpt, allowing for intricate surface detailing.
- Choosing Appropriate Textures and Alphas:
- Select or create textures and alphas that match the surface details you wish to emulate, such as skin textures, scales, or fabric patterns.
- Importing Textures into Blender:
- In the Texture tab, add a new texture and choose the image or alpha you want to use. Adjust the mapping and influence settings to control how the texture is projected onto your model.
- Using Textures with Sculpt Brushes:
- Assign your imported texture or alpha to a sculpt brush. Adjust the brush\"s settings to control the strength, scale, and direction of the texture effect as you sculpt.
- Stenciling with Alphas:
- Use alphas as stencils to apply detailed patterns or textures selectively. This is particularly useful for adding complex surface details like scars, wrinkles, or engravings.
- Layering Textures for Complexity:
- Layer multiple textures and alphas to create more complex and detailed surfaces. Experiment with blending modes and opacity to achieve realistic results.
- Customizing Textures and Alphas:
- Create custom textures and alphas in image editing software to fit specific needs of your project, offering unparalleled control over the detailing of your sculpt.
- Dynamic Topology and Texture Detail:
- When using Dynamic Topology (Dyntopo), be mindful of your mesh\"s resolution. Higher resolutions are necessary to capture the finer details of your textures and alphas.
- Previewing and Adjusting Textures:
- Regularly preview your model with textures applied. Adjust the texture scale, rotation, and position as needed to achieve the desired effect.
- Finalizing and Exporting:
- Once satisfied with the textured details, finalize your sculpt. Ensure all textures are properly applied and export your model for rendering or 3D printing.
Utilizing textures and alphas in sculpting can dramatically increase the realism and detail of your Blender projects. With practice, you can master these techniques to create stunning, lifelike sculpts.
Workflow Optimization and Best Practices
Textures and alphas play a crucial role in adding complexity and detail to your sculptures in Blender. This guide will walk you through the process of applying these elements to your work, significantly enhancing the realism and depth of your sculpts.
- Understanding Textures and Alphas:
- Textures are images used to add surface detail to a model, while alphas are grayscale images that affect the depth of your sculpt, allowing for intricate surface detailing.
- Choosing Appropriate Textures and Alphas:
- Select or create textures and alphas that match the surface details you wish to emulate, such as skin textures, scales, or fabric patterns.
- Importing Textures into Blender:
- In the Texture tab, add a new texture and choose the image or alpha you want to use. Adjust the mapping and influence settings to control how the texture is projected onto your model.
- Using Textures with Sculpt Brushes:
- Assign your imported texture or alpha to a sculpt brush. Adjust the brush\"s settings to control the strength, scale, and direction of the texture effect as you sculpt.
- Stenciling with Alphas:
- Use alphas as stencils to apply detailed patterns or textures selectively. This is particularly useful for adding complex surface details like scars, wrinkles, or engravings.
- Layering Textures for Complexity:
- Layer multiple textures and alphas to create more complex and detailed surfaces. Experiment with blending modes and opacity to achieve realistic results.
- Customizing Textures and Alphas:
- Create custom textures and alphas in image editing software to fit specific needs of your project, offering unparalleled control over the detailing of your sculpt.
- Dynamic Topology and Texture Detail:
- When using Dynamic Topology (Dyntopo), be mindful of your mesh\"s resolution. Higher resolutions are necessary to capture the finer details of your textures and alphas.
- Previewing and Adjusting Textures:
- Regularly preview your model with textures applied. Adjust the texture scale, rotation, and position as needed to achieve the desired effect.
- Finalizing and Exporting:
- Once satisfied with the textured details, finalize your sculpt. Ensure all textures are properly applied and export your model for rendering or 3D printing.
Utilizing textures and alphas in sculpting can dramatically increase the realism and detail of your Blender projects. With practice, you can master these techniques to create stunning, lifelike sculpts.
Common Challenges and How to Overcome Them
Textures and alphas play a crucial role in adding complexity and detail to your sculptures in Blender. This guide will walk you through the process of applying these elements to your work, significantly enhancing the realism and depth of your sculpts.
- Understanding Textures and Alphas:
- Textures are images used to add surface detail to a model, while alphas are grayscale images that affect the depth of your sculpt, allowing for intricate surface detailing.
- Choosing Appropriate Textures and Alphas:
- Select or create textures and alphas that match the surface details you wish to emulate, such as skin textures, scales, or fabric patterns.
- Importing Textures into Blender:
- In the Texture tab, add a new texture and choose the image or alpha you want to use. Adjust the mapping and influence settings to control how the texture is projected onto your model.
- Using Textures with Sculpt Brushes:
- Assign your imported texture or alpha to a sculpt brush. Adjust the brush\"s settings to control the strength, scale, and direction of the texture effect as you sculpt.
- Stenciling with Alphas:
- Use alphas as stencils to apply detailed patterns or textures selectively. This is particularly useful for adding complex surface details like scars, wrinkles, or engravings.
- Layering Textures for Complexity:
- Layer multiple textures and alphas to create more complex and detailed surfaces. Experiment with blending modes and opacity to achieve realistic results.
- Customizing Textures and Alphas:
- Create custom textures and alphas in image editing software to fit specific needs of your project, offering unparalleled control over the detailing of your sculpt.
- Dynamic Topology and Texture Detail:
- When using Dynamic Topology (Dyntopo), be mindful of your mesh\"s resolution. Higher resolutions are necessary to capture the finer details of your textures and alphas.
- Previewing and Adjusting Textures:
- Regularly preview your model with textures applied. Adjust the texture scale, rotation, and position as needed to achieve the desired effect.
- Finalizing and Exporting:
- Once satisfied with the textured details, finalize your sculpt. Ensure all textures are properly applied and export your model for rendering or 3D printing.
Utilizing textures and alphas in sculpting can dramatically increase the realism and detail of your Blender projects. With practice, you can master these techniques to create stunning, lifelike sculpts.
READ MORE:
Resource Compilation for Further Learning
Embarking on the journey of mastering sculpting in Blender is an exciting endeavor. To support your learning and growth, we have compiled a comprehensive list of resources. These resources cater to varying levels of expertise, from beginners to advanced users, ensuring a well-rounded understanding and skill development in sculpting within Blender.
Official Blender Resources
- Blender Studio: Access production assets, tutorials, and insights from open movie projects. Explore a wealth of knowledge in sculpting and beyond, directly from the creators.
- Blender Sculpting Feature Set: Learn about the seamless sculpting experience in Blender, including dedicated workspaces, diverse brush types, dynamic topology, and mirrored sculpting techniques.
- Blender Manual: Dive into the official documentation for in-depth understanding of Blender\"s sculpting tools and features, ensuring you make the most out of your digital sculpting projects.
- Blender Fundamentals: The ultimate starting point for beginners. This series of tutorials covers every corner of Blender, including a special focus on sculpting basics and advanced techniques.
Community and Online Tutorials
Beyond the official channels, the Blender community is a treasure trove of knowledge, offering tutorials, courses, and forums where enthusiasts and professionals alike share their skills and insights.
- YouTube Channels: Numerous artists and educators share their sculpting workflows, tips, and tricks on YouTube, making it an invaluable resource for visual learners.
- Blender Cloud: Subscribe for access to detailed tutorials and project files from Blender Foundation\"s films, providing a unique look at professional workflows.
- Blender Artists Forum: Engage with a vibrant community of Blender users, ask questions, share your work, and get feedback from peers and pros alike.
Books and E-Books
For those who prefer a structured learning path, several books and e-books cover Blender sculpting in depth, from basics to advanced techniques. These resources often come with step-by-step tutorials, high-quality images, and project files to practice.
Workshops and Conferences
Attending Blender workshops and conferences, such as the annual Blender Conference, provides unique opportunities to learn directly from leading artists and developers in the field. These events are perfect for networking, inspiration, and discovering the latest trends and techniques in sculpting.
As you explore these resources, remember that practice is key to mastering sculpting in Blender. Experiment with different tools and techniques, and don\"t hesitate to share your work with the community for feedback and support. Happy sculpting!
Embark on your Blender sculpting journey with confidence, guided by our curated tutorials and resources. Transform your creative visions into reality, and join a community of passionate artists. Start sculpting today and unleash your artistic potential!
_HOOK_