Topic remove background adobe illustrator: Discover the art of effortlessly removing backgrounds in Adobe Illustrator, enhancing your designs and creativity with our comprehensive guide.
Table of Content
- How to remove background in Adobe Illustrator?
- Understanding the Basics of Adobe Illustrator
- Preparing Your Image for Background Removal
- Using the Pen Tool for Manual Background Removal
- Exploring the Magic Wand Tool for Easier Removal
- Leveraging the Lasso Tool for Complex Images
- Refining Edges for a Smooth Finish
- YOUTUBE: Remove White Background in Adobe Illustrator - Make Image Transparent
- Applying Clipping Masks for Non-Destructive Editing
- Adjusting Colors and Contrasts Post-Background Removal
- Exporting Your Final Image
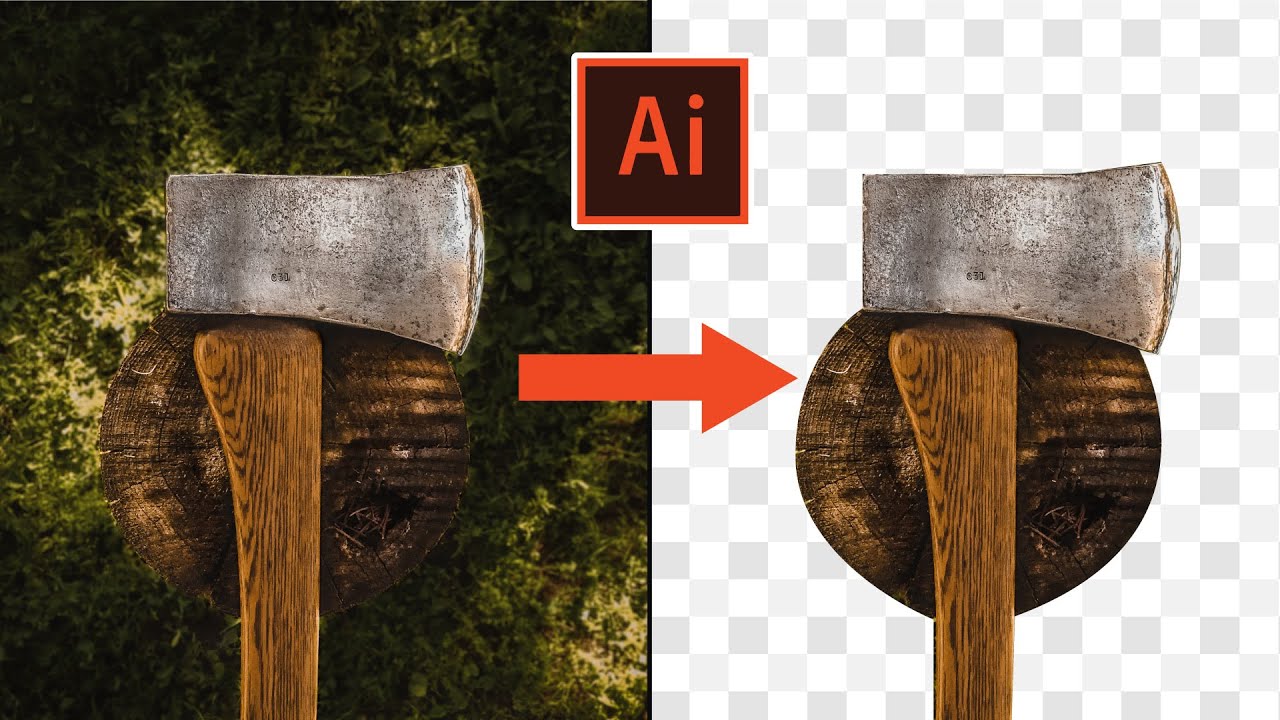
How to remove background in Adobe Illustrator?
To remove the background in Adobe Illustrator, you can use various tools and techniques. Below is a step-by-step guide:
- Select and open your image in Adobe Illustrator.
- Use the Magic Wand Tool to select the background. Adjust the settings as needed for better selection accuracy.
- Press the Delete key to remove the selected background.
- If the Magic Wand Tool doesn\'t give desired results, you can try using the Direct Selection Tool.
- Click outside the image and use the Direct Selection Tool to select the background.
- Press the Delete key to delete the selected background.
- If you want to remove multiple background objects, you can use the Select Tool.
- Click on the Select Tool in the toolbar or press \"V\" to activate it.
- Click on each background object while holding down the Shift key to select multiple objects.
- Press the Delete key to delete the selected background objects.
These steps should help you remove the background from your image in Adobe Illustrator. Remember to save your work regularly to avoid any potential loss of progress.

READ MORE:
Understanding the Basics of Adobe Illustrator
Adobe Illustrator, a powerful tool for vector graphics, offers various features for background removal. The process involves precise selection and manipulation of images, and understanding the basics of Illustrator is crucial for effective background removal.
- Getting Started: Begin by importing your image into Illustrator. It\"s essential to choose an image that benefits from background removal.
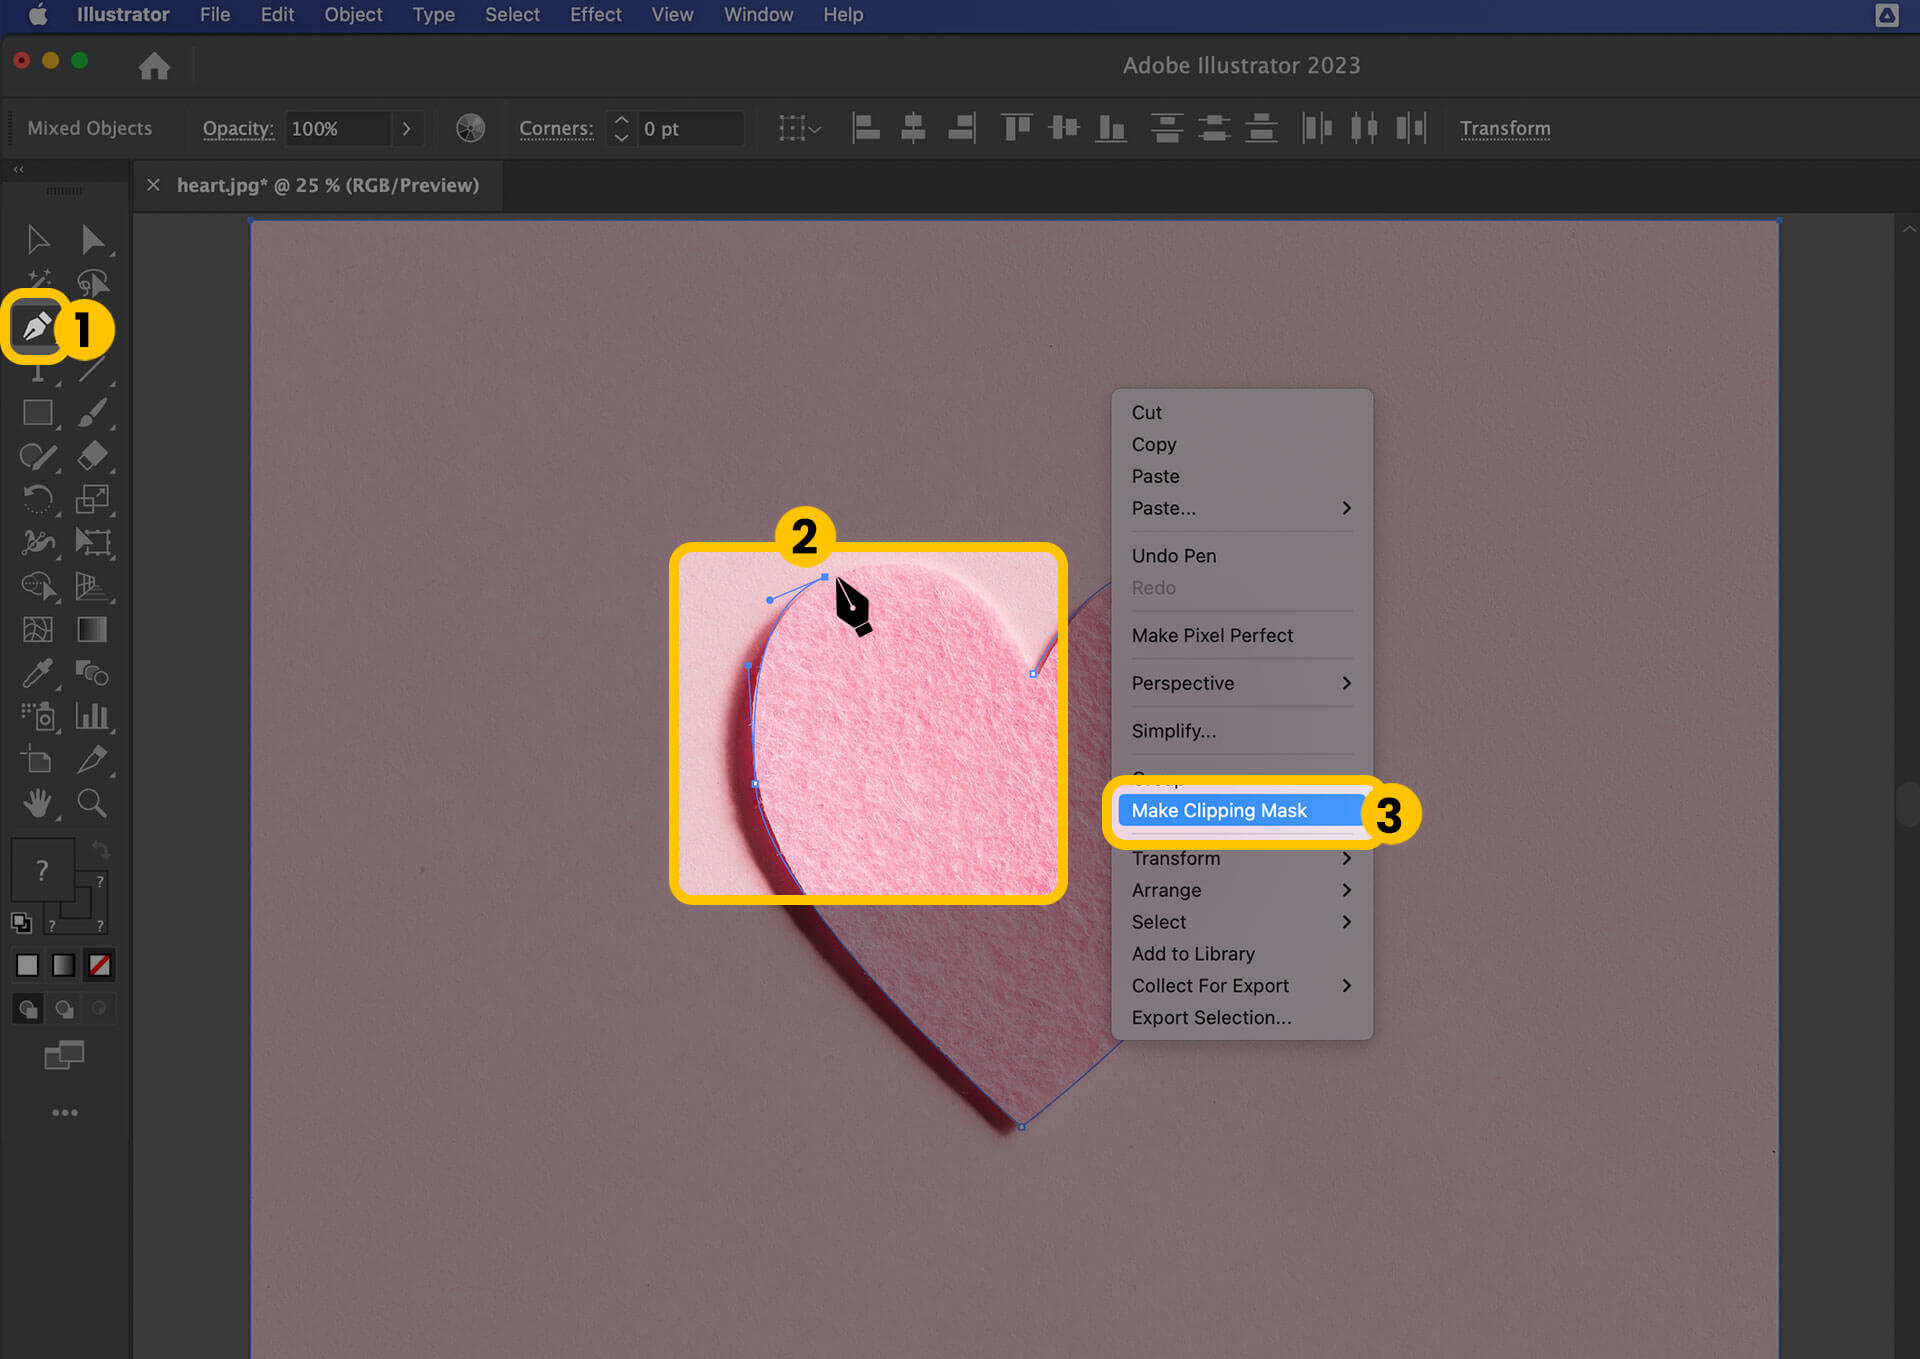
- Using the Pen Tool: The Pen Tool is vital for creating detailed paths around the subject, offering full control over background removal. Start by selecting the Pen Tool and trace around your subject to create anchor points. Ensure to close the path for a complete selection.
- Clipping Masks: Clipping masks are another effective method for background removal. After creating a path with the Pen Tool, right-click and select \"Make Clipping Mask\" to isolate the subject and remove the background.
- Magic Wand Tool: For simpler tasks, the Magic Wand tool can quickly select and remove areas of similar color. Adjust the tool’s settings for optimal results.
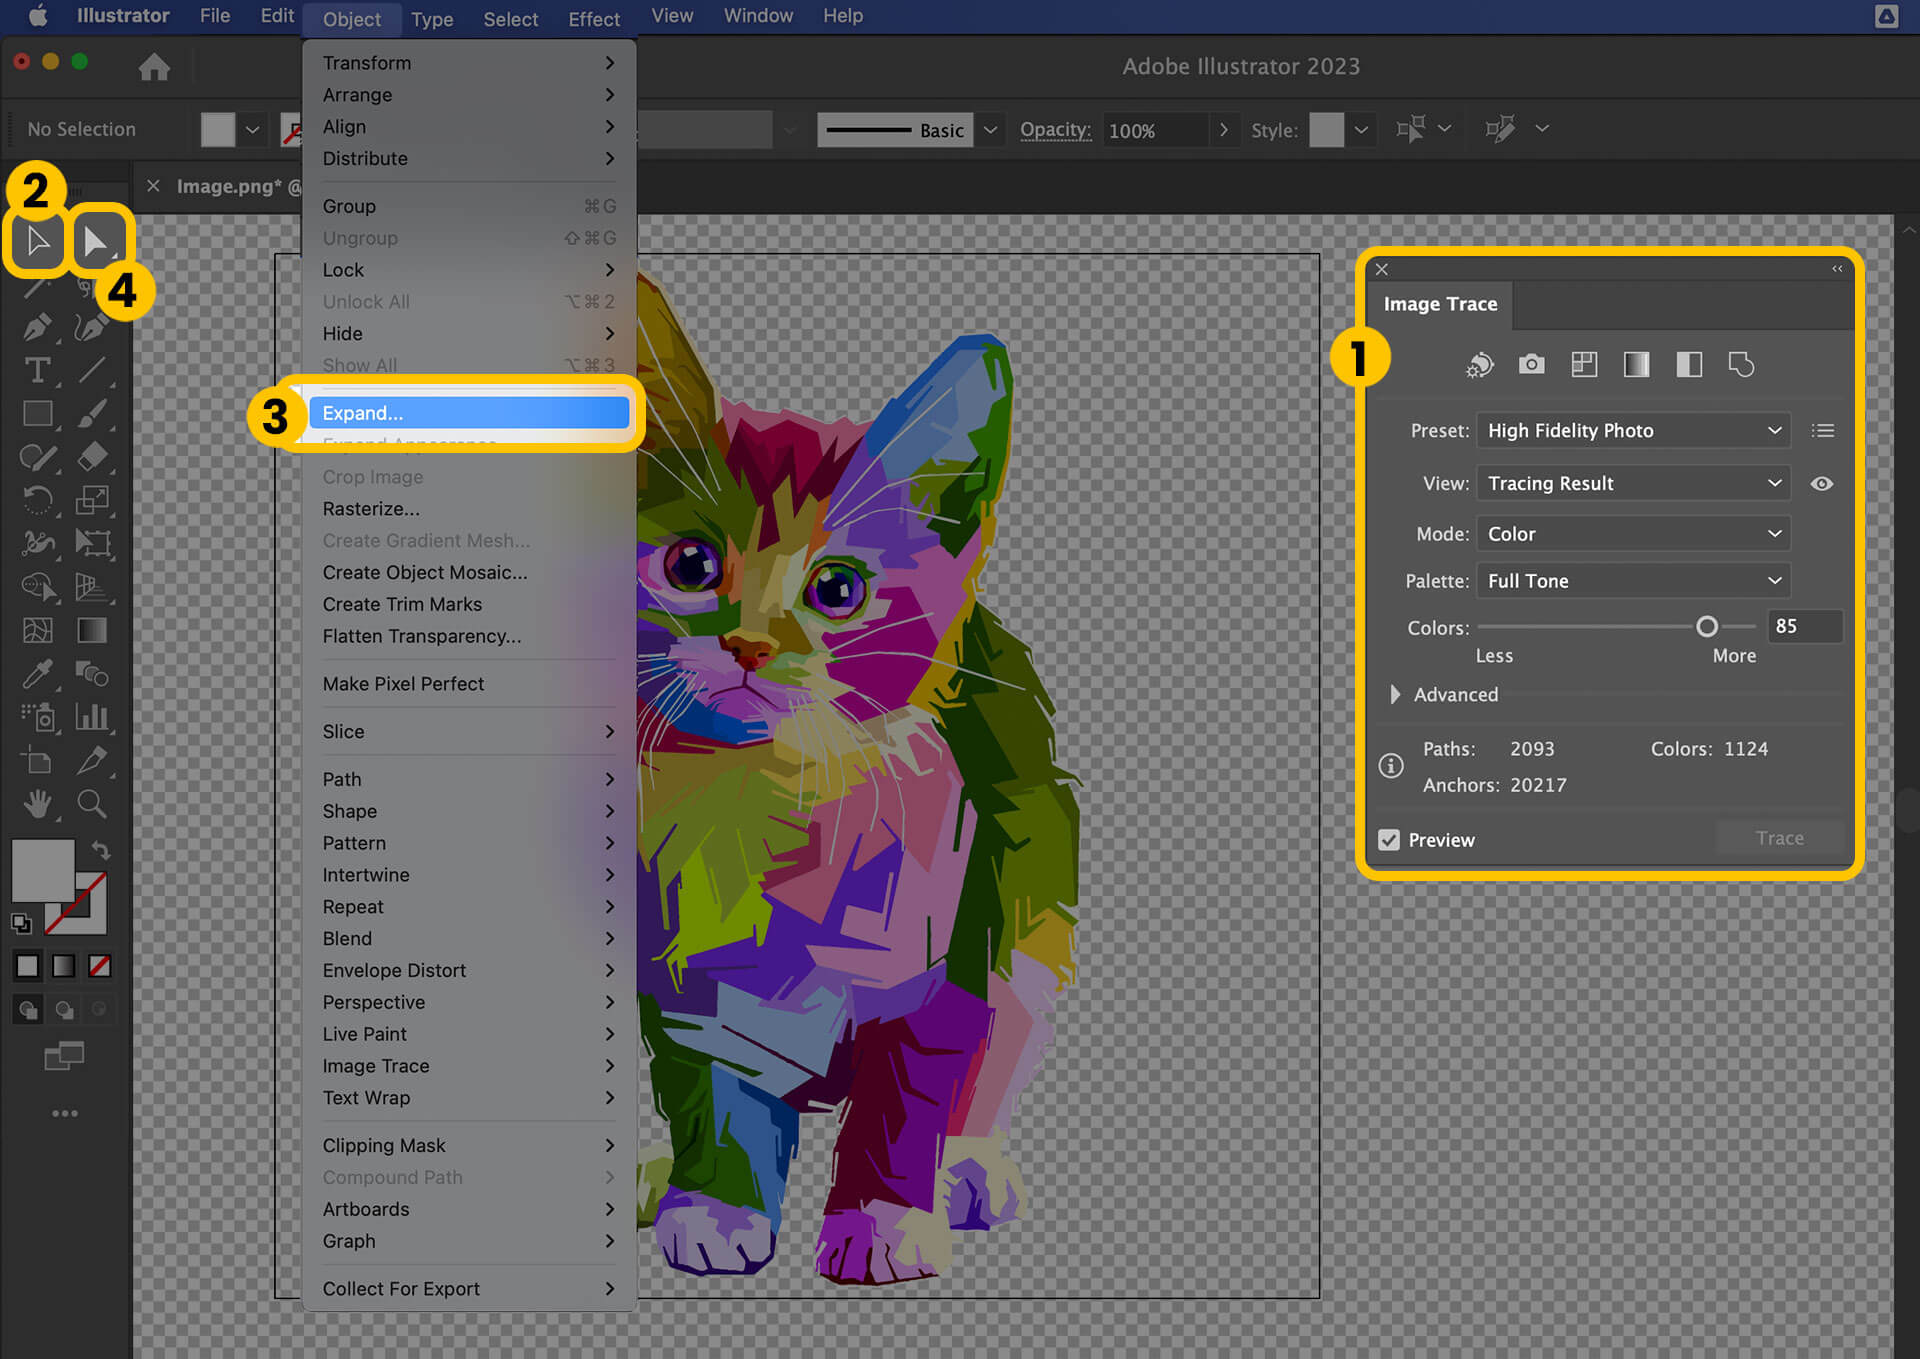
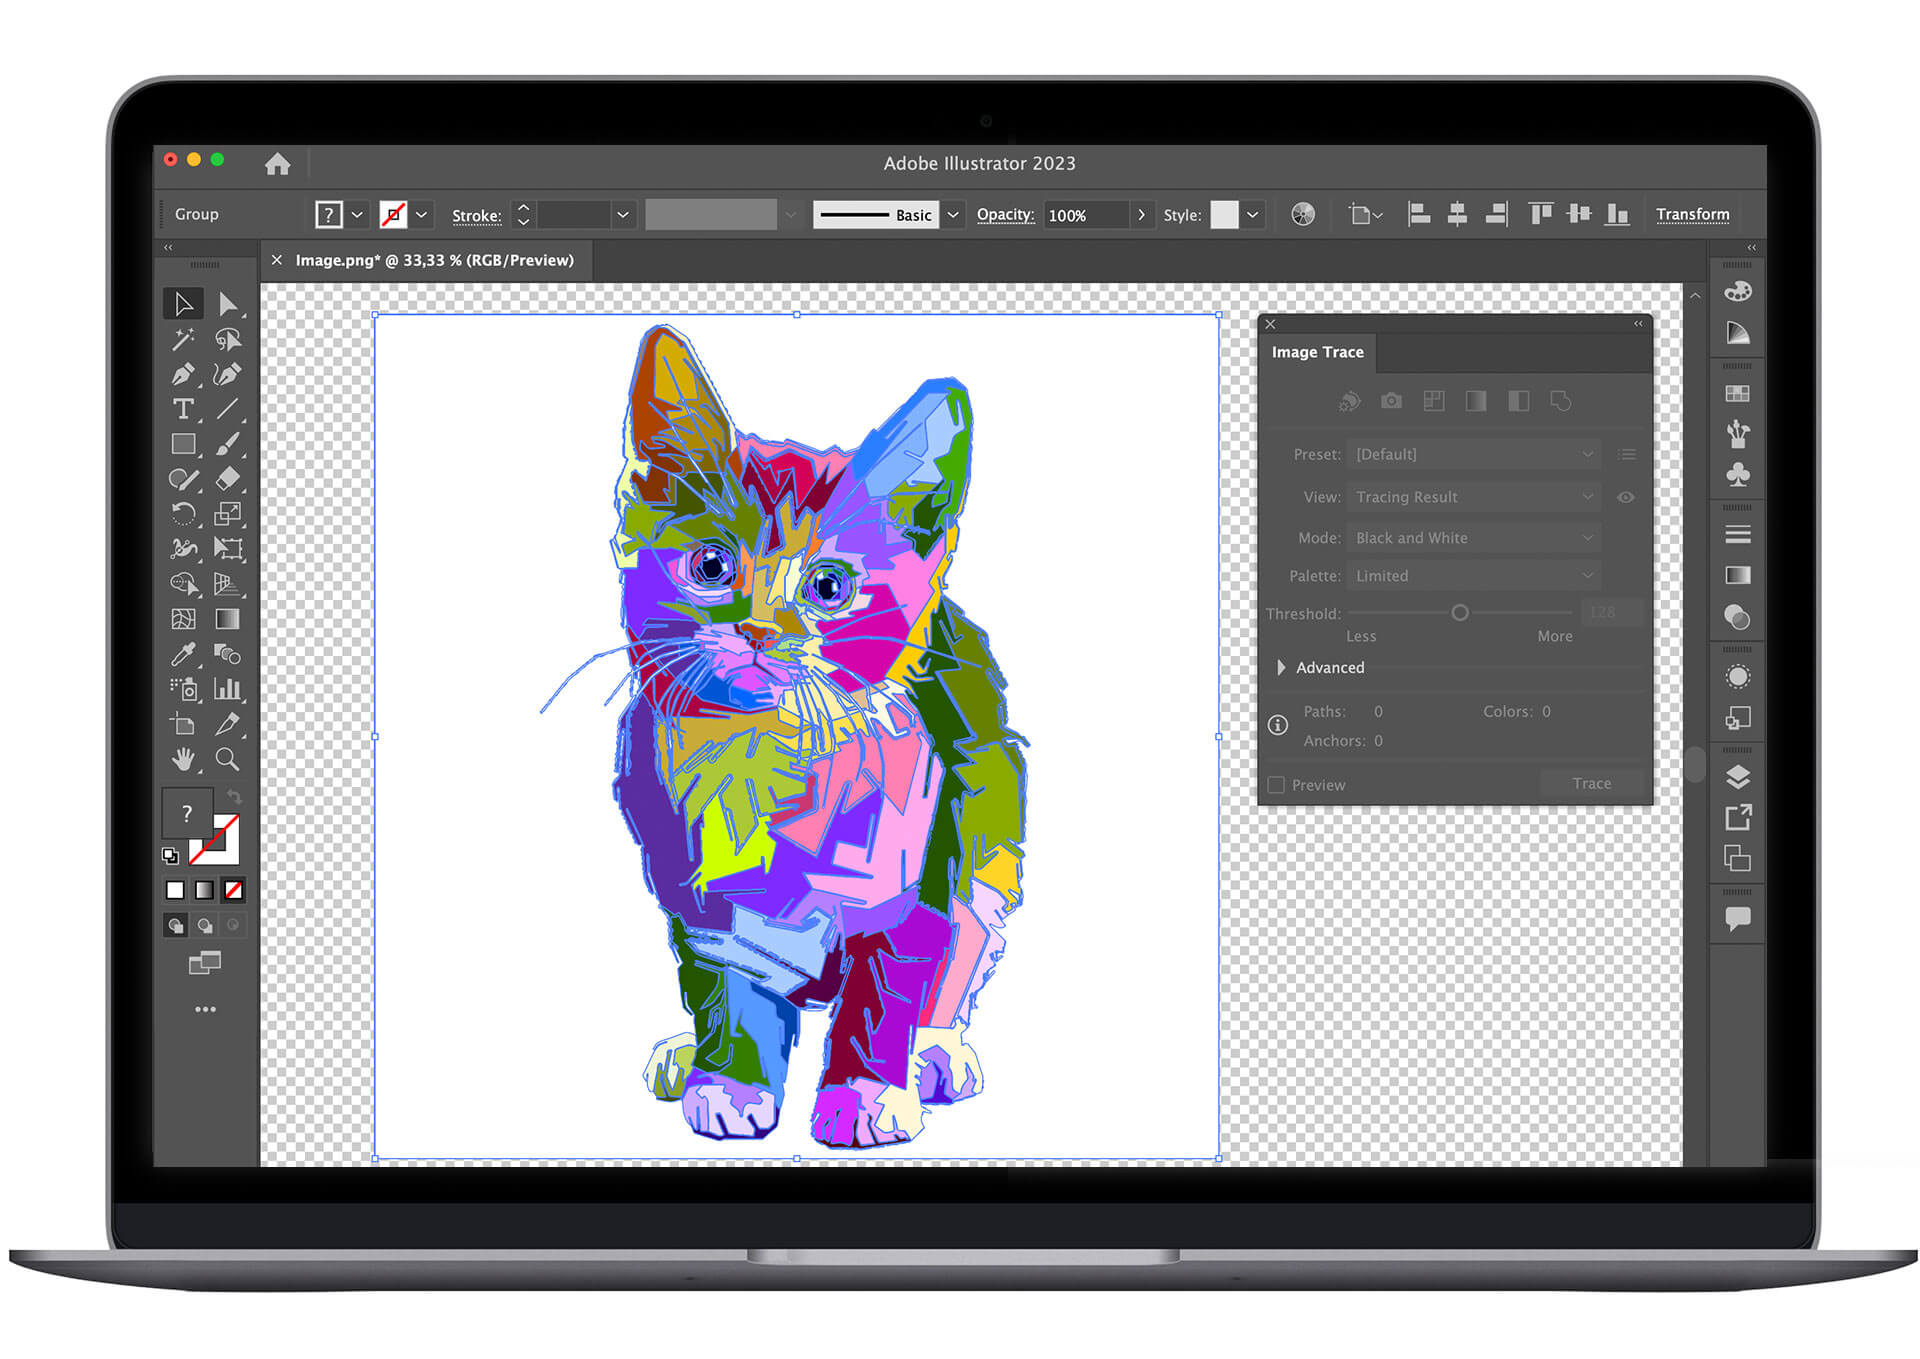
- Image Trace: The Image Trace feature is suitable for less complex images, converting them into vector shapes for easy background removal.
- Exporting: Once the background is removed, you can export your file in various formats like EPS or PNG, ensuring the Background Transparent Box is checked for maintaining transparency.
- Additional Tips: Pay attention to details such as hair and fur, manage layers efficiently, and remember that Illustrator doesn\"t support automated background removal for multiple images simultaneously.
Mastering these tools and techniques in Adobe Illustrator will empower you to skillfully remove backgrounds, enhancing the overall appeal and professionalism of your designs.
Preparing Your Image for Background Removal
Proper preparation of your image is a crucial step in the background removal process using Adobe Illustrator. This preparation enhances the effectiveness of the tools used and ensures a smoother workflow.
- Choose the Right Image Format: Begin by selecting an image in a format that supports transparency, like PNG or TIFF. These formats are preferable as they maintain the transparency information, aiding in easier background removal. If your image is in a format like JPEG, which doesn\"t support transparency, you will still be able to work effectively with Illustrator’s advanced selection tools.
- Optimize Image Resolution and Size: High-resolution images are ideal as they provide better detail, which is crucial for precise background removal. However, remember to balance image resolution with file size to maintain efficient workflow and storage management. Consider the end use of your image to decide on the appropriate resolution and size.
- Adjust Image Positioning: Depending on your project requirements, you might need to crop or resize your image to fit specific design dimensions. This ensures that your subject is well-positioned and scaled within the overall design composition.
- Image Trace for Vector Conversion: If dealing with raster images like photographs, using Illustrator’s Image Trace feature can be beneficial. This tool converts the image into a vector, which can then be manipulated more easily for background removal.
- Use of Pen and Magic Wand Tools: Illustrator provides several tools for background removal, like the Pen Tool for precise path creation and the Magic Wand Tool for quick selection and removal of specific color ranges.
- Manual Techniques like Clipping Masks: For more control, you can use manual techniques such as creating a clipping mask. This helps in isolating the subject from the background and is useful for images with irregular shapes or backgrounds.
- Advanced Techniques for Complex Images: For images with intricate details, like hair or complex patterns, tools like the Select and Mask feature and the Refine Edge Tool help in fine-tuning your selections for highly accurate results.
By following these steps and utilizing the powerful features of Adobe Illustrator, you can prepare your image effectively for background removal, setting the stage for a successful design process.

Using the Pen Tool for Manual Background Removal
The Pen Tool in Adobe Illustrator is a precise and versatile tool for manually removing backgrounds from images. Its ability to create custom paths makes it ideal for images with complex edges or detailed subjects.
- Open Your Image: Start by importing your image into Illustrator. It\"s best to work with a high-resolution image for better accuracy.
- Select the Pen Tool: Locate the Pen Tool in the toolbar or press \"P\" on your keyboard. This tool is used to draw paths around the area you want to keep.
- Create Anchor Points: Click around the edges of your subject to create anchor points. Be as precise as possible, especially around intricate areas like hair or fur. Close the path by connecting the last anchor point with the first one.
- Adjust the Path: Use the Direct Selection Tool (A) to adjust the anchor points and handles for a more accurate path. This step is crucial for closely following the contours of your subject.
- Complete the Path: Once your path closely follows the subject\"s outline, right-click and choose \"Make Clipping Mask\". This action removes the background outside of the path you\"ve created.
- Refine Edges: If necessary, go back and refine the edges of your path to ensure no background remnants are left around your subject.
- Save Your Work: After successfully removing the background, save your file in a format that preserves transparency, like PNG or EPS, ensuring the Background Transparent Box is checked.
Using the Pen Tool for background removal requires patience and practice but offers unmatched precision and control, making it ideal for detailed and professional work.
Exploring the Magic Wand Tool for Easier Removal
The Magic Wand tool in Adobe Illustrator is a straightforward and efficient option for removing backgrounds, particularly effective for images with solid or consistent color ranges.
- Preparing the Image: Start by opening your image in Illustrator and enable the Show Transparency Grid option under the View menu. This step is crucial for visually identifying the removed background.
- Selecting the Magic Wand Tool: Find and select the Magic Wand tool from the toolbar. This tool is designed to work with vector files and may not be as effective on raster images.
- Adjusting Tool Settings: Before using the tool, you can adjust its settings like colors, opacity, or weight, to better suit your image.
- Selecting the Background: Click on the background or the object areas you want to remove. The Magic Wand tool will select regions with similar colors. For adding to your selection, hold the Shift key and click on the desired part. To remove elements from your selection, use the Alt (Option on macOS) key.
- Deleting the Background: Once you have your selection, press Delete to remove the background. It\"s important to double-check your selection to ensure accuracy before deletion.
- Saving Your Work: After removing the background, export your file in a format like PNG or AI, ensuring to preserve the transparency.
This method is particularly useful for quick edits where precision is less of a concern, and the background has a uniform color or pattern.
_HOOK_
Leveraging the Lasso Tool for Complex Images
Adobe Illustrator\"s Lasso Tool is an effective solution for removing backgrounds from complex images. Its free-form selection capability makes it ideal for intricate and detailed subjects.
- Opening the Image: Begin by loading your image into Illustrator. High-resolution images offer better control for detailed work.
- Selecting the Lasso Tool: Find the Lasso Tool in the toolbar or press the \"Q\" key. This tool allows you to draw free-form paths around the area you wish to retain.
- Drawing Around the Subject: Use the Lasso Tool to draw around your subject. The tool is particularly useful for irregular shapes and detailed edges, such as hair or complex patterns.
- Refining Your Selection: Once you have made an initial selection, use the Direct Selection Tool (A) to fine-tune the path, adjusting anchor points and curves for accuracy.
- Creating a Clipping Mask: After completing the selection, right-click and choose \"Make Clipping Mask\" to hide the background outside your selection.
- Additional Adjustments: If necessary, further refine your selection to ensure no background elements are left around the subject. You may need to zoom in for more precise adjustments.
- Saving the Image: Save your edited image in a format that supports transparency, such as PNG, ensuring the \"Background Transparent\" option is selected.
While the Lasso Tool demands a steadier hand and more time, it is invaluable for tackling complex images where other selection tools may fall short.

Refining Edges for a Smooth Finish
Refining edges in Adobe Illustrator is a crucial step for achieving a polished look in your designs after removing the background. This process involves fine-tuning the edges of your selection to create a seamless transition between the subject and its new background.
- Review Your Selection: After removing the background, closely examine the edges of your subject. Look for any jagged lines, missed spots, or areas that don’t blend well.
- Use the Direct Selection Tool: With the Direct Selection Tool (A), click on the path of your subject. You can then adjust the anchor points and handles to smooth out any irregularities in the edges.
- Feather the Edges: To create a softer edge, you can use the Feather effect. Go to Effect > Stylize > Feather, and adjust the radius to get the desired softness.
- Adjust Opacity: Sometimes, slightly reducing the opacity of the edges can help blend the subject more naturally with its new background. This is especially useful for hair or fur edges.
- Add a Stroke: If needed, add a subtle stroke to the edge of your subject to define its borders. Ensure the stroke color and weight complement the overall design.
- Double Check Your Work: Zoom in and out to review the changes from different perspectives. Make sure the edges look natural and well-integrated into the overall design.
- Save in the Appropriate Format: Once satisfied with the refinements, save your work. For web use, PNG is often preferred for its ability to handle transparency.
Refining edges is an art that requires patience and attention to detail, but it significantly enhances the quality of your design, giving it a professional and seamless appearance.
Remove White Background in Adobe Illustrator - Make Image Transparent
Dive into the world of transparency as this mesmerizing video showcases the intricate beauty of see-through materials, giving you a whole new perspective on transparency like you\'ve never seen before!
Remove Background in Illustrator
Join this talented illustrator on a captivating journey of imagination and creativity as they effortlessly bring their beautiful creations to life in this enchanting video. Watch as their skillful strokes transform a blank canvas into a work of art before your eyes!
Applying Clipping Masks for Non-Destructive Editing
Clipping masks in Adobe Illustrator are a powerful feature for non-destructive background removal or editing. This technique allows you to hide parts of an object without actually deleting or altering them, offering flexibility for future adjustments.
- Prepare Your Image: Start by opening your image in Illustrator. If you’ve already used tools like the Pen or Magic Wand for selection, ensure your subject is clearly defined.
- Create a Shape for the Mask: Use a drawing tool (like the Rectangle Tool or Ellipse Tool) to create a shape over the area you want to keep visible. This shape will define the visible area of your final image.
- Position the Shape and Image: Arrange the shape over your subject. The area inside the shape will be visible while the rest will be masked.
- Apply the Clipping Mask: Select both the shape and your image. Right-click and choose ‘Make Clipping Mask’ or use the shortcut Ctrl+7 (Cmd+7 on Mac). The parts of the image outside the shape will be hidden, not deleted.
- Adjust if Necessary: If you need to adjust the mask or the image, use the Direct Selection Tool (A). You can move or resize the mask shape or the subject without losing any data.
- Refine the Mask: For further refinement, add additional shapes or paths to the mask. This can be useful for complex images requiring multiple masked areas.
- Finalize and Save: Once your editing is complete, save your file. Remember, the masked parts are hidden but still present in the file, allowing for future edits.
Clipping masks are an essential tool for designers who need flexibility and precision, particularly in complex compositions or when preserving the original image is important.

Adjusting Colors and Contrasts Post-Background Removal
After removing the background in Adobe Illustrator, adjusting colors and contrasts is vital to ensure your subject blends seamlessly with its new background or stands out as required.
- Evaluate Color Balance: Start by assessing the overall color balance of your subject. Look for any color casts or inconsistencies that might have been influenced by the original background.
- Use the Color Balance Tool: Navigate to Edit > Edit Colors > Adjust Color Balance. Here, you can tweak the cyan, magenta, and yellow balances to correct any color disparities.
- Adjust Brightness and Contrast: To modify the brightness and contrast, go to Edit > Edit Colors > Brightness & Contrast. Adjust these settings to enhance your subject\"s details and make it more visually appealing.
- Apply Color Corrections: If necessary, use the Recolor Artwork tool to make more intricate color adjustments. This tool is particularly useful for changing specific colors within your subject.
- Refine with the Hue/Saturation Tool: Further refine your colors by adjusting the hue and saturation. This can be done under Edit > Edit Colors > Saturate or using the Recolor Artwork tool.
- Test with Different Backgrounds: Place your subject against various backgrounds to ensure it looks good in different contexts. This is crucial if the image will be used in multiple settings.
- Final Review: Take a step back and review your image as a whole. Ensure the colors and contrasts look natural and that the subject is well-integrated into its new environment.
Color and contrast adjustments are key to creating a harmonious composition, especially after background removal where the subject might need recalibration to suit its new setting.
READ MORE:
Exporting Your Final Image
After all the edits, exporting your final image in Adobe Illustrator is the last step. This process allows you to save your image in a format suitable for its intended use, whether for web, print, or further digital manipulation.
- Choose the Right Format: Consider the final use of your image to select the best format. Use PNG or SVG for web use for their transparency support. For print, consider formats like PDF or EPS.
- Go to File > Export: In Illustrator, click on \"File\" in the menu and select \"Export.\" Choose \"Export As\" to select your desired format.
- Set Export Options: In the export dialog box, adjust settings like resolution (dpi), color mode (RGB for web, CMYK for print), and whether to use artboards.
- Check Transparency: If your image has a transparent background, ensure the transparency box is checked in the export settings.
- Preview Before Exporting: Use the preview option to check how your image looks in the chosen format. Make sure there are no unexpected changes or quality issues.
- Save the File: After adjusting all settings, click \"Export\" to save your final image. Choose an appropriate file name and location for easy access later.
- Backup Your Work: It\"s a good practice to save a copy of your Illustrator file (.ai) before exporting, so you can make future edits if necessary.
Exporting correctly ensures that your image maintains its quality and is compatible with its intended platform or use.
Mastering background removal in Adobe Illustrator elevates your designs, bringing professionalism and versatility to your creative projects. Embrace these skills to transform your visuals and captivate your audience!

_HOOK_