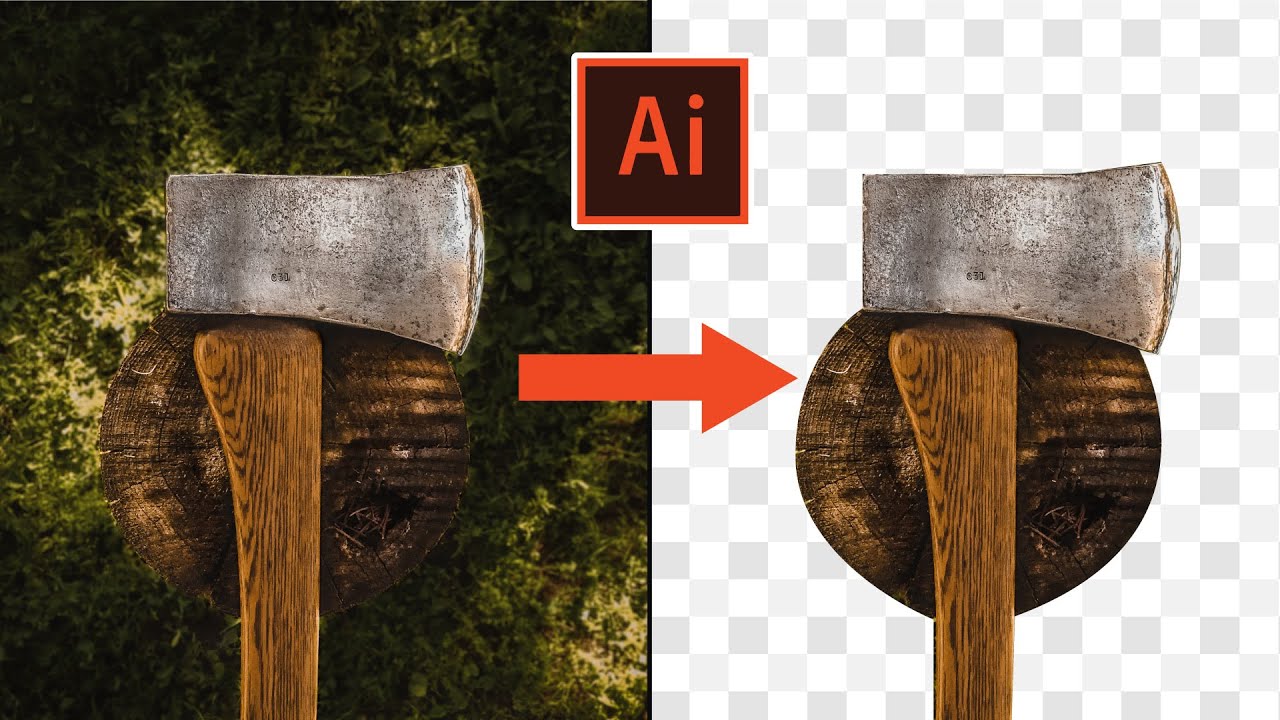
Topic how to remove background in adobe illustrator: Unlock the potential of Adobe Illustrator with our expert guide on how to remove backgrounds, transforming your images into professional-grade graphics with ease and precision.
Table of Content
- How can I remove the background in Adobe Illustrator?
- Overview of Background Removal Techniques in Adobe Illustrator
- Step-by-Step Guide for Using the Magic Wand Tool
- Detailed Instructions on Utilizing the Pen Tool for Precise Background Removal
- How to Use Image Trace for Background Removal
- Creating and Applying Clipping Masks for Advanced Background Removal
- YOUTUBE: How to Remove White Background in Adobe Illustrator - Make Part of an Image Transparent
- Removing Backgrounds with the Lasso Tool for Complex Images
- Tips for Adjusting Tolerance Levels for More Accurate Selections
- Techniques for Managing Tricky Backgrounds with Multiple Colors
- Best Practices for Exporting Images with Transparent Backgrounds
- Common Mistakes to Avoid When Removing Backgrounds in Illustrator
- Additional Resources and Tutorials for Mastering Background Removal
How can I remove the background in Adobe Illustrator?
To remove the background in Adobe Illustrator, you can follow these steps:
- Select the image you want to remove the background from.
- Open the \"Transparency\" panel by going to Window > Transparency.
- Click on the \"Make Mask\" button at the bottom of the Transparency panel.
- Select the image and click on the \"Mask\" button in the Transparency panel.
- Use the \"Brush\" tool to paint over the areas of the image you want to keep.
- Use the \"Eraser\" tool to remove any parts of the background that you want to delete.
- Adjust the opacity of the brush and eraser tools if needed.
- Once you are satisfied with the result, click on the \"Release\" button in the Transparency panel to remove the mask.
By following these steps, you should be able to remove the background from your image in Adobe Illustrator.

READ MORE:
Overview of Background Removal Techniques in Adobe Illustrator
Adobe Illustrator offers several powerful tools and techniques for removing backgrounds from images, making it a go-to solution for graphic designers and illustrators. Understanding these methods can significantly enhance your workflow and allow for more creative flexibility in your designs.
- Magic Wand Tool: Ideal for images with solid or consistent background colors. This tool selects and removes backgrounds based on color similarity.
- Pen Tool: Perfect for detailed and precise background removal around complex shapes. It involves manually tracing the object\"s outline to create a path and then using it to separate the subject from the background.
- Image Trace: Converts raster images to vector graphics, making it easier to isolate and remove backgrounds by tracing the main subject and deleting unwanted areas.
- Clipping Mask: A method used to clip the background around the object using a path, effectively hiding everything outside the path without actually deleting any part of the image.
- Layer Masks: Allows for non-destructive background removal by painting over areas you want to hide, thus maintaining the original image intact for future adjustments.
Each method has its advantages and is suited to different types of images and design needs. Mastering these techniques will enable you to choose the most effective approach for your specific project, ensuring high-quality results every time.
- For simple backgrounds, the Magic Wand or Image Trace tools can quickly remove unwanted areas.
- For more complex images, the Pen Tool or Clipping Mask method offers greater control and precision.
- Layer Masks provide flexibility for adjustments without permanent changes to the original image.
Experimenting with these tools and techniques will help you develop a keen eye for which method best suits your image\"s needs, streamlining your design process and elevating the quality of your work.
Step-by-Step Guide for Using the Magic Wand Tool
The Magic Wand Tool in Adobe Illustrator is a powerful feature for selecting and removing backgrounds, especially when dealing with solid or consistent colors. Here\"s how to use it effectively:
- Open Your Image: Start by importing your image into Adobe Illustrator. Navigate to \"File\" > \"Open\" and select the image you want to edit.
- Select the Magic Wand Tool: Click on the Magic Wand Tool in the toolbar or press the \"Y\" key on your keyboard.
- Adjust the Tolerance: Before making a selection, adjust the tolerance level in the options bar. A higher tolerance selects a broader range of colors, while a lower tolerance selects colors more similar to the clicked point.
- Click on the Background: Click on the part of the background you want to remove. If the background has multiple colors, you may need to click different areas while holding the \"Shift\" key to add to your selection.
- Refine Your Selection: Use the \"Shift\" key to add more areas to your selection or the \"Alt\" (Windows) or \"Option\" (Mac) key to subtract from your selection.
- Delete the Background: Once you\"re satisfied with the selection, hit the \"Delete\" key to remove the background. You may need to press \"Delete\" twice if the image is on a locked layer or if it\"s a compound path.
- Save Your Work: With the background removed, save your image in a format that supports transparency, such as PNG or SVG, to preserve the transparent background.
This tool is particularly useful for images with solid-color backgrounds or those with high contrast between the background and the foreground. For more complex images, other techniques like the Pen Tool or Clipping Masks might be more suitable.

Detailed Instructions on Utilizing the Pen Tool for Precise Background Removal
The Pen Tool in Adobe Illustrator is a versatile and precise option for removing backgrounds, especially around complex subjects. Follow these detailed steps to master background removal with the Pen Tool:
- Select the Pen Tool: Find the Pen Tool in the toolbar or press \"P\" to activate it.
- Set Starting Point: Click on the edge of your subject to place the first anchor point. Avoid dragging the mouse; simply click to create sharp corners.
- Create the Path: Continue clicking around the subject to add more anchor points. To create curves, click, hold, and drag to adjust the direction handles.
- Close the Path: To complete the selection, click on the first anchor point you made. A closed path will ensure that the entire subject is selected.
- Refine the Path: Use the Direct Selection Tool (A) to adjust anchor points and handles for a more accurate path around your subject.
- Convert Path to Selection: With the path complete, switch to the Selection Tool (V), right-click on the path, and choose \"Make Selection\" to turn the path into a selection.
- Invert Selection: If needed, invert the selection so that the background is selected instead of the subject. This can be done from the \"Select\" menu.
- Delete the Background: With the background now selected, press the \"Delete\" key to remove it. You might need to unlock the layer first if it\"s not editable.
- Save Your Image: Save your work in a format that supports transparency, like PNG, to maintain the transparent background.
Using the Pen Tool for background removal allows for high precision and control, making it ideal for images with intricate edges or detailed subjects. Practice and patience are key to mastering this technique.
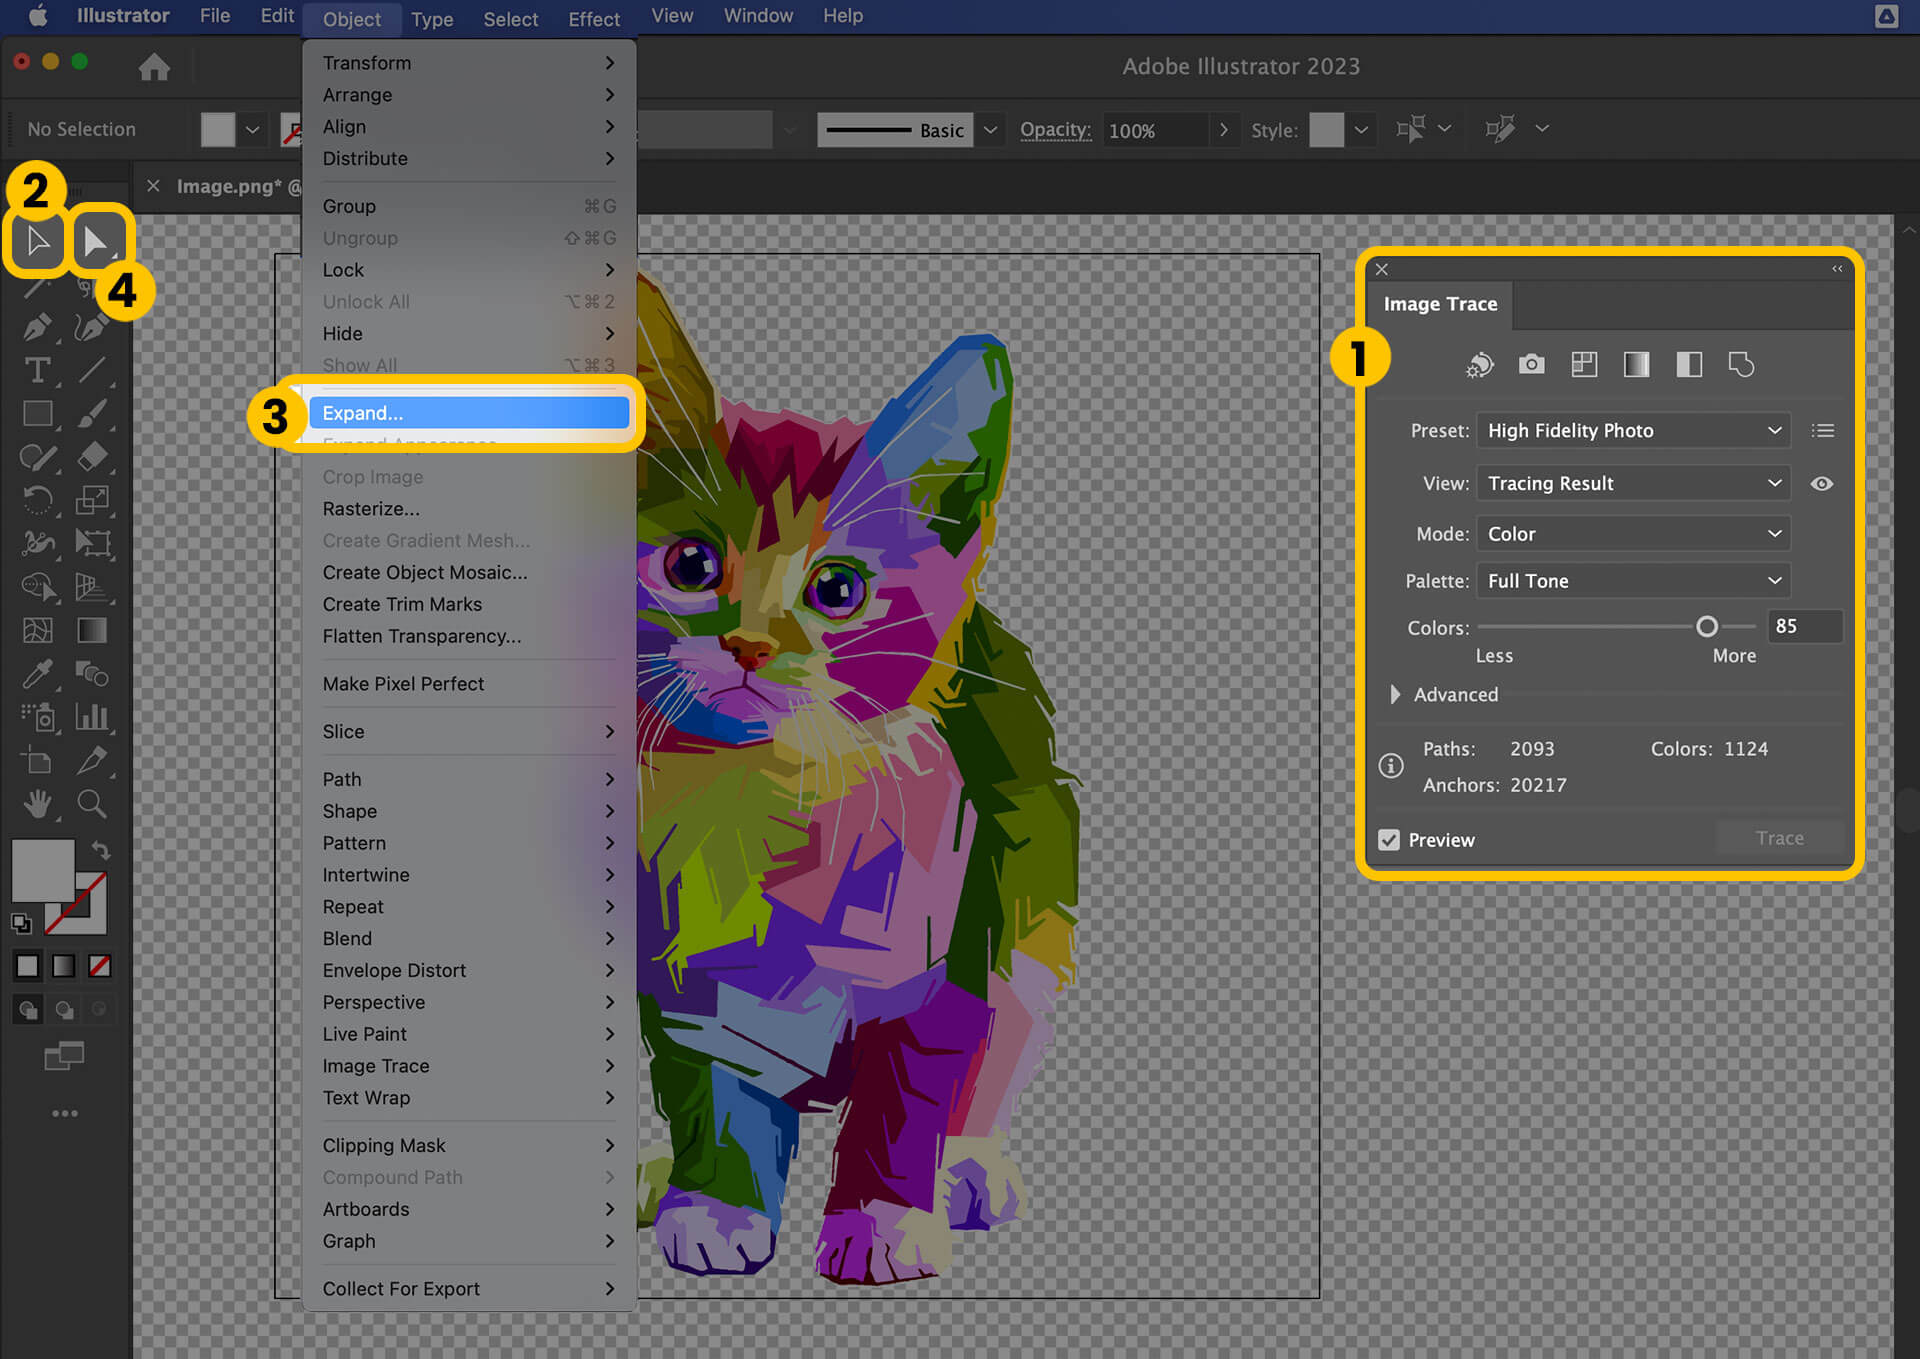
How to Use Image Trace for Background Removal
Image Trace in Adobe Illustrator is a powerful tool for converting raster images into vector graphics, which can be particularly useful for removing backgrounds efficiently. Follow these steps to utilize Image Trace for background removal:
- Place Your Image: Start by placing the image you wish to edit into your Illustrator document. Navigate to \"File\" > \"Place\" and select your image.
- Select the Image: With the Selection Tool (V), click on your image to select it.
- Open Image Trace: Go to \"Window\" > \"Image Trace\" to open the Image Trace panel. Ensure your image is selected to activate the options.
- Choose a Preset: Select a preset that best matches the type of image you\"re working with. For background removal, \"High Fidelity Photo\" or \"Silhouettes\" might be suitable choices depending on your image.
- Refine Settings: Adjust the settings such as \"Paths\", \"Corners\", and \"Noise\" to get the best result. The goal is to clearly define the edges of your subject against the background.
- Trace: Click the \"Trace\" button to convert the image into a vector graphic. This process might take a moment depending on the complexity of your image.
- Expand: Once the tracing is complete, click \"Expand\" to turn the trace into actual vector shapes.
- Remove the Background: Use the Direct Selection Tool (A) to click on the parts of the background you wish to remove, and press \"Delete\". You may need to ungroup (Shift+Ctrl/Cmd+G) the traced elements before doing so.
- Final Adjustments: Make any necessary adjustments to clean up the image. This might include deleting any leftover background elements or refining the edges of your subject.
- Save Your Work: Save your document in a format that supports transparency, such as PNG or SVG, to maintain the transparent background.
The Image Trace tool is ideal for creating clean, scalable vector graphics from raster images and is particularly useful for images with clear contrast between the subject and background.
_HOOK_
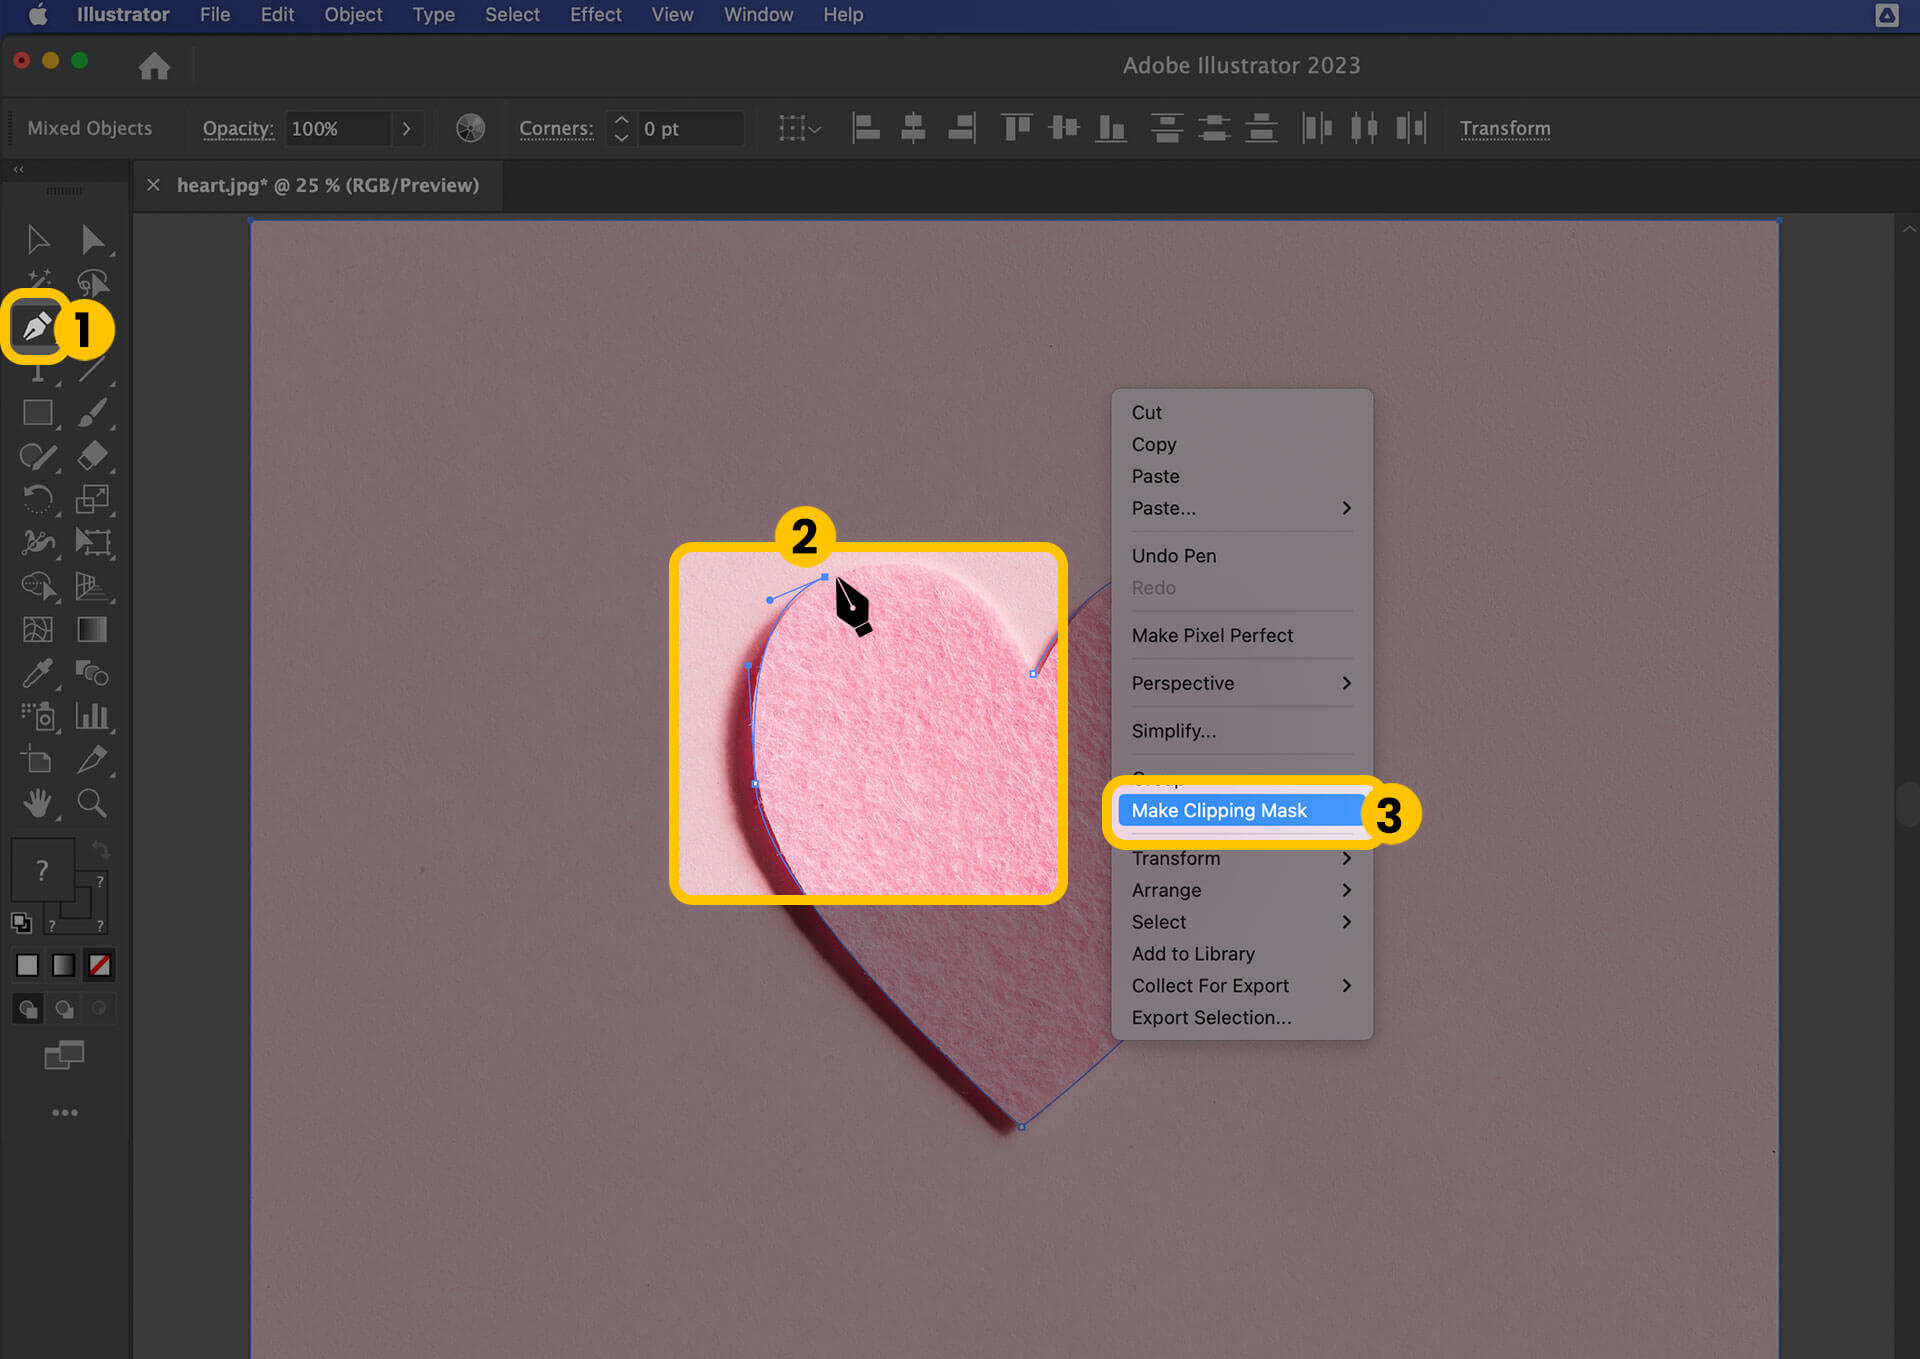
Creating and Applying Clipping Masks for Advanced Background Removal
Clipping masks in Adobe Illustrator are a sophisticated method for removing or hiding the background from an image, allowing for intricate details and complex shapes to be preserved. This technique is especially useful for images where the subject and background are not clearly defined or separated. Follow these steps to create and apply a clipping mask:
- Prepare Your Image: Place the image you want to edit into your Illustrator workspace. Ensure it is selected for editing.
- Draw the Clipping Path: Use the Pen Tool (P) or any shape tool to draw the path or shape you want to use as the mask over the area you wish to keep visible.
- Position the Path: Make sure the path or shape you have drawn is above the image you want to clip. Layers play a crucial role in clipping masks; the mask layer must be above the layer to be clipped.
- Select Both Layers: With the Selection Tool (V), select both the image and the path by holding the Shift key and clicking on both.
- Create the Clipping Mask: Right-click on the selected items and choose \"Make Clipping Mask\" from the context menu. Alternatively, you can go to \"Object\" > \"Clipping Mask\" > \"Make\".
- Adjust if Necessary: After applying the clipping mask, you may need to adjust the position or shape of the clipping path. Use the Direct Selection Tool (A) for fine-tuning.
- Save Your File: Once satisfied with the background removal, save your file in a format that supports transparency, such as PNG or SVG, to preserve the effect of the clipping mask.
Clipping masks allow for dynamic background removal that can be adjusted or reversed at any time, providing a non-destructive way to manage your image\"s background. This flexibility makes it an ideal choice for complex designs where precision is key.

How to Remove White Background in Adobe Illustrator - Make Part of an Image Transparent
\"If you\'re curious about how transparent materials are made and want to dive into the fascinating world of glass manufacturing, this video is a must-watch! Join us and uncover the mesmerizing secrets of transparency.\"
How to Remove White Background in Illustrator CC
\"Calling all aspiring graphic designers and art enthusiasts! Get ready to be inspired as this video showcases the incredible skills of an illustrator. Watch their creative process unfold and discover the magic of bringing imagination to life.\"
Removing Backgrounds with the Lasso Tool for Complex Images
The Lasso Tool in Adobe Illustrator is a versatile tool for removing backgrounds from complex images. This guide will walk you through the process of using the Lasso Tool to isolate and remove unwanted backgrounds, allowing your main subject to stand out.
- Select the Lasso Tool: Find the Lasso Tool in the toolbar or press \"Q\" on your keyboard. The Lasso Tool allows for freehand selection, making it perfect for intricate shapes.
- Draw Your Selection: Click and drag around the edges of the object you wish to isolate. You do not need to complete the loop; if you release the mouse before connecting the start and end points, Illustrator will automatically close the selection by drawing a straight line between them.
- Refine Your Selection: If you need to adjust your selection, you can add or subtract from it by holding down the Shift or Alt/Option keys while dragging with the Lasso Tool. This is useful for capturing exactly what you need without starting over.
- Remove the Background: Once you have your object selected, you can delete the background by hitting the Delete key. If your object is not directly selectable (for instance, if it\"s part of a larger group or locked), you may need to double-click to enter Isolation Mode or unlock the object first.
- Clean Up: After removing the main parts of the background, you may find small areas that need cleanup. Use the Lasso Tool to select these remnants and press Delete to remove them.
Tips for Effective Use:
- Zoom in on your work area for more precise control over your selections.
- Practice using the Lasso Tool to get a feel for its sensitivity and selection behavior. This will help you make more accurate selections more quickly.
- For complex images with multiple colors or similar background and foreground colors, consider using a combination of selection tools (like the Magic Wand or Pen Tool) to achieve the best result.
Removing backgrounds from complex images can be challenging, but with practice and the right techniques, the Lasso Tool can be a powerful ally in your design toolkit. Remember, patience and attention to detail are key when working with intricate selections.
Tips for Adjusting Tolerance Levels for More Accurate Selections
Adjusting tolerance levels in Adobe Illustrator is essential for achieving accurate selections, especially when dealing with complex images or backgrounds. The tolerance setting affects how the Magic Wand and similar selection tools differentiate between colors and shades. Here are tips to help you adjust tolerance levels for more precise selections:
- Understand the Basics: Tolerance level controls how similar in color a pixel needs to be to the initially selected pixel to be included in the selection. Lower tolerance selects pixels that are very similar in color, while a higher tolerance includes a wider range of similar colors.
- Start with Low Tolerance: Begin with a lower tolerance setting to make more precise selections. Gradually increase the tolerance until you achieve the desired selection without including unwanted colors or areas.
- Use Preview Option: Always use the preview option if available to see how your selection changes with the adjustment of tolerance levels. This can help you avoid making selections that are too broad or too narrow.
- Adjust for Background Complexity: For images with complex backgrounds or subtle color differences, you may need to experiment with different tolerance levels. Sometimes, making several selections at lower tolerance levels is more effective than one broad selection.
- Combine Tools for Best Results: Don\"t rely solely on tolerance adjustments for perfect selections. Combine the use of the Magic Wand, Lasso, and Pen tools to refine edges and make precise selections around the subject of your image.
- Practice Makes Perfect: Like any skill, mastering tolerance adjustments takes practice. Experiment with different images to understand how slight changes in tolerance levels affect your selections.
By following these tips, you can significantly improve your selection accuracy in Adobe Illustrator, leading to more professional and polished final images.

Techniques for Managing Tricky Backgrounds with Multiple Colors
Removing backgrounds with multiple colors in Adobe Illustrator can be challenging, but with the right techniques, you can manage even the most complex images. Here\"s how to effectively handle backgrounds that don\"t have a uniform color, allowing for precise background removal and cleaner final designs.
- Use the Magic Wand Tool Strategically: Adjust the Magic Wand Tool\"s tolerance to better select varied color ranges within the background. Start with a lower tolerance and gradually increase it to include more shades without capturing the main subject.
- Leverage the Lasso Tool: For more control, use the Lasso Tool to manually select around the edges of your subject. This method is particularly useful for intricate details against a multicolored background.
- Apply the Pen Tool for Precision: The Pen Tool allows for the most precise control over selection boundaries. Use it to create detailed paths around your subject, isolating it from a complex background.
- Experiment with Image Trace: Image Trace can convert raster images into vector shapes, making it easier to separate backgrounds from subjects. Use this feature with caution, as it may require fine-tuning for optimal results.
- Utilize Clipping Masks: Clipping masks are perfect for hiding unwanted background areas without actually removing them. This non-destructive approach is great for complex compositions.
- Adjusting Tolerance and Feathering: When using selection tools, playing with tolerance and feather settings can help create smoother selections that blend well when removing backgrounds.
- Color Range Selection: For images with a wide range of colors, the Color Range selection tool can help isolate specific colors or shades, making it easier to remove parts of the background.
Each image presents unique challenges, so combining these techniques often yields the best results. Practice and experimentation are key to mastering background removal in multicolored or complex scenarios.

Best Practices for Exporting Images with Transparent Backgrounds
Exporting images with transparent backgrounds from Adobe Illustrator ensures your graphics are versatile for use across various media. To achieve the best results, follow these best practices:
- Choose the Right Format: For maintaining transparency, use formats like PNG, GIF, or SVG. These formats support transparency and are ideal for web graphics, logos, and illustrations.
- Use the Export for Screens Option: Illustrator\"s \"Export for Screens\" feature allows you to select multiple artboards and export them with specific settings, including format options that support transparency.
- Artboard Size Matters: Ensure your artboard size matches your graphic\"s dimensions closely to avoid unnecessary transparent space around your image.
- Check Transparency Settings: When exporting, double-check the transparency settings. Ensure \"Transparent Background\" is selected if available in your chosen export format options.
- Preview Before Exporting: Utilize the preview feature (if available) to check how your image looks with a transparent background. This can help identify any issues before final export.
- Minimize File Size: Transparent images, especially PNGs, can have large file sizes. Use options like \"Smallest File Size\" for SVGs or adjust PNG compression settings to balance transparency with file size.
- Test Across Different Backgrounds: After exporting, test your image on various backgrounds to ensure it looks as intended in real-world applications.
Following these practices will help you export high-quality images with transparent backgrounds from Adobe Illustrator, making your graphics more flexible and professional-looking for any application.

_HOOK_
Common Mistakes to Avoid When Removing Backgrounds in Illustrator
Removing backgrounds in Adobe Illustrator is a fundamental skill, but there are common pitfalls that can affect the quality and efficiency of your work. Here are key mistakes to avoid for better results:
- Ignoring Layer Management: Not organizing layers properly can lead to confusion and mistakes, such as accidentally deleting or editing the wrong elements. Always lock the layer your subject is on before beginning background removal.
- Overlooking the Use of Masks: Clipping masks and opacity masks are non-destructive ways to hide background without removing it. Overlooking these tools can result in permanently losing parts of your image that you might later decide to keep.
- Forgetting to Expand the Image Trace: If you use Image Trace to vectorize a raster image before removing the background, ensure you expand the trace afterward. This converts the trace into editable vector paths.
- Not Adjusting Tolerance Levels: When using the Magic Wand or similar tools, failing to adjust the tolerance level appropriately can lead to incomplete selections or accidentally selecting part of your subject.
- Skipping Manual Cleanup: Relying solely on automated tools can leave behind stray pixels or artifacts. Always zoom in and manually clean up the edges for a crisp, professional finish.
- Using the Wrong File Format: When saving your finished image, ensure you choose a format that supports transparency, like PNG or SVG, to preserve the transparent background.
- Not Testing on Different Backgrounds: Always test your image on different backgrounds to ensure there are no missed spots or unwanted transparency issues.
Avoiding these mistakes will help you achieve cleaner, more professional background removals in Adobe Illustrator, enhancing your overall design workflow.
READ MORE:
Additional Resources and Tutorials for Mastering Background Removal
Mastering the art of removing backgrounds in Adobe Illustrator enhances your design flexibility and skill set. To further refine your techniques, consider exploring a variety of additional resources and tutorials. Here\"s where to look and what to focus on:
- Adobe\"s Official Website: Adobe offers comprehensive tutorials on Illustrator, including tips on background removal, handling complex images, and using specific tools for precise editing.
- YouTube Channels: Many professional designers and illustrators share their expertise on YouTube. Channels like Adobe Creative Cloud, Satori Graphics, and Dansky feature tutorials on Illustrator that cover everything from basic to advanced techniques.
- Design Blogs and Websites: Websites such as Vectips, Creative Bloq, and Tuts+ offer in-depth guides and articles on various Illustrator techniques, including background removal.
- Online Learning Platforms: Platforms like Udemy, Coursera, and Skillshare provide courses on Adobe Illustrator. These range from beginner guides to advanced tutorials, where you can learn at your own pace about background removal and much more.
- Illustrator Forums and Community Groups: Engaging with communities on platforms like Reddit, Adobe Support Community, and Graphic Design Stack Exchange can provide personalized advice, tips, and solutions to specific problems you might encounter.
By diversifying your learning sources, you can discover a wide range of techniques and workflows that suit various design scenarios. Always practice with different images to build your confidence and proficiency in using Adobe Illustrator for background removal.
Mastering background removal in Adobe Illustrator can elevate your design work, offering clarity and versatility to your projects. This comprehensive guide demystifies the process, ensuring designers of all levels can achieve professional results with confidence and creativity.