Topic how to install blender add ons: Discover the simplicity of enhancing Blender with add-ons, unlocking new functionalities and streamlining your 3D modeling workflow to elevate your creative projects.
Table of Content
- Step 1: Download the Add-on
- Step 2: Open Blender Preferences
- Step 3: Access the Add-ons Tab
- Step 4: Install the Add-on
- Step 5: Activate the Add-on
- Step 6: Save Preferences (Optional)
- Troubleshooting
- Step 2: Open Blender Preferences
- Step 3: Access the Add-ons Tab
- How do I install Blender add-ons?
- Step 4: Install the Add-on
- YOUTUBE: Installing Addons in Blender
- Step 5: Activate the Add-on
- Step 6: Save Preferences (Optional)
- Troubleshooting
- Step 3: Access the Add-ons Tab
- Step 4: Install the Add-on
- Step 5: Activate the Add-on
- Step 6: Save Preferences (Optional)
- Troubleshooting
- Step 4: Install the Add-on
- Step 5: Activate the Add-on
- Step 6: Save Preferences (Optional)
- Troubleshooting
- Step 5: Activate the Add-on
- Step 6: Save Preferences (Optional)
- Troubleshooting
- Step 6: Save Preferences (Optional)
- Troubleshooting
- Troubleshooting
- Introduction to Blender Add-ons
- Step-by-Step Installation Guide
- Finding and Downloading Blender Add-ons
- Navigating Blender Preferences for Add-on Installation
- Activating and Configuring Add-ons in Blender
- Saving Preferences and Ensuring Add-on Compatibility
- Troubleshooting Common Add-on Installation Issues
- Advanced Tips for Blender Add-on Users
- Recommended Blender Add-ons for Beginners
- Keeping Your Blender Add-ons Updated
- Exploring Blender Add-on Communities and Resources
Step 1: Download the Add-on
First, download the add-on you wish to install. Add-ons can be found on various websites and are typically downloaded as .zip files. Do not unzip the file.

READ MORE:
Step 2: Open Blender Preferences
Launch Blender and navigate to Edit > Preferences to open the Blender Preferences window.
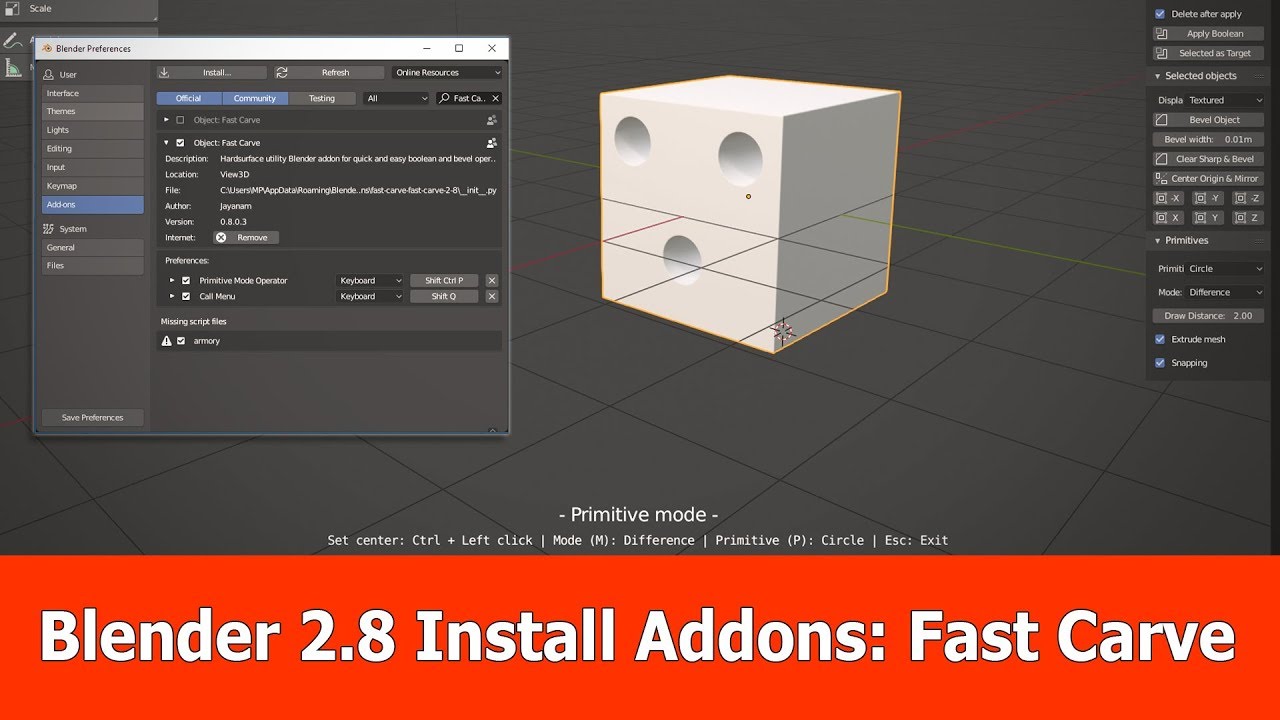
Step 3: Access the Add-ons Tab
In the Preferences window, click on the Add-ons tab located on the left side.
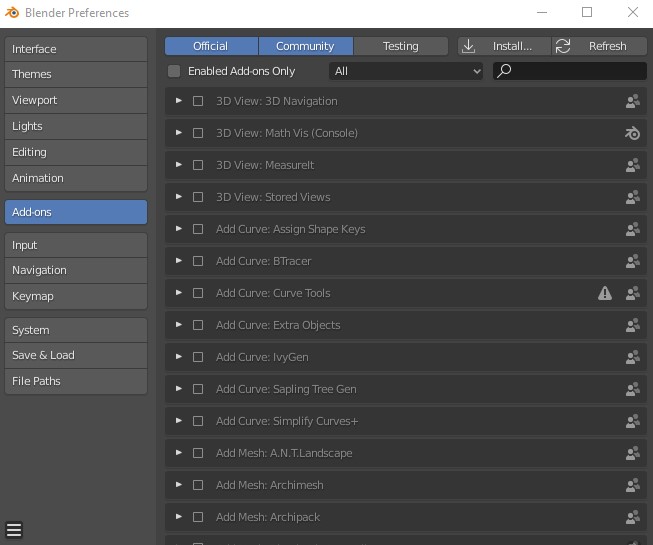
Step 4: Install the Add-on
Click the Install button located at the top right of the Add-ons tab. Navigate to the location of your downloaded .zip file, select it, and click Install Add-on.

Step 5: Activate the Add-on
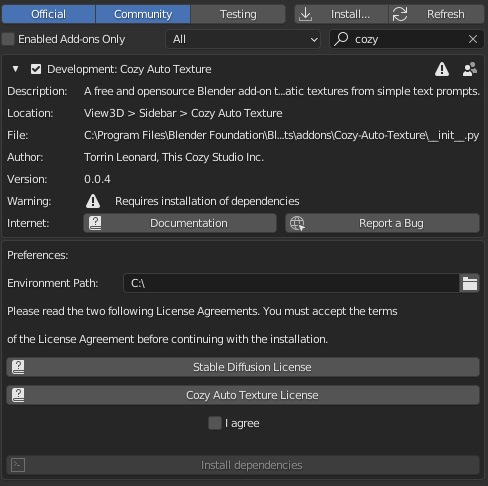
After installation, use the search bar in the Add-ons tab to find your newly installed add-on. Check the box next to the add-on name to activate it. You may need to expand the add-on details to see the checkbox.

_HOOK_
Step 6: Save Preferences (Optional)
To ensure the add-on is enabled by default in future Blender sessions, click Save Preferences at the bottom left of the Preferences window.

Troubleshooting
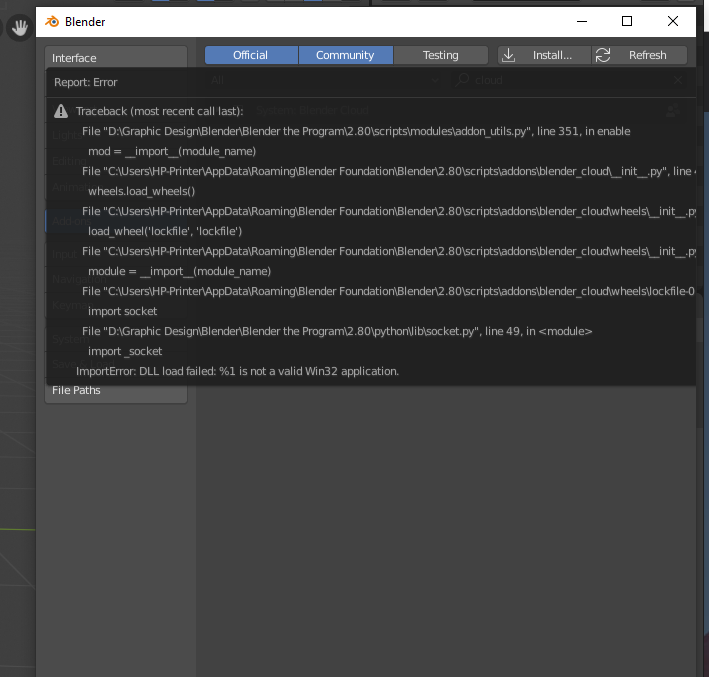
If the add-on does not appear after installation, make sure you are using a compatible version of Blender. Some add-ons may require specific versions to function properly.
Additional Tips
- Review add-on documentation for specific installation instructions or additional dependencies.
- Some add-ons come as .py files, which can be installed in the same manner as .zip files.
- Regularly update your add-ons to access new features and bug fixes.
Step 2: Open Blender Preferences
Launch Blender and navigate to Edit > Preferences to open the Blender Preferences window.

Step 3: Access the Add-ons Tab
In the Preferences window, click on the Add-ons tab located on the left side.
How do I install Blender add-ons?
Installing add-ons in Blender is a simple process that can enhance the functionality of the software. Here is a step-by-step guide:
- Download the add-on file (.zip or .py) that you want to install.
- Open Blender and go to Edit > Preferences.
- Click on the Add-ons tab.
- Click the \"Install...\" button located in the top right corner of the window.
- Navigate to the location where you saved the add-on file and select it.
- Click \"Install Add-on\" to complete the installation.
- You should now see the newly installed add-on in the list of available add-ons.
- Check the box next to the add-on to enable it.
- You can now use the add-on in Blender to enhance your workflow.
_HOOK_
Step 4: Install the Add-on
Click the Install button located at the top right of the Add-ons tab. Navigate to the location of your downloaded .zip file, select it, and click Install Add-on.

Installing Addons in Blender
Discover the exciting world of Blender addons and take your 3D modeling and animation to the next level! Unlock new tools, features, and possibilities to enhance your creative projects. Watch our video to learn more.
Installing Blender Addons for Beginners
Are you new to Blender and feeling overwhelmed? Don\'t worry, our beginner-friendly tutorial video will guide you through the basics step by step. Learn how to navigate the interface, create simple models, and kickstart your journey in 3D design.
Step 5: Activate the Add-on
After installation, use the search bar in the Add-ons tab to find your newly installed add-on. Check the box next to the add-on name to activate it. You may need to expand the add-on details to see the checkbox.
Step 6: Save Preferences (Optional)
To ensure the add-on is enabled by default in future Blender sessions, click Save Preferences at the bottom left of the Preferences window.
Troubleshooting
If the add-on does not appear after installation, make sure you are using a compatible version of Blender. Some add-ons may require specific versions to function properly.
Additional Tips
- Review add-on documentation for specific installation instructions or additional dependencies.
- Some add-ons come as .py files, which can be installed in the same manner as .zip files.
- Regularly update your add-ons to access new features and bug fixes.
Step 3: Access the Add-ons Tab
In the Preferences window, click on the Add-ons tab located on the left side.
_HOOK_
Step 4: Install the Add-on
Click the Install button located at the top right of the Add-ons tab. Navigate to the location of your downloaded .zip file, select it, and click Install Add-on.
Step 5: Activate the Add-on
After installation, use the search bar in the Add-ons tab to find your newly installed add-on. Check the box next to the add-on name to activate it. You may need to expand the add-on details to see the checkbox.
Step 6: Save Preferences (Optional)
To ensure the add-on is enabled by default in future Blender sessions, click Save Preferences at the bottom left of the Preferences window.
Troubleshooting
If the add-on does not appear after installation, make sure you are using a compatible version of Blender. Some add-ons may require specific versions to function properly.
Additional Tips
- Review add-on documentation for specific installation instructions or additional dependencies.
- Some add-ons come as .py files, which can be installed in the same manner as .zip files.
- Regularly update your add-ons to access new features and bug fixes.
Step 4: Install the Add-on
Click the Install button located at the top right of the Add-ons tab. Navigate to the location of your downloaded .zip file, select it, and click Install Add-on.
_HOOK_
Step 5: Activate the Add-on
After installation, use the search bar in the Add-ons tab to find your newly installed add-on. Check the box next to the add-on name to activate it. You may need to expand the add-on details to see the checkbox.
Step 6: Save Preferences (Optional)
To ensure the add-on is enabled by default in future Blender sessions, click Save Preferences at the bottom left of the Preferences window.
Troubleshooting
If the add-on does not appear after installation, make sure you are using a compatible version of Blender. Some add-ons may require specific versions to function properly.
Additional Tips
- Review add-on documentation for specific installation instructions or additional dependencies.
- Some add-ons come as .py files, which can be installed in the same manner as .zip files.
- Regularly update your add-ons to access new features and bug fixes.
Step 5: Activate the Add-on
After installation, use the search bar in the Add-ons tab to find your newly installed add-on. Check the box next to the add-on name to activate it. You may need to expand the add-on details to see the checkbox.
Step 6: Save Preferences (Optional)
To ensure the add-on is enabled by default in future Blender sessions, click Save Preferences at the bottom left of the Preferences window.
_HOOK_
Troubleshooting
If the add-on does not appear after installation, make sure you are using a compatible version of Blender. Some add-ons may require specific versions to function properly.
Additional Tips
- Review add-on documentation for specific installation instructions or additional dependencies.
- Some add-ons come as .py files, which can be installed in the same manner as .zip files.
- Regularly update your add-ons to access new features and bug fixes.
Step 6: Save Preferences (Optional)
To ensure the add-on is enabled by default in future Blender sessions, click Save Preferences at the bottom left of the Preferences window.
Troubleshooting
If the add-on does not appear after installation, make sure you are using a compatible version of Blender. Some add-ons may require specific versions to function properly.
Additional Tips
- Review add-on documentation for specific installation instructions or additional dependencies.
- Some add-ons come as .py files, which can be installed in the same manner as .zip files.
- Regularly update your add-ons to access new features and bug fixes.
Introduction to Blender Add-ons
Blender add-ons are tools created by the community or developers to enhance the functionality of Blender, a powerful open-source 3D modeling and animation software. These add-ons can introduce new features, streamline workflows, and customize the software to better fit individual project needs or personal preferences. From modeling, animation, and rendering to compositing and motion tracking, Blender\"s versatility is significantly expanded through the installation of these add-ons.
Add-ons come in various forms, catering to different aspects of the 3D creation process. They can help with tasks ranging from simple operations, like adding pre-designed objects to a scene, to more complex functionalities, such as simulating physics or automating repetitive tasks.
- Utility Add-ons: Enhance productivity and offer shortcuts for common tasks.
- Modeling Add-ons: Introduce new tools for creating complex 3D shapes and structures.
- Animation Add-ons: Provide advanced rigging tools and animation features.
- Rendering Add-ons: Offer additional rendering capabilities or integrate external render engines.
- Simulation Add-ons: Add physics and particle effects simulations for more realistic scenes.
To use an add-on in Blender, it must first be installed and activated within the software. This process is straightforward and can significantly impact your 3D modeling and animation projects by extending Blender\"s native capabilities.
_HOOK_
Step-by-Step Installation Guide
Installing Blender add-ons is a straightforward process that can significantly enhance your 3D modeling and animation capabilities. Follow these detailed steps to install and activate your chosen Blender add-ons:
- Download the Add-on: Begin by downloading the desired add-on. Blender add-ons are typically distributed as .zip files. Ensure to download the file from a reputable source to avoid any security issues.
- Open Blender: Launch Blender on your computer to start the installation process.
- Access Preferences: Navigate to Edit > Preferences from the top menu to open the Blender Preferences window.
- Install the Add-on: In the Preferences window, switch to the Add-ons tab. Click on the Install button, then locate and select the downloaded .zip file of the add-on. Blender will automatically install the add-on.
- Activate the Add-on: After installation, a list of add-ons will appear. Use the search bar to find the newly installed add-on. Check the box next to its name to activate it.
- Save Preferences: Optionally, click on Save Preferences to ensure the add-on remains active in future Blender sessions.
With the add-on installed and activated, you are now ready to explore its new features and functionalities within Blender. Remember, some add-ons may require a restart of Blender to fully integrate and become operational.
Finding and Downloading Blender Add-ons
Discovering and downloading the right Blender add-ons can significantly enhance your 3D creation experience. Here\"s how to find and download Blender add-ons:
- Official Blender Add-ons Repository: Start with the official Blender website, which hosts a collection of add-ons approved by Blender. These add-ons are often well-documented and maintained.
- Blender Market: The Blender Market is a popular platform where developers sell or freely distribute their add-ons. It\"s a great place to find high-quality, professional add-ons for various needs.
- GitHub: Many developers choose to host their add-ons on GitHub. You can find free and open-source add-ons here, with the added benefit of accessing the latest versions directly from the developers.
- Blender Artists Forum: The Blender Artists community forum is a hub for Blender enthusiasts. Members often share their own add-ons or recommend others, making it a valuable resource for discovering unique add-ons.
- Search Engines: A simple web search can also lead you to blogs, tutorials, and websites dedicated to Blender add-ons. Use keywords specific to the functionality you\"re looking for to find relevant results.
When downloading add-ons, always ensure they are compatible with your version of Blender. Additionally, download from reputable sources to protect your system from malicious software.
Navigating Blender Preferences for Add-on Installation
Installing add-ons in Blender involves navigating through the software\"s Preferences window. This section guides you through accessing and using Blender Preferences for add-on installation:
- Open Blender Preferences: Start Blender and go to Edit on the top menu. Select Preferences from the dropdown menu to open the Preferences window.
- Access the Add-ons Tab: In the Preferences window, you\"ll see several tabs on the left. Click on the Add-ons tab to view available add-ons.
- Install Add-on: At the top of the Add-ons section, you\"ll find an Install button. Click this button to open a file browser where you can navigate to and select the add-on file (usually a .zip file) you\"ve downloaded.
- Activate Add-on: After installation, the add-on will appear in the list but will not be active by default. Find the add-on using the search function or by scrolling through the list. Check the box next to the add-on\"s name to activate it.
- Configure Add-on Settings: Some add-ons come with customizable settings. If available, these can be accessed by expanding the add-on\"s tab in the Add-ons section. Adjust the settings as needed to suit your workflow.
- Save Preferences: To make sure your add-on settings and activation status are saved for future Blender sessions, click the Save Preferences button at the bottom left of the Preferences window.
By following these steps, you can efficiently manage add-on installations and ensure a smoother workflow within Blender. This process allows for easy customization and enhancement of Blender\"s capabilities to suit your specific project needs.
Activating and Configuring Add-ons in Blender
After successfully installing an add-on in Blender, the next critical steps are activating it and, if necessary, configuring it to fit your needs. This ensures the add-on functions correctly and integrates seamlessly into your Blender workflow. Follow these steps for activation and configuration:
- Locate the Installed Add-on: Within the Blender Preferences window, under the Add-ons tab, use the search bar to find your newly installed add-on. You can also scroll through the list if you prefer.
- Activate the Add-on: Find the checkbox next to the add-on\"s name and click it to activate the add-on. Once checked, Blender will load the add-on, making its features available for use.
- Access Add-on Preferences: Many add-ons come with customizable settings that allow you to tweak their behavior. If available, these settings can be accessed by clicking the arrow next to the add-on\"s name to expand its options.
- Configure Add-on Settings: Adjust the settings according to your project needs or personal preferences. This might include specifying paths, adjusting thresholds, or enabling/disabling specific features.
- Test the Add-on: After activation and configuration, it\"s a good practice to test the add-on. This can be as simple as using its features within a project to ensure it behaves as expected.
- Save Your Preferences: To ensure the add-on remains active and retains its settings in future Blender sessions, click the Save Preferences button at the bottom of the Preferences window.
By following these steps, you can ensure that your Blender add-ons are not only installed but also properly activated and configured, enhancing your 3D modeling, animation, or rendering projects.
Saving Preferences and Ensuring Add-on Compatibility
Once you have installed and activated your Blender add-ons, it\"s crucial to save your preferences and ensure that the add-ons are compatible with your version of Blender. This ensures a smooth workflow and prevents any potential issues. Follow these steps for saving preferences and checking add-on compatibility:
- Save Preferences: After activating and configuring your add-ons, make sure to save your preferences. This can be done by clicking the Save Preferences button at the bottom left of the Preferences window. This action ensures that your add-ons will be automatically activated in future Blender sessions.
- Check Blender Version Compatibility: Before downloading and installing an add-on, verify that it is compatible with your version of Blender. This information is usually available on the add-on’s documentation or download page.
- Update Blender: If an add-on requires a newer version of Blender, consider updating your Blender installation. Always back up your work before updating to prevent any potential loss of data.
- Test Add-on Functionality: After installation, thoroughly test the add-on to ensure it functions as expected with your current Blender version. If you encounter any issues, refer to the add-on’s documentation or support channels for troubleshooting tips.
- Regularly Update Add-ons: Developers frequently update add-ons to improve functionality or compatibility with new Blender versions. Regularly check for and install updates to your add-ons to take advantage of these improvements.
By saving your preferences and ensuring add-on compatibility, you can maintain an efficient and effective Blender setup, allowing you to focus on creating stunning 3D art and animations.
_HOOK_
Troubleshooting Common Add-on Installation Issues
Encountering issues while installing Blender add-ons can be frustrating. However, most problems have straightforward solutions. Here are some common issues and how to troubleshoot them:
- Add-on Does Not Appear After Installation: Ensure you have installed the add-on correctly through Blender\"s Preferences. If it still doesn\"t appear, restart Blender. Some add-ons may also require specific versions of Blender to function properly.
- Add-on Activation Error: This could be due to compatibility issues with your Blender version. Check the add-on documentation for version requirements and update your Blender if necessary.
- Missing Add-on Features: Some add-ons may have dependencies on other software or libraries. Review the add-on\"s documentation for any additional installation steps or required downloads.
- Performance Issues: Certain add-ons may impact Blender\"s performance. If you notice slowdowns, try adjusting the add-on\"s settings or disable it when not in use to see if performance improves.
- Conflicts Between Add-ons: Occasionally, add-ons may conflict with each other. If you experience issues, try disabling other recently installed or updated add-ons to identify the conflict.
- Corrupted Add-on Files: If an add-on consistently fails to work, the download may have been corrupted. Try re-downloading the add-on from a reliable source and reinstalling it.
By systematically addressing these common issues, you can resolve most problems encountered during the add-on installation process, ensuring a smooth and productive experience in Blender.
Advanced Tips for Blender Add-on Users
Maximizing the potential of Blender add-ons can significantly enhance your 3D modeling, animation, and rendering projects. Here are some advanced tips for users looking to get the most out of Blender add-ons:
- Customize Add-on Preferences: Dive into the settings of each add-on to customize its functionality to your needs. Many add-ons offer a wide range of configurable options that can optimize your workflow.
- Combine Add-ons for Enhanced Functionality: Don’t limit yourself to using just one add-on for a project. Many add-ons can work together seamlessly, providing a more powerful and efficient workflow.
- Stay Updated on Add-on Releases: Follow the developers of your favorite add-ons on social media or their websites. This will keep you informed about updates, new features, and tips for using their add-ons effectively.
- Participate in the Blender Community: Joining forums and social media groups can provide insights into how other artists are using add-ons. The Blender community is a great resource for discovering new add-ons and getting creative ideas for their use.
- Create Your Own Add-ons: If you have coding skills, consider creating your own add-ons to address specific needs in your workflow. Blender’s open-source nature allows for extensive customization and development.
- Backup Your Blender Settings: Before installing new add-ons or updating existing ones, back up your Blender settings and preferences. This precaution can save you time if you need to revert to a previous setup.
By following these advanced tips, you can leverage the full power of Blender add-ons to create more sophisticated and high-quality 3D content. Experimenting with and learning from each add-on will enrich your Blender experience and expand your creative possibilities.
Recommended Blender Add-ons for Beginners
Starting your journey in Blender can be significantly enhanced by leveraging the right add-ons. Here are some highly recommended Blender add-ons for beginners, designed to simplify tasks, improve workflow, and introduce powerful functionalities:
- Node Wrangler: Essential for anyone working with material nodes, this add-on streamlines the process of creating and connecting nodes, making it easier to achieve complex materials and textures.
- Archipack: A great tool for architects and designers, Archipack provides a set of tools for creating architectural elements directly in Blender, such as walls, doors, and windows, with parametric controls.
- BlenderKit: Offers a vast library of materials, models, and brushes directly within Blender. It\"s a fantastic resource for quickly populating your scenes with content.
- BoolTool: Simplifies the process of boolean operations, making it more intuitive to cut and combine shapes, which is especially useful for modeling and creating complex geometries.
- Auto-Rig Pro: While more advanced, this add-on is invaluable for anyone looking to get into character animation. It provides a comprehensive set of tools for rigging characters easily.
- Fluent: Fluent is designed with beginners in mind, offering intuitive tools for creating complex hard surface models. Its user-friendly approach helps in learning modeling techniques while achieving professional results.
These add-ons are just the starting point for enhancing your Blender experience. Each add-on comes with its own set of instructions for installation and use, ensuring you can integrate them into your workflow with ease.
Keeping Your Blender Add-ons Updated
Regularly updating your Blender add-ons is crucial for maintaining compatibility with the latest Blender versions and accessing new features and improvements. Here’s how to keep your add-ons up-to-date:
- Check for Updates Regularly: Many add-ons feature an update check within their preferences. Access this through the Blender Preferences window, under the Add-ons tab, and look for an update button or notification.
- Visit the Add-on’s Website: For add-ons downloaded from external sources, visit the developer’s website or the platform where you obtained the add-on for information on updates.
- Use Blender Market or Similar Platforms: Platforms like Blender Market often have built-in systems for notifying users of available updates for purchased or downloaded add-ons.
- Subscribe to Developer Communications: Follow add-on developers on social media or subscribe to their newsletters to get notifications about updates.
- Manual Update Process: To update an add-on, download the latest version and install it as you would a new add-on. Blender will replace the older version with the new one, maintaining your settings where applicable.
- Backup Before Updating: Before updating an add-on, it\"s wise to back up your current Blender settings and projects. This ensures that you can revert to a previous state if an update causes issues.
By ensuring your Blender add-ons are up-to-date, you can enjoy a more stable and feature-rich 3D creation experience, leveraging the latest developments in Blender’s vibrant add-on ecosystem.
READ MORE:
Exploring Blender Add-on Communities and Resources
Engaging with Blender add-on communities and exploring various resources can greatly enhance your 3D modeling and animation skills. Here\"s how to connect with these communities and find valuable resources:
- Blender Artists Forum: An active online community where Blender users, from beginners to professionals, share their work, discuss topics, and help each other with advice and tips, including add-on recommendations.
- BlenderNation: Offers daily news about Blender and its community, including updates on new add-ons, tutorials, and artist showcases that can inspire and inform your own work.
- GitHub: Many add-on developers use GitHub to host their projects. It\"s a great place to find the latest versions of add-ons, report issues, or even contribute to the development.
- Blender Market: A marketplace for Blender add-ons where you can support developers by purchasing their creations. It hosts a wide range of tools that cater to all aspects of 3D production.
- Blender Add-ons Directory: The official Blender website maintains a directory of add-ons that come bundled with Blender, providing documentation and tutorials on how to use them effectively.
- Social Media Groups: Platforms like Facebook, Reddit, and Discord host Blender-related groups where users share their work, ask for feedback, and discuss add-ons and techniques.
By diving into these communities and resources, you can stay updated on the latest developments in Blender add-ons, learn new skills, and connect with like-minded individuals who share your passion for 3D creation.
Embrace the power of Blender add-ons to transform your 3D projects. With this guide, installing, updating, and utilizing add-ons becomes a breeze, unlocking endless possibilities for creativity and efficiency in your digital art journey.
_HOOK_