Topic blender aioli: Discover the art of making blender aioli, a simple yet sophisticated way to elevate your culinary creations with this creamy, garlicky sauce that promises to transform any dish.
Table of Content
- What is the best method for making blender aioli quickly and easily?
- Classic Blender Aioli
- Storing Your Aioli
- Enjoying Your Aioli
- Storing Your Aioli
- Enjoying Your Aioli
- Enjoying Your Aioli
- Introduction to Blender Aioli
- YOUTUBE: Aioli Recipe - One of the BEST Dips
- Essential Ingredients for Blender Aioli
- Step-by-Step Blender Aioli Making Process
- Variations of Blender Aioli Recipes
- Tips for Perfect Blender Aioli Every Time
- Common Mistakes to Avoid in Blender Aioli Preparation
- Storing and Shelf Life of Blender Aioli
- Health Benefits and Nutritional Information
- Pairing Ideas: What Goes Well with Blender Aioli
- User Questions and Concerns About Blender Aioli
What is the best method for making blender aioli quickly and easily?
To make blender aioli quickly and easily, follow these steps:
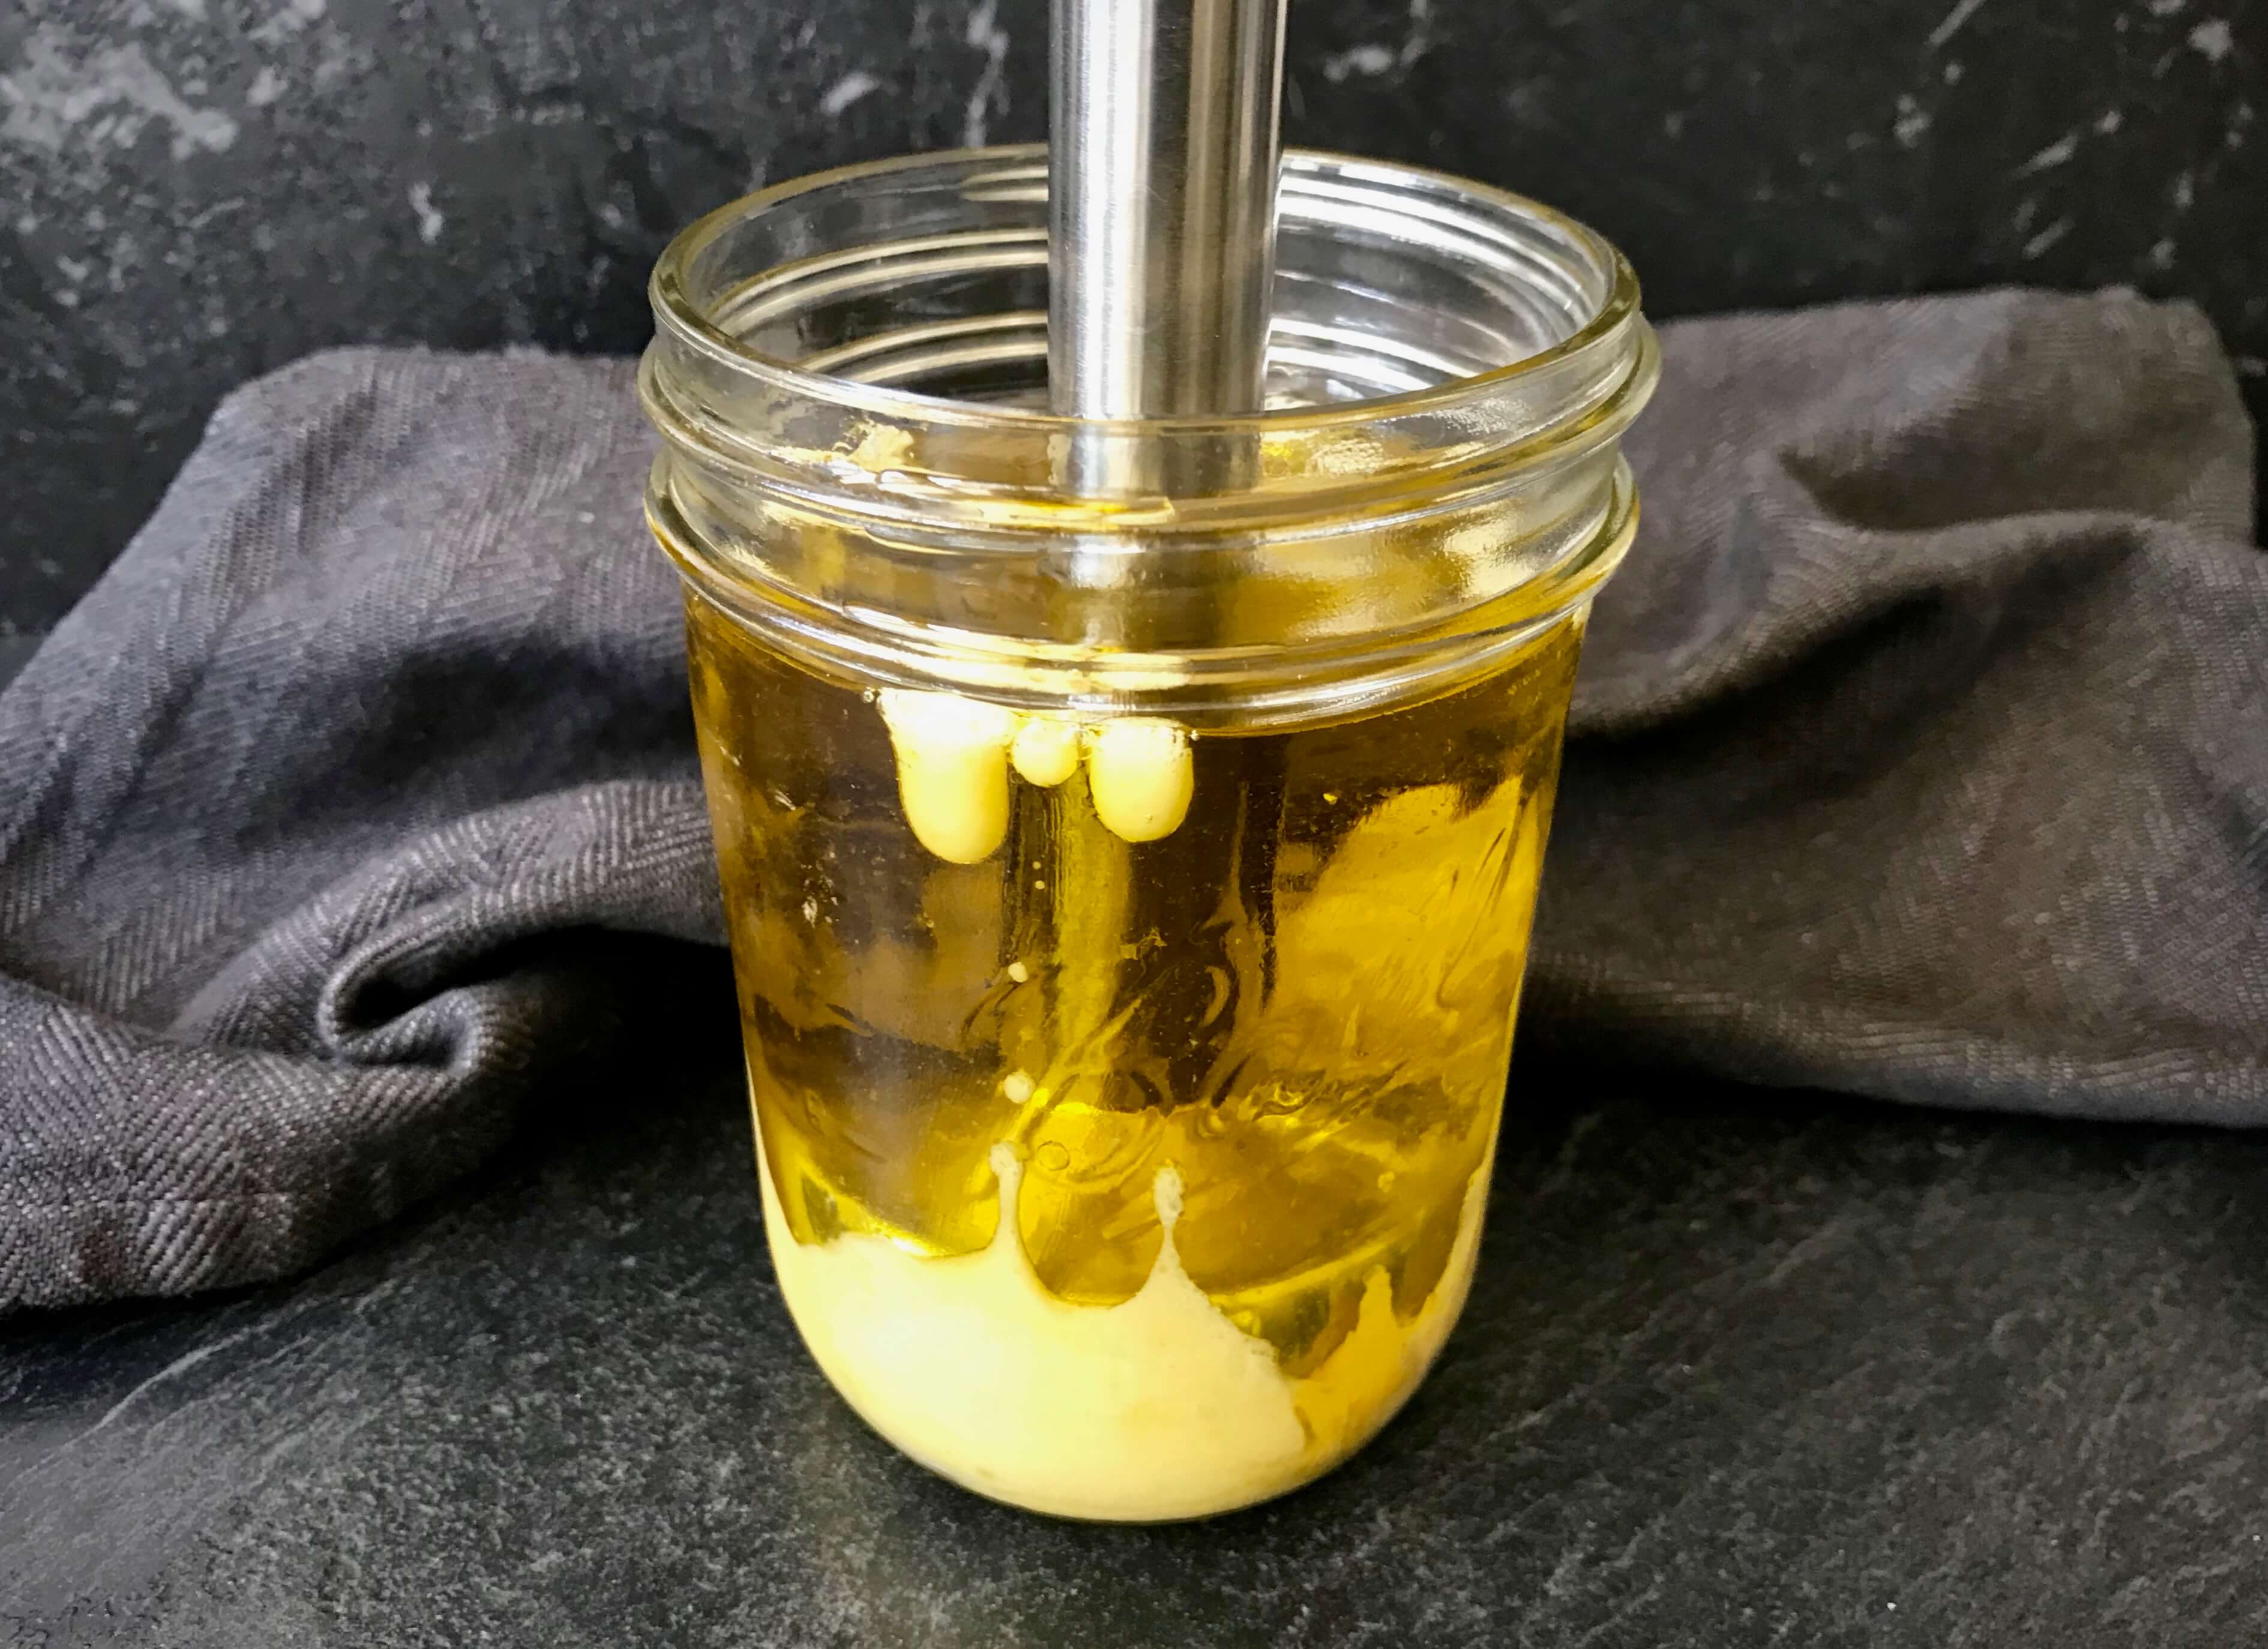
- Place an egg, garlic, and lemon juice in the bottom of an immersion blender cup.
- Pour canola oil (or vegetable or light olive oil) on top of the other ingredients.
- Place the immersion blender at the bottom of the cup, covering the egg and garlic.
- Start blending at the bottom until the mixture starts to emulsify and thicken.
- Slowly lift the blender while still blending to incorporate the rest of the oil until the aioli is well combined.
- Add salt and any additional seasoning to taste.
READ MORE:
Classic Blender Aioli
Start by blending an egg with garlic, salt, and a few tablespoons of oil. Gradually add more oil while blending until the mixture thickens. Finish with lemon juice for a tangy twist.
Variations to Try
- Light and Healthy Garlic Aioli: Blend ingredients and refrigerate for up to 4 days for a fresh condiment anytime.
- Foolproof Aioli: A combination of oils blended with egg, garlic, and lemon zest for a rich flavor.
- Roasted Garlic Aioli: Elevate your aioli with the deep, nutty flavor of roasted garlic.
- Quick 30-Second Aioli: A fast and efficient recipe for when you\"re short on time.
Preparation Tips
- Combine oils in a container for easy pouring.
- Use a blender to mix eggs, garlic, and lemon juice before slowly adding oil.
- For a thicker consistency, add oil gradually and blend until desired thickness is achieved.

Storing Your Aioli
Most blender aioli recipes can be stored in the refrigerator for up to 2 weeks. Ensure it\"s covered tightly to maintain freshness.
Enjoying Your Aioli
Use your homemade aioli as a dip, spread, or dressing to elevate any meal. Its garlicky, creamy flavor pairs wonderfully with sandwiches, salads, and grilled meats.

Storing Your Aioli
Most blender aioli recipes can be stored in the refrigerator for up to 2 weeks. Ensure it\"s covered tightly to maintain freshness.

_HOOK_
Enjoying Your Aioli
Use your homemade aioli as a dip, spread, or dressing to elevate any meal. Its garlicky, creamy flavor pairs wonderfully with sandwiches, salads, and grilled meats.

Enjoying Your Aioli
Use your homemade aioli as a dip, spread, or dressing to elevate any meal. Its garlicky, creamy flavor pairs wonderfully with sandwiches, salads, and grilled meats.

Introduction to Blender Aioli
Aioli, a rich and creamy condiment akin to garlic-flavored mayonnaise, has its roots in Mediterranean cuisine. Traditionally made by painstakingly emulsifying eggs, oil, and garlic using a mortar and pestle, the advent of modern kitchen appliances has simplified this process. Blender aioli, in particular, offers a quick and effortless way to achieve the same luscious, garlicky sauce with minimal effort and time.
The basic components of blender aioli include fresh eggs (or egg yolks), oil—typically olive or a combination of olive and neutral oils for a balanced flavor—garlic, lemon juice, and seasoning. The process involves blending these ingredients until they emulsify into a thick, smooth sauce. The beauty of using a blender lies in its ability to create a stable emulsion easily, transforming simple ingredients into a versatile and flavorful condiment that can elevate any dish.
- The egg acts as an emulsifier, with lecithin in the yolk stabilizing the mixture.
- Olive oil adds richness and a distinct flavor, though a blend with neutral oils can mellow the taste.
- Garlic, the star ingredient, infuses the aioli with its characteristic pungency and depth.
- Lemon juice provides acidity, balancing the flavors and adding a bright note.
Variations of blender aioli abound, from adding roasted garlic for sweetness to incorporating herbs, spices, or other flavorings for a personalized touch. The simplicity of the blender method not only makes homemade aioli accessible but also opens up a world of culinary possibilities, inviting cooks of all levels to experiment and enjoy the rich flavors of this beloved sauce.

Aioli Recipe - One of the BEST Dips
Discover a mouth-watering recipe that will tantalize your taste buds and impress your friends and family. Get ready to embark on a culinary adventure filled with delicious flavors and simple instructions to create a memorable meal.
Essential Ingredients for Blender Aioli
Creating the perfect blender aioli begins with assembling the right ingredients. This sauce, celebrated for its creamy texture and deep flavor, requires a few key components:
- Eggs: The foundation of aioli, providing the emulsifying agent needed to blend oil and water-based ingredients smoothly.
- Garlic: The star of aioli, its quantity and preparation method (raw or roasted) can be adjusted to taste.
- Olive Oil: Adds richness and a distinct, fruity flavor. A blend of olive and neutral oils like canola or vegetable can be used to achieve the desired taste and consistency.
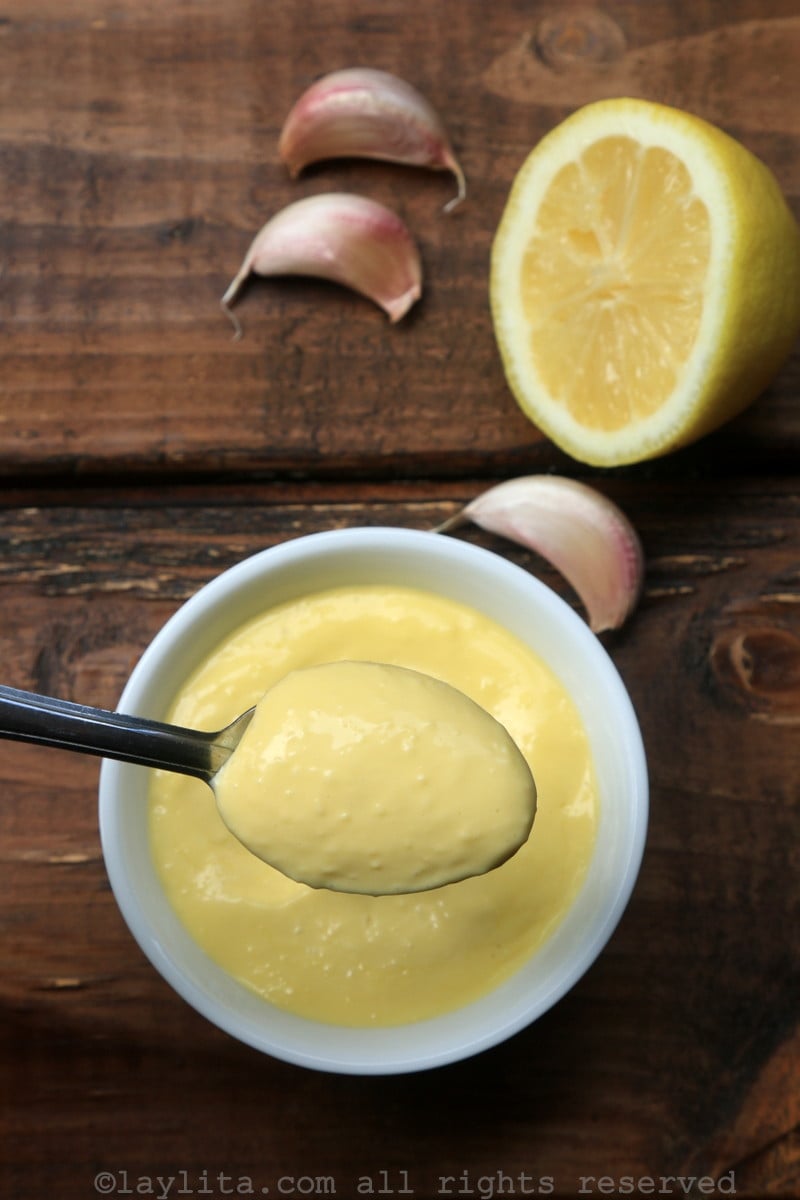
- Lemon Juice: Cuts through the richness of the oil and adds brightness. Vinegar can be used as an alternative for its acidic component.
- Salt: Essential for seasoning and bringing out the flavors of the aioli.
Optional ingredients include mustard for an extra layer of complexity, herbs like basil or tarragon for freshness, and spices such as cayenne pepper for a bit of heat. The versatility of blender aioli lies in its adaptability; you can customize the base recipe to suit your taste preferences and the requirements of the dish it will accompany.
The process involves blending the eggs and garlic first to create a smooth paste before slowly incorporating the oil to achieve an emulsion. Lemon juice and salt are added towards the end to taste. The result is a lusciously smooth aioli that can elevate any dish, from simple grilled vegetables to sophisticated seafood platters.
Talking Food - Immersion Blender Mayonnaise and Garlic Aioli
Join us for an engaging and enlightening session of talking where we discuss intriguing topics that will spark your curiosity and keep you hooked till the very end. Get ready to be inspired and entertained by our fascinating conversations.
Step-by-Step Blender Aioli Making Process
Making aioli in a blender simplifies the traditional process, delivering a creamy and flavorful sauce in minutes. Follow these detailed steps to create your own:
- Prepare Your Ingredients: Gather fresh eggs or egg yolks, garlic, lemon juice, salt, and your choice of oils. Combining olive oil with a neutral oil like canola can balance the flavor.
- Blending the Base: Add the egg and garlic (to taste) into the blender. For a smoother aioli, you can press or mince the garlic beforehand.
- Initial Blend: Pulse the blender to mix these ingredients until well combined. This initial blend helps to break down the garlic and integrate it with the egg.
- Emulsifying the Aioli: With the blender running on a medium to low speed, begin to slowly drizzle in your oil. Start with a few drops at a time, gradually increasing to a thin stream. This slow addition is crucial for creating a stable emulsion.
- Adding Flavor: Once the mixture begins to thicken, add lemon juice and salt to taste. You can also incorporate other seasonings or herbs at this stage.
- Adjusting Consistency: If the aioli is too thick, you can thin it with a little more lemon juice or water. If it\"s too thin, slowly add more oil until the desired consistency is reached.
- Taste and Season: Give your aioli a final taste and adjust the seasoning if necessary. Additional salt, lemon juice, or garlic can be added to suit your preference.
This process yields a rich and creamy aioli, perfect for spreading on sandwiches, dipping vegetables, or as a gourmet accompaniment to grilled meats and fish. With practice, you can easily adjust the ingredients and steps to create various aioli flavors tailored to your meals.
_HOOK_
Variations of Blender Aioli Recipes
Blender aioli is versatile, allowing for numerous variations to suit any taste or dish. Here are some popular twists on the classic recipe:
- Roasted Garlic Aioli: Substitute raw garlic with roasted garlic for a milder, sweeter flavor. Roast a head of garlic, squeeze out the cloves, and blend as usual.
- Lemon Herb Aioli: Add lemon zest and a blend of fresh herbs like dill, parsley, or chives for a fresh, zesty flavor.
- Spicy Aioli: Incorporate a teaspoon of sriracha or a pinch of cayenne pepper to give your aioli a spicy kick.
- Chipotle Aioli: Mix in some chipotle peppers in adobo sauce for a smoky, spicy version that pairs well with burgers and fries.
- Saffron Aioli: A pinch of saffron soaked in a tablespoon of warm water adds a luxurious, subtle flavor and a beautiful golden color.
- Truffle Aioli: Adding a small amount of truffle oil or finely grated truffle elevates the aioli for gourmet sandwiches and dishes.
Each variation can be created by adjusting the base recipe, adding or substituting ingredients to achieve the desired flavor profile. The key to successful aioli variations is to start with the basic method, then experiment with flavors and additions to complement your meals.
Tips for Perfect Blender Aioli Every Time
Achieving the perfect blender aioli is an art that requires attention to detail. Here are some expert tips to ensure success every time:
- Use Fresh Ingredients: Fresh eggs and garlic will significantly impact the flavor and quality of your aioli.
- Room Temperature Ingredients: Ensure your eggs are at room temperature to help the emulsion process.
- Oil Selection: A blend of oils can provide the perfect balance of flavor. Start with a neutral oil and slowly incorporate olive oil for depth.
- Slow Oil Addition: Add oil very slowly at the beginning of the emulsion process to prevent the aioli from separating.
- Garlic Preparation: For a smoother flavor, consider roasting the garlic beforehand or using less if you prefer a milder taste.
- Seasoning: Add salt and lemon juice to taste, but do so gradually. You can always add more, but you can\"t take it away.
- Consistency Adjustments: If your aioli is too thick, a few drops of water can help achieve the desired consistency. If it\"s too thin, continue to slowly add oil while blending.
- Storage: Store aioli in a sealed container in the refrigerator for up to one week. Note that the freshness of the eggs will affect the shelf life.
By following these tips, you\"ll be able to create a delicious and versatile blender aioli that can enhance any dish, from simple snacks to elaborate entrees.
Common Mistakes to Avoid in Blender Aioli Preparation
While making aioli in a blender might seem straightforward, certain pitfalls can hinder achieving the perfect emulsion. Here are some common mistakes to watch out for:
- Adding Oil Too Quickly: One of the most critical steps in making aioli is the slow addition of oil. Adding it too fast can prevent the mixture from emulsifying properly, resulting in a separated sauce.
- Not Using Room Temperature Ingredients: Cold ingredients can shock the emulsion, making it harder to blend smoothly. Always use room temperature eggs and lemon juice.
- Overloading the Blender: Adding too much of any ingredient before starting the emulsion can overwhelm the blender\"s ability to create a smooth texture. Start with small amounts and build gradually.
- Ignoring the Blender\"s Speed: The speed at which you blend plays a crucial role in the emulsification process. Start on a low setting and gradually increase to medium. Too high speed from the start can splatter ingredients and affect the emulsion.
- Using Poor Quality Oil: The flavor of the oil is paramount in aioli. Using a low-quality oil can result in a bitter or bland aioli. Opt for a good quality extra virgin olive oil for the best taste.
- Skipping the Taste Test: It\"s important to taste your aioli as you make it. Adjusting the garlic, lemon juice, and salt gradually ensures a balanced flavor that suits your preference.
- Forgetting to Check Consistency: The desired thickness of aioli can vary. If it\"s too thick, adding a little water can help. If too thin, a slow drizzle of oil might be needed to reach the right texture.
Avoiding these common mistakes will help ensure your blender aioli turns out creamy, flavorful, and perfectly emulsified every time.
Storing and Shelf Life of Blender Aioli
Proper storage of blender aioli is crucial to maintaining its freshness and preventing spoilage. To ensure your aioli stays fresh for as long as possible, follow these guidelines:
- Refrigeration: Always store aioli in the refrigerator immediately after preparation. Use an airtight container to prevent the aioli from absorbing odors from other foods.
- Shelf Life: Homemade aioli can last in the refrigerator for up to one week. The exact shelf life depends on the freshness of the ingredients used, so it\"s important to use fresh eggs and oil for the best results.
- Freezing: Although not recommended due to potential changes in texture and flavor, aioli can be frozen for longer storage. Store it in a tightly sealed container and freeze at 0°F (-18°C) for up to 3-4 months. Label the container with the date of preparation for best tracking.
- Thawing and Reusing: If frozen, thaw your aioli in the refrigerator before use. Whisk well after thawing to restore its consistency. If the aioli separates, a quick blend can help re-emulsify it.
Be aware that freezing may affect the texture and flavor of the aioli, so it\"s best used for cooking rather than as a fresh condiment after being frozen. Always check your aioli for signs of spoilage, such as an off smell or color change, before use.
Health Benefits and Nutritional Information
Aioli, known for its rich, creamy texture and flavor, can offer several health benefits when consumed in moderation as part of a balanced diet. Here are some key points to consider:
- Source of Healthy Fats: Aioli made with olive oil provides monounsaturated fats, which are known to support heart health.
- Nutrient Absorption: The fats in aioli can help improve the absorption of fat-soluble vitamins (A, D, E, and K) from meals.
- Gastrointestinal Health: Ingredients like garlic in aioli have been shown to support gastrointestinal health and may have prebiotic effects.
- Immune System Support: Garlic is also known for its immune-boosting properties.
- Skin Health: The vitamin E present in olive oil can be beneficial for skin health, providing antioxidant protection.
- Customizable for More Nutrients: Homemade aioli can be enriched with additional ingredients like herbs, lemon juice, and jalapeno to increase its nutritional value.
Nutritional information per 100g of aioli typically includes:
| Nutrient | Amount |
| Calories | 769 kcal |
| Fats | High in monounsaturated fats |
| Vitamin E | Varies with oil used |
| Garlic Components | Immune-boosting and gastrointestinal health supporting |
While aioli can be a flavorful addition to many dishes, it\"s important to consume it in moderation due to its high calorie and fat content. Incorporating aioli made with high-quality ingredients and less saturated fats can be a healthier choice for those looking to enjoy its unique flavor while maintaining a balanced diet.
_HOOK_
Pairing Ideas: What Goes Well with Blender Aioli
Blender aioli is a versatile condiment that can enhance a variety of dishes with its rich and creamy flavor. Here are some delicious pairing ideas to inspire your next meal:
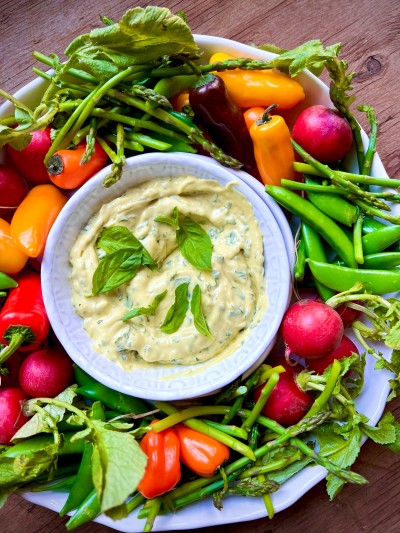
- Grilled Vegetables: Aioli is a perfect complement to the smoky flavors of grilled vegetables such as asparagus, zucchini, and bell peppers.
- Seafood: Whether it\"s shrimp, crab cakes, or grilled fish, a dollop of aioli can add a delightful richness to seafood dishes.
- Sandwiches and Wraps: Spread aioli on your favorite sandwiches or wraps to add moisture and depth of flavor. It works especially well with chicken, turkey, and vegetable fillings.
- Potato Dishes: Elevate your roasted, boiled, or mashed potatoes with a side of aioli for dipping or mixing.
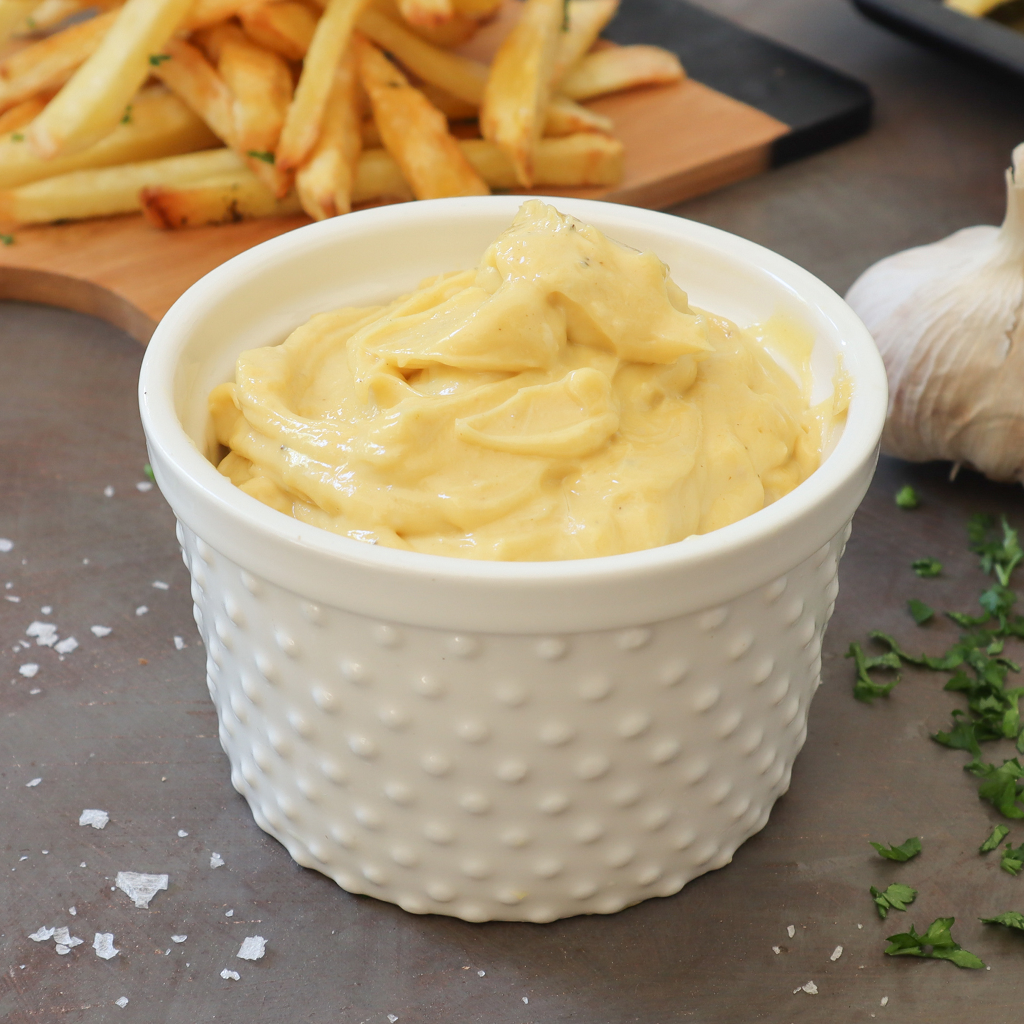
- Fried Foods: Aioli makes an excellent dipping sauce for fried foods such as French fries, onion rings, and calamari, adding a garlicky punch that cuts through the grease.
- Salads: Use aioli as a dressing base to create creamy salads, or drizzle over tomato and cucumber salads for added flavor.
- Meat Dishes: Pair aioli with grilled or roasted meats like steak, chicken, or lamb for a Mediterranean-inspired meal.
- Bread: Serve aioli as a dip for crusty bread, focaccia, or garlic bread for a simple yet satisfying appetizer.
These pairing ideas are just the beginning. Feel free to get creative and experiment with aioli in your cooking to discover new and exciting flavor combinations.
READ MORE:
User Questions and Concerns About Blender Aioli
Many users have questions and concerns about making and using blender aioli. Here, we address some of the most common inquiries to help you create perfect aioli every time:
- Can I make aioli without raw eggs? Yes, you can use pasteurized eggs or egg substitutes to minimize the risk of salmonella. Some recipes also use mayonnaise as a base to avoid raw eggs entirely.
- What if my aioli doesn\"t emulsify? The key to emulsification is adding the oil slowly while blending. If your aioli separates, try adding a tablespoon of cold water and blend again. For stubborn cases, starting over with a new egg yolk and slowly incorporating the broken aioli might work.
- Can I make aioli with a regular blender? Absolutely! While an immersion blender is handy for making aioli directly in a jar, a regular blender works just as well. Just be sure to add the oil slowly to achieve the right texture.
- How can I flavor my aioli? Garlic is just the starting point. Feel free to experiment with additional flavors like lemon zest, herbs (dill, basil, tarragon), spices (paprika, cayenne), or even anchovies for a deeper taste.
- Is aioli the same as mayonnaise? While both are emulsions, traditional aioli is made with garlic and olive oil, whereas mayonnaise is based on egg yolks and neutral oil. However, many modern aioli recipes incorporate egg yolk to help with emulsification.
- How long can I store homemade aioli? Homemade aioli should be stored in the refrigerator and used within a week. Always use fresh, quality ingredients and store in an airtight container to extend its shelf life.
By addressing these concerns, you can enjoy making and experimenting with blender aioli in your cooking, adding delicious flavors and textures to a variety of dishes.
Discover the joy of making blender aioli, a versatile condiment that can elevate any dish with its creamy, garlicky goodness. Embrace the simplicity and creativity of aioli to transform your meals into gourmet experiences.