Topic how to animate 3d models in blender: Unlock the secrets of animating 3D models in Blender with our comprehensive guide, designed to take you from novice to expert through easy-to-follow steps and essential tips for creating captivating animations.
Table of Content
- How can I animate 3D models in Blender?
- Understanding Blender\"s Interface and Basic Setup
- Creating Your First Animation with Keyframes
- Advanced Animation Techniques: Rigging and Bone Structures
- Using Constraints for Enhanced Control Over Animations
- Integrating Motion Capture for Realistic Animations
- Animating with Shape Keys for Detailed Expressions
- YOUTUBE: The Easiest Way to Animate 3D Characters Quickly
- Utilizing Drivers for Automated Movements
- Exploring Motion Paths for Smooth Trajectories
- Texturing and Material Application for Realism
- Lighting Techniques to Enhance Your Scene
- Rendering Your Animation for Final Output
How can I animate 3D models in Blender?
To animate 3D models in Blender, you can follow these steps:
- Create a new file in Blender.
- Import your 3D model into the scene.
- Add keyframes to define the starting and ending positions or poses of the model.
- Adjust the timeline to the desired duration of the animation.
- Use the animation tools in Blender to animate the model.
- Consider using references, such as videos or images, to help you achieve the desired movement and poses.
- Polish and fine-tune the animation by adjusting the timing, easing, and interpolation of keyframes.
By following these steps, you\'ll be able to create animations for your 3D models in Blender. There are plenty of tutorials and resources available online that can provide more in-depth guidance on specific animation techniques and tools within Blender. Good luck with your animations!
Understanding Blender\"s Interface and Basic Setup
Blender\"s comprehensive interface might seem daunting at first, but it\"s meticulously designed to enhance your 3D animation workflow. Familiarizing yourself with its layout and basic functionalities is the first step towards mastering 3D animation.
- Workspace Layout: Blender’s interface is divided into several areas such as the 3D Viewport, Timeline, Outliner, and Properties panel. The 3D Viewport is where you’ll spend most of your time, as it displays the 3D scene you are working on.
- Navigation: Learning to navigate the 3D Viewport is crucial. Use the middle mouse button to orbit, scroll to zoom, and shift+middle mouse button to pan your view. Mastering these will greatly enhance your efficiency.
- Object Mode and Edit Mode: Blender operates in different modes, with Object Mode for selecting, transforming, and positioning objects, and Edit Mode for modifying the geometry of your selected object.
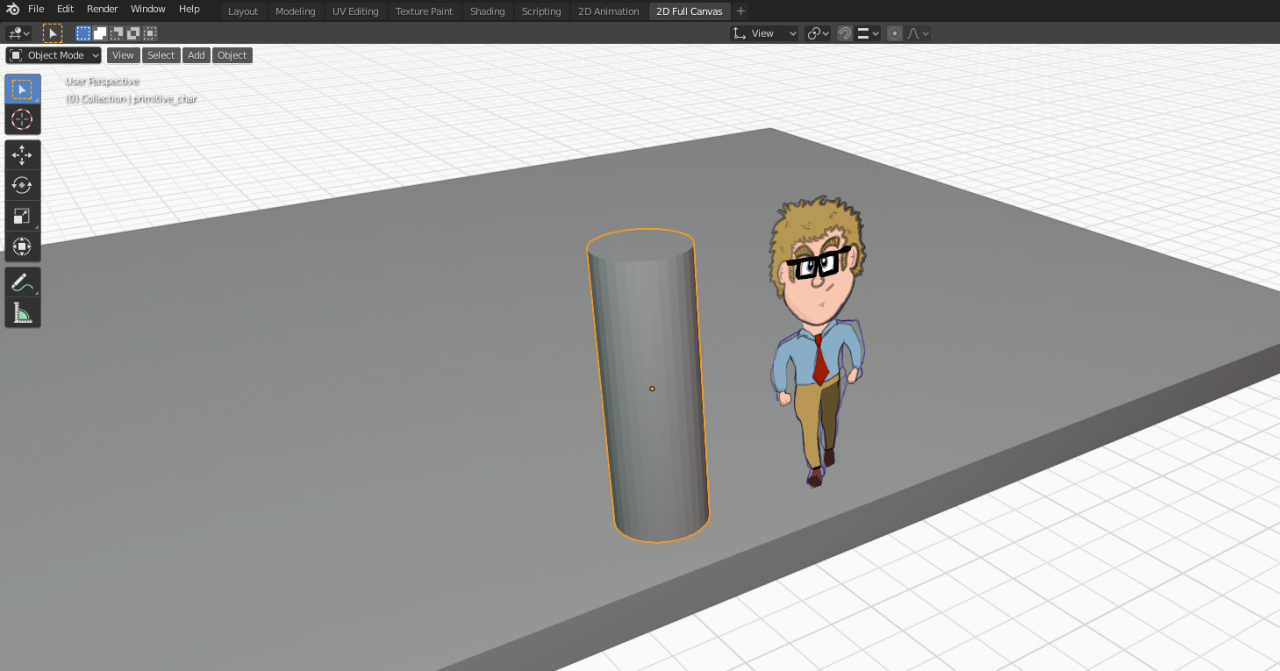
- Adding Objects: To start animating, you need objects in your scene. Press Shift+A to access the Add menu and select from mesh objects like cubes, spheres, or more complex shapes to serve as the basis of your animation.
- Keyframes: Animation in Blender is based on keyframes. Select your object, move to the desired frame in the Timeline, and insert a keyframe (I key) for location, rotation, or scale to begin creating motion.
- Properties Panel: The Properties panel houses settings for the active object or scene, including modifiers, material settings, and physics properties. It\"s essential for tweaking the appearance and behavior of your objects.
- Timeline and Dope Sheet: The Timeline at the bottom of the interface provides control over the animation playback, while the Dope Sheet offers a detailed view of all keyframes and their timing.
Getting comfortable with Blender’s interface and these basic concepts is foundational for any animation project. Practice navigating and manipulating objects, then experiment with keyframes to start bringing your models to life.
Creating Your First Animation with Keyframes
Animating in Blender uses keyframes to define the start and end points of any movement. A keyframe is essentially a marker that saves the position, rotation, and scale of an object at a specific point in time. By setting keyframes at different times, you can create smooth transitions between these states. Here\"s a step-by-step guide to creating your first animation.
- Choose Your Object: Start with a simple object, like a cube, to learn the basics of animation. Ensure your object is selected in the 3D Viewport.
- Inserting Keyframes: With your object selected, move to the frame where you want your animation to start. This can be done by clicking on the frame number in the Timeline. Change the position, rotation, or scale of your object. Press I to insert a keyframe. A menu will appear, allowing you to choose which properties to keyframe (e.g., Location, Rotation, Scale).
- Creating Movement: Move to another frame in the Timeline. Alter the position, rotation, or scale of your object to where you want it to be at this point in the animation. Press I again and insert the same type of keyframe. Blender will automatically create a smooth transition between these keyframes.
- Play Your Animation: Use the play button in the Timeline to watch your animation. Adjust the keyframe positions on the Timeline if the movement is too fast or too slow.
- Refine Your Animation: Open the Graph Editor from the editor type menu to fine-tune your animation curves for more control over acceleration and deceleration.
Keyframing is a fundamental skill in Blender that allows you to animate just about anything. Practice by animating simple objects and experimenting with different types of movements. As you become more comfortable, you can start to explore more complex animations and techniques.

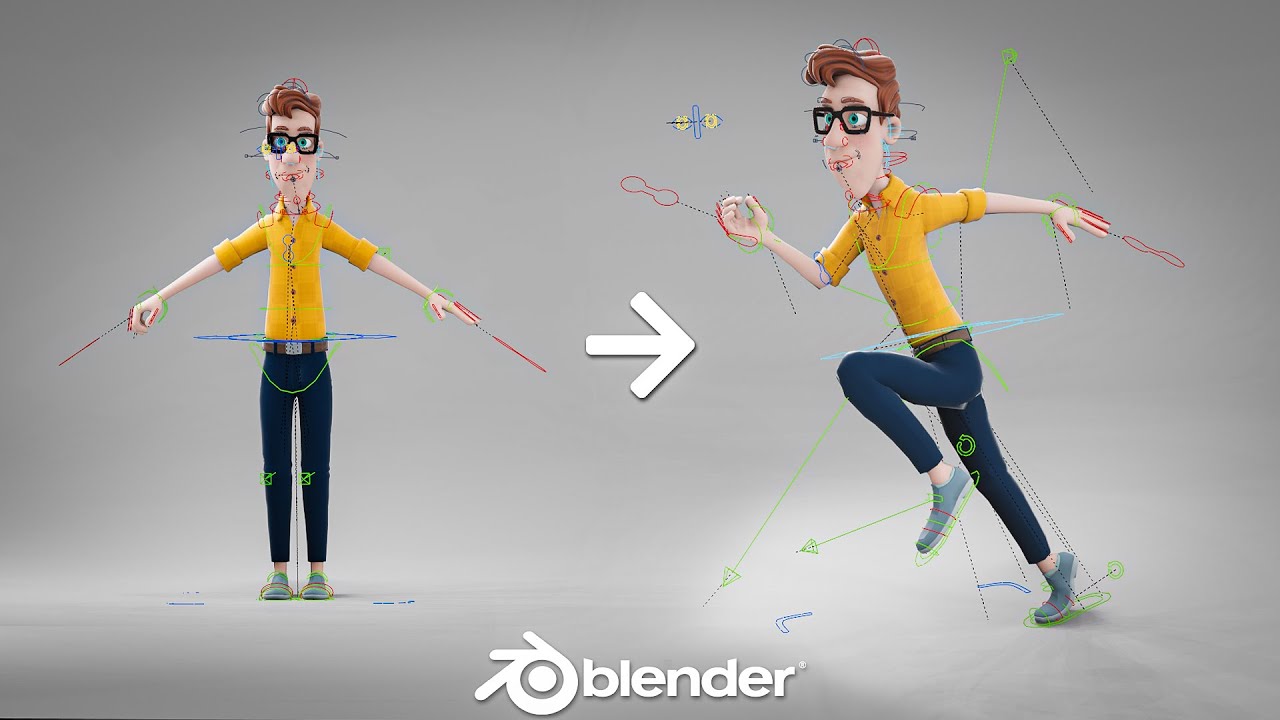
Advanced Animation Techniques: Rigging and Bone Structures
For more complex animations involving characters or objects that require intricate movements, understanding rigging and bone structures is crucial. Rigging is the process of creating a skeleton (armature) for a model, which bones can then control. Here\"s how to get started with rigging in Blender:
- Creating an Armature: Start by adding an armature to your model. Go to the 3D Viewport, press Shift+A, and select Armature. Position the armature at the base of your model and begin adding bones to match the model\"s structure.
- Editing Bones: Enter Edit Mode to adjust the bones\" length and orientation to align with your model\"s anatomy or structure. Use extrusion (E) to extend new bones from existing ones, creating a chain that matches your model’s limbs or parts.
- Parenting Model to Armature: Once your armature matches your model, you need to parent the model to the armature. Select the model first, then the armature, and press Ctrl+P. Choose \"With Automatic Weights\" for Blender to automatically create vertex groups and assign weights based on bone proximity.
- Weight Painting: To refine how the bones influence the model, use Weight Painting mode. This mode allows you to manually adjust the influence (weight) each bone has on different parts of the model, ensuring more realistic movements.
- Posing and Animating: With the rigging complete, switch to Pose Mode to manipulate the bones and pose your model. Insert keyframes for the bones to create animations, just as you would with simple objects.
Rigging and creating bone structures allow for dynamic and realistic animations of characters and objects. While the process can be intricate, mastering these techniques opens up a vast range of animation possibilities in Blender.
Using Constraints for Enhanced Control Over Animations
Constraints in Blender are powerful tools that offer advanced control over the behavior of objects in animation. They can automate movements, simulate physical properties, and create complex interactions between objects. Here’s how to effectively use constraints for animation:
- Understanding Constraints: Constraints restrict an object’s movement, rotation, or scale based on specific conditions. They can be applied to objects or bones within an armature for precise control over animated actions.
- Adding Constraints: With an object or bone selected, go to the Properties panel, find the Constraints tab, and click \"Add Constraint\". Choose from various types like \"Copy Location\", \"Inverse Kinematics\", \"Follow Path\", etc., depending on your animation needs.
- Configuring Constraints: Each constraint has its own set of parameters that can be adjusted to control how it affects the object. For example, the \"Influence\" slider determines the strength of the constraint\"s effect on the object.
- Using Target Objects: Many constraints require a target object to function. This could be another object or bone that the constrained object will follow, copy, or otherwise reference in its movement.
- Animating Constraints: You can animate the properties of constraints themselves, such as their influence, to create dynamic interactions between objects. Keyframing these changes can lead to sophisticated animation effects.
Constraints are invaluable for creating realistic and complex animations without manually keyframing every detail. By understanding and applying constraints effectively, you can elevate the quality of your animations in Blender.
_HOOK_
Integrating Motion Capture for Realistic Animations
Motion capture (mocap) technology is a game-changer for creating highly realistic animations, capturing the intricate movements of real-life actors and translating them into digital models. Blender supports motion capture data integration, allowing animators to bring their 3D characters to life with authentic movements. Here\"s how to start with motion capture in Blender:
- Acquiring Motion Capture Data: Motion capture data can be obtained from various sources, including mocap libraries, online marketplaces, or creating your own using mocap suits and software.
- Importing Mocap Data: Blender allows the import of mocap data through BVH (BioVision Hierarchy) files. Go to File > Import and select the BVH format to load your motion capture data into Blender.
- Applying Mocap Data to Your Character: Once imported, you need to retarget the mocap data to your character\"s rig. This involves matching the mocap\"s bone hierarchy to your character\"s armature, ensuring the movements translate correctly.
- Refining the Animation: Mocap data often requires adjustments to fit your character perfectly. Use Blender\"s NLA (Nonlinear Animation) editor and Graph editor to tweak and refine the animation, ensuring natural movements.
- Integrating with Keyframe Animation: For even greater control, combine mocap data with traditional keyframe animation techniques. This allows for customizing specific parts of the animation or adding unique movements that were not captured in the mocap session.
By integrating motion capture data into your Blender projects, you can achieve professional-level animations with lifelike precision and fluidity. Whether for film, game development, or virtual reality, mocap provides an invaluable tool for animators looking to elevate their work.

Animating with Shape Keys for Detailed Expressions
Shape keys in Blender offer a powerful method for creating detailed facial expressions and morphing objects without altering the base mesh. This technique is especially useful for animating characters, allowing for nuanced emotional expressions or transformations. Follow these steps to utilize shape keys effectively:
- Creating Shape Keys: With your object selected, go to the Object Data tab in the Properties panel and find the Shape Keys section. Press the \"+\" button to add a Basis shape key, which represents the original state of your mesh. Add another shape key to start shaping your desired expression or transformation.
- Editing Shape Keys: Select the shape key you wish to edit and enter Edit Mode. Modify the mesh to create your desired expression or form. Changes are saved automatically to the selected shape key.
- Animating Shape Keys: Switch back to Object Mode. You can animate the influence of each shape key by adjusting the value slider and inserting keyframes at different points on your timeline. This allows for smooth transitions between expressions or shapes.
- Combining Shape Keys: For complex expressions, you can combine multiple shape keys. Adjust the value sliders for each key to blend different expressions or transformations seamlessly.
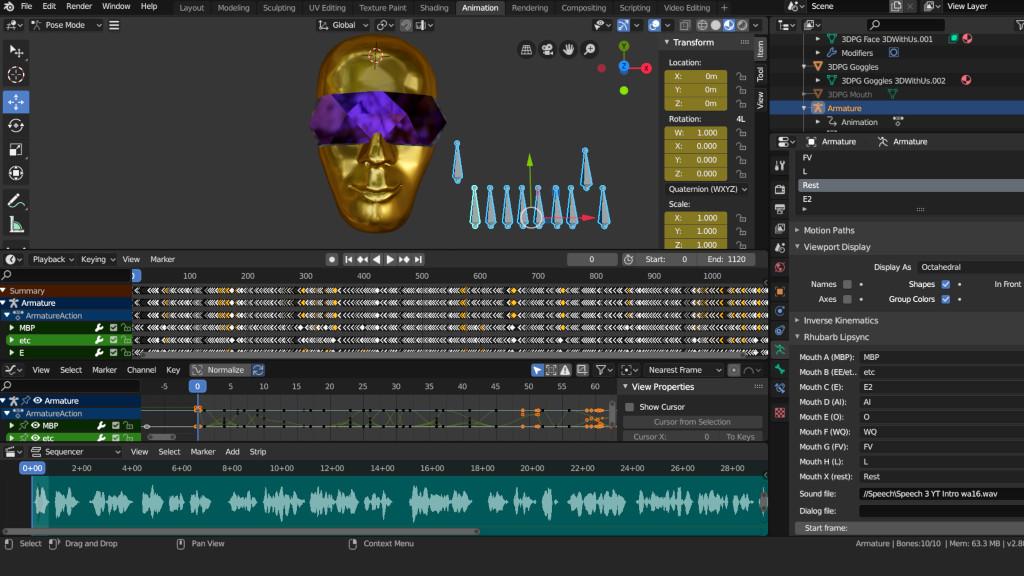
- Using Drivers for Automated Control: For advanced control, you can use drivers to link the influence of shape keys to the rotation or location of other objects or bones. This is particularly useful for automatic syncing of lip movement with dialogue or linking facial expressions to character rig controls.
Shape keys are an indispensable tool for animators looking to add depth and realism to their characters. By mastering shape keys, you can achieve subtle facial movements, complex transformations, and dynamic expressions that bring your Blender projects to life.
The Easiest Way to Animate 3D Characters Quickly
Animate: Dive into the captivating world of animation with this exciting video! Unleash your creativity and learn to bring your drawings to life through vibrant colors, smooth movements, and enchanting characters. Discover the magic of animation and be amazed by the endless possibilities it holds!
Beginner\'s Guide to 3D Animation in Blender by LeeDanielsART
Beginner\'s Guide: Embark on your creative journey with the ultimate beginner\'s guide video! Whether you\'ve always dreamt of drawing, painting, or sculpting, this video is the perfect starting point. Gain essential skills, explore basic techniques, and unleash your inner artist. Let this guide ignite your passion and unlock your artistic potential!
Utilizing Drivers for Automated Movements
Drivers in Blender are an advanced feature that allows you to create automated movements and changes in your animations based on the properties of other objects or bones. They enable complex animations that react dynamically to various parameters. Here’s how to set up and use drivers for your projects:
- Understanding Drivers: Drivers are essentially a way to automate the influence of one property over another. For example, you can use a driver to control the rotation of a wheel based on the movement of a car model.
- Adding a Driver: Right-click on the property you want to be driven (e.g., the rotation angle of an object) and choose ‘Add Drivers’ > ‘Manually Create Later (Single)’. This adds a driver to the property.
- Configuring Drivers: Open the Graph Editor and switch to the Drivers mode. Here you will see the list of drivers you have added. Select a driver to configure its settings, including the type of driver, the target object, and the property that influences it.
- Setting Up the Driver: In the driver configuration, you can specify the object or bone that will act as the driver (the \"Driver Object\") and the driven property (the \"Driven Property\"). You can also use expressions or variables to fine-tune how the driver influences the driven property.
- Testing and Adjusting: After setting up your driver, test the animation to see how the driven property reacts. You may need to adjust the driver\"s settings or the expression to achieve the desired effect.
Drivers can significantly enhance the dynamism and complexity of your animations by linking properties and automating movements. Whether it\"s making a character\"s eyes follow an object or synchronizing movements across multiple elements, drivers provide a powerful tool for creating sophisticated animations in Blender.
Exploring Motion Paths for Smooth Trajectories
Motion paths in Blender are a crucial tool for visualizing and editing the trajectory of an object or character\"s movement through space. They allow animators to fine-tune animations for smoother and more precise paths. Here\"s how to work with motion paths in Blender:
- Understanding Motion Paths: Motion paths show the route an object takes over time in the 3D Viewport. They are especially useful for complex animations where precise control over movement is required.
- Generating Motion Paths: Select your animated object and go to the Object menu. Under Animation, find and click on \"Calculate Motion Paths\". This will generate a visual representation of your object\"s trajectory throughout the animation.
- Editing Motion Paths: Once a motion path is generated, you can edit it to adjust the movement of your object. Use the handles and keyframes displayed on the path to tweak its curve and shape, ensuring a smooth transition between points.
- Keyframe Manipulation: Keyframes along the motion path can be moved, added, or removed, allowing for detailed adjustments to the timing and position of your object\"s movement.
- Using Handles for Curvature: Adjust the handles at each keyframe to modify the path\"s curvature, making movements more natural and fluid. This is particularly useful for simulating physical dynamics like bouncing or swinging.
Utilizing motion paths effectively can dramatically improve the realism and fluidity of your animations. They provide a powerful way to visualize and refine the movement of objects in your scenes, ensuring your animations are precisely controlled and visually appealing.
Texturing and Material Application for Realism
Creating realistic textures and applying materials in Blender is essential for adding depth and realism to your 3D models. This process involves several key steps, from selecting appropriate textures to fine-tuning material properties for lifelike results. Here’s how to enhance your models with texturing and materials:
- Understanding Materials: Materials define the color, texture, and reflective properties of your object. In Blender, you can create new materials in the Material Properties tab, customizing aspects like diffuse color, specularity, and roughness to mimic real-world surfaces.
- Applying Textures: Textures are images that are mapped onto the surface of your models. To add a texture, first, ensure you have a material applied to your object. Then, in the Shader Editor, add a Texture node and select the image you want to use. You can use UV mapping to accurately align the texture with your model’s geometry.
- UV Mapping: UV mapping is the process of projecting a 2D image onto a 3D model. It requires unwrapping the model to create a UV map, which serves as a guide for how textures align with the surface. Blender offers several unwrapping methods to simplify this process.
- Using PBR Materials: For realism, use Physically Based Rendering (PBR) materials, which simulate real-world light and shadow interactions. PBR materials typically include base color, normal, roughness, metallic, and ambient occlusion maps for comprehensive surface detail.
- Adjusting Lighting: Realistic texturing and material application also depend on effective lighting. Experiment with different lighting setups to highlight the texture details and material properties of your object, using Blender’s Light objects and the World settings for environmental lighting.
By carefully selecting and applying textures and materials, and adjusting lighting to complement these elements, you can significantly enhance the realism of your 3D models in Blender. Practice with different materials and textures to discover the vast potential for creating lifelike or stylized looks.

_HOOK_
Lighting Techniques to Enhance Your Scene
Effective lighting is crucial for bringing realism and depth to your 3D scenes in Blender. It highlights details, sets the mood, and guides the viewer\"s eye. Here are essential lighting techniques to elevate the quality of your animations:
- Three-Point Lighting: This classic technique uses three lights: the key light, fill light, and back light. The key light is the main source of light, usually positioned to one side of the object. The fill light, softer and less intense, reduces shadows caused by the key light. The back light separates the object from the background, adding depth to the scene.
- HDRI Lighting: High Dynamic Range Imaging (HDRI) uses an image to provide environmental lighting. This technique offers realistic lighting and reflections with minimal setup. In Blender, you can add an HDRI in the World settings by selecting an Environment Texture as the world’s color source.
- Area Lights for Soft Shadows: Area lights produce soft, diffuse shadows, ideal for simulating natural light from windows or large light sources. The larger the light source, the softer the shadows, which can add a more realistic or gentle feel to your scene.
- Color and Temperature: Adjusting the color and temperature of lights can dramatically affect the mood and feel of a scene. Warm colors suggest a cozy, intimate atmosphere, while cool colors imply a detached, eerie setting. Use the light properties in Blender to experiment with different hues and temperatures.
- Utilizing Spotlights: Spotlights can focus attention on specific areas or objects, creating dramatic effects or highlighting details. They can be used to mimic the effect of stage lights or to simulate sunlight coming through a window.
By mastering these lighting techniques, you can significantly enhance the visual appeal of your 3D scenes in Blender. Experiment with different setups and adjustments to discover the best lighting arrangement for your projects.
Rendering Your Animation for Final Output
Rendering is the final step in the animation process where your 3D models and animations are converted into a finalized video or image sequence. This process can be both exciting and daunting due to the numerous settings and options available in Blender. Here’s a step-by-step guide to help you navigate through rendering your animation in Blender for the best results.
- Choose Your Render Engine: Blender offers multiple rendering engines, such as Eevee and Cycles. Eevee is a real-time render engine offering faster results, while Cycles is a ray-traced engine that produces more realistic images but takes longer. Select the one that best suits your project\"s needs.
- Adjust Render Settings: In the Properties panel, navigate to the Render tab. Here, you can adjust settings such as the resolution, frame rate, and output format. For high-quality renders, increase the resolution and consider the frame rate of your animation. Common output formats include MPEG for videos and PNG for image sequences.
- Set Up Lighting: Proper lighting is crucial for the final look of your animation. Ensure your scene is well-lit by adjusting the lights or adding new ones. Pay attention to the shadows and highlights to enhance the realism or artistic effect you wish to achieve.
- Configure Output Properties: In the Output Properties tab, specify the file path where your rendered animation will be saved. Choose the file format carefully based on your project\"s requirements. For animations, a sequence of PNG images is recommended for preserving quality, which can later be compiled into a video file.
- Apply Post-Processing Effects: Blender’s Compositor offers a range of post-processing effects, such as color correction, glare, and blur effects. These can add a professional touch to your final render. Experiment with different nodes to enhance your animation.
- Start Rendering: Once you are satisfied with your settings, it’s time to render. You can render your animation by going to Render > Render Animation or pressing Ctrl+F12. Rendering can take a significant amount of time, especially for complex scenes or when using the Cycles engine.
- Review and Export: After rendering, review your animation for any necessary adjustments. If you’re satisfied with the result, you can compile your image sequence into a video using Blender\"s Video Sequencer or external video editing software.
Remember, rendering is a process that might require several attempts to perfect. Don’t hesitate to experiment with different settings to achieve the desired outcome. With patience and practice, you\"ll be able to render stunning animations using Blender.
Mastering 3D animation in Blender opens a world of creative possibilities. With dedication and practice, you can bring your visions to life, crafting breathtaking animations that captivate audiences and showcase your artistic prowess.